
Isee Systems LED taillight conversion

Thread Starter
JK Enthusiast
Joined: Jun 2009
Posts: 136
Likes: 1
From: Tulsa, Oklahoma
I purchased the Isee-Systems LED military tail lamp conversion kit earlier this month and they arrived today so I thought I'd do a write up on the installation. Here's how they arrived

They were well packaged

Here's what was in the box: 2 tail lights, two transformers, instructions, and a small bag with two zip ties and four washers

Here's the tail lights out of package

Ok, start by removing the two screws that hold the factory tail light onto the body. Save them, you will reuse.

They were well packaged
Here's what was in the box: 2 tail lights, two transformers, instructions, and a small bag with two zip ties and four washers
Here's the tail lights out of package
Ok, start by removing the two screws that hold the factory tail light onto the body. Save them, you will reuse.
Thread Starter
JK Enthusiast
Joined: Jun 2009
Posts: 136
Likes: 1
From: Tulsa, Oklahoma
Next, disconnect the factory wiring by pressing down on the tab and pulling apart

At this point you can set the factory tail light aside

Now remove the transistor and prepare to mount it to the square hole in the body

Transistor is mounted
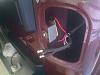
Next, attach the bullet connectors from the new tail light to the transistor (there is no proper way, just connect them)

At this point you can set the factory tail light aside
Now remove the transistor and prepare to mount it to the square hole in the body
Transistor is mounted
Next, attach the bullet connectors from the new tail light to the transistor (there is no proper way, just connect them)
Thread Starter
JK Enthusiast
Joined: Jun 2009
Posts: 136
Likes: 1
From: Tulsa, Oklahoma
Here is a photo of the connectors properly seated

Now connect the main plug to the factory harness (there is an X on the side that matches the tab on the factory harness so you don't try to insert it upside down and damage the pins inside the harness)

The plug does not snap together but it is snug

In order to secure the plug together, use one of the supplied zip ties and place it between the wires then fasten

Next, place one of the provided washers on the screw that holds the tail light on the body

Now connect the main plug to the factory harness (there is an X on the side that matches the tab on the factory harness so you don't try to insert it upside down and damage the pins inside the harness)
The plug does not snap together but it is snug
In order to secure the plug together, use one of the supplied zip ties and place it between the wires then fasten
Next, place one of the provided washers on the screw that holds the tail light on the body
Thread Starter
JK Enthusiast
Joined: Jun 2009
Posts: 136
Likes: 1
From: Tulsa, Oklahoma
Now place the tail light assembly in position and replace the screws

Your new light is now installed

Here are a couple action shots


These lights are very bright and look to be well made. The only complaint I found was the housing is a little larger than stock and it does not sit perfectly flush with the side of the body (as in where the body curves from the side to the rear). There is a tiny gap between the light and body. Also, I was hoping the housing would be aluminum or steel.
Anyway, they look great and I'm happy.
Your new light is now installed
Here are a couple action shots
These lights are very bright and look to be well made. The only complaint I found was the housing is a little larger than stock and it does not sit perfectly flush with the side of the body (as in where the body curves from the side to the rear). There is a tiny gap between the light and body. Also, I was hoping the housing would be aluminum or steel.
Anyway, they look great and I'm happy.
JK Enthusiast
Joined: May 2009
Posts: 202
Likes: 0
From: Wylie, TX
Anyway we could see a picture of the "gap?"

Trending Topics
JK Freak

Joined: Apr 2011
Posts: 537
Likes: 0
From: Somewhere Out There
Now place the tail light assembly in position and replace the screws
Attachment 474056
Your new light is now installed
Attachment 474057
Here are a couple action shots
Attachment 474058
Attachment 474059
These lights are very bright and look to be well made. The only complaint I found was the housing is a little larger than stock and it does not sit perfectly flush with the side of the body (as in where the body curves from the side to the rear). There is a tiny gap between the light and body. Also, I was hoping the housing would be aluminum or steel.
Anyway, they look great and I'm happy.
They really do look great, thanks for the write up. The $490 price tag is very steep but I have found nothing better. Cheaper, yes but not better. Those will be the last pair of tail lights you will need even if you keep the Jeep for another 20 years. These look great on my 2011 Call of Duty.
Last edited by Macman1138; May 14, 2014 at 03:49 PM.