JCR Bumper / Tire Carrier Upgrade Thread


Thread Starter
JK Newbie
Joined: Sep 2013
Posts: 38
Likes: 0
From: Winston Salem, NC
I'm stubbing this out for my full experience in purchasing/coating/installing a JCR Offroad bumper and tire carrier.
I ordered it yesterday with a few week lead time. Until it arrives, I'll be getting a few quotes for powdercoating, ordering a daystar switch panel (which I'll document the installation of in this thread).
Currently: Researching switch panels and figuring out how to wire the reverse LEDs.
On Order:
Full-width Vanguard Bumper
Adventure Carrier
Hi-Lift Mount
RotoPax Carrier Mount
x2 RotoPax (Gas/H2o)
3x3 LED Reverse Lights x2
48" Hi-Lift Jack
Tailgate Cover Plate
ToDo:
I'll naturally do a full overview of my experience with JCR and their ordering process/customer service when everything is said and done. Initially, I'm very optimistic. They've been great to deal with and have made themselves very available to my numerous questions.
I ordered it yesterday with a few week lead time. Until it arrives, I'll be getting a few quotes for powdercoating, ordering a daystar switch panel (which I'll document the installation of in this thread).
Currently: Researching switch panels and figuring out how to wire the reverse LEDs.
On Order:
Full-width Vanguard Bumper
Adventure Carrier
Hi-Lift Mount
RotoPax Carrier Mount
x2 RotoPax (Gas/H2o)
3x3 LED Reverse Lights x2
48" Hi-Lift Jack
Tailgate Cover Plate
ToDo:
- Identify best wiring plan for LED lights. DONE
- Figure out how to remove existing bumper. DONE
- Source local powdercoating DONE. Changed to JCR Coat for color match purposes.
- Order Switch Panel DONE. Ordered Daystar lower panel
- Order Neoprene lift cover
- Buy wife flowers to be delivered the day the credit card bill arrives.
I'll naturally do a full overview of my experience with JCR and their ordering process/customer service when everything is said and done. Initially, I'm very optimistic. They've been great to deal with and have made themselves very available to my numerous questions.
Last edited by AU_Guy; Nov 18, 2014 at 03:11 PM.
JK Super Freak

Joined: Sep 2013
Posts: 1,636
Likes: 7
From: Mentor, OH
Curious why you didn't just have JCR powder coat everything for you. That's how I had mine done. For the extra cost, it was worth it not to have to track down a powder coat shop and take it in.
I have the Crusader mid width rear. I am looking to add the Adventure carrier with the same options you have picked. I will be interested in hearing your opinions and seeing some pics when you have it installed.
I have the Crusader mid width rear. I am looking to add the Adventure carrier with the same options you have picked. I will be interested in hearing your opinions and seeing some pics when you have it installed.
Thread Starter
JK Newbie
Joined: Sep 2013
Posts: 38
Likes: 0
From: Winston Salem, NC
Curious why you didn't just have JCR powder coat everything for you. That's how I had mine done. For the extra cost, it was worth it not to have to track down a powder coat shop and take it in.
I have the Crusader mid width rear. I am looking to add the Adventure carrier with the same options you have picked. I will be interested in hearing your opinions and seeing some pics when you have it installed.
I have the Crusader mid width rear. I am looking to add the Adventure carrier with the same options you have picked. I will be interested in hearing your opinions and seeing some pics when you have it installed.
I'll be sure to post plenty of pics of the process and the poser shots afterwards.
JK Super Freak
Joined: Sep 2013
Posts: 1,636
Likes: 7
From: Mentor, OH
Yeah, my Classic Sliders could have been packed a little better. There was some powder coat that was a little scratched in a couple locations. But considering what they are for, I am likely to scratch the heck out of them at some point anyway, so I just touched it up with some rustoleum.
Thread Starter
JK Newbie
Joined: Sep 2013
Posts: 38
Likes: 0
From: Winston Salem, NC
I've been going stir crazy waiting for my bumper. I've already figured out my wiring and routing, so I needed something to do until it arrives. I ordered a new set of Retro decals from The Pixel Hut | Specialty Car Truck BMW Motorcycle Boat and Plane Graphics.
I think they look pretty slick. I've already got a few compliments on them. I screwed up the driver's side so I had to order a replacement (shout out to Richard @ pixelhut for being such a stand-up guy).
So mark that one off the list.
I think they look pretty slick. I've already got a few compliments on them. I screwed up the driver's side so I had to order a replacement (shout out to Richard @ pixelhut for being such a stand-up guy).
So mark that one off the list.
Thread Starter
JK Newbie
Joined: Sep 2013
Posts: 38
Likes: 0
From: Winston Salem, NC
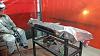
I asked for it, and JCR graciously provided me with a shot of the bumper being put together. This is just the bumper portion, upside down (for anyone curious). I'm starting my pre-wiring tonight which I'll document through the process. I'm using an On/Off/On SPDT from OTRATTW along with the Daystar lower switch panel for mounting.