
My turn at using Raptor liner...


JK Enthusiast
Joined: Jul 2007
Posts: 336
Likes: 0
From: Scottsdale, AZ
Note: When WRM and I did my Jeep I was just getting off work, so we had to prep and paint by the light of my dome lights, a small flash light and the PIAA flood light on my AEV rear mast. Got the job done, but more difficult to see what you're doing. If I had a darker colored Jeep we'd-a-been screwed.
This afternoon:
I ran my backup camera inside with the passenger side harness up behind the dash to my LockPick.
Finally finished up my Microphone Setup (link - w/ pics in it - to come)
AND SECURED MY FLOOR MATS!! They aren't going anywhere now.

I also took a pic of the rear carpet deck on since folks were asking. The pic was taken at night with the flash, so it really doesn't show up as much as it shows. Eventually I'll get the tuffy cover (and raptor line it), but thats down the road.
I used my trusty AEV touch-up paint to coat the metal and painted the screws and washers so they aren't as noticeable.


Front:


Rear: (same location on both sides)

I put Blue Locktite (all I had) on the screws so they stay put.
I got the Nutserts from Copper State Bolt and Nut in Phoenix. It was a kit of 10 with a temporary tool that works really well ($25 with 10 screws & 10 washers) I only used 4, but you have to buy the kit to get the tool included.
Install was very easy and straight forward. Find where you want to put it. Lay some tape down, drill pilot hole first, then drill the larger hole. Spray some paint down to cover up the exposed metal. Install the nutsert.
The carpeted rear deck:

JK Super Freak
Joined: Oct 2009
Posts: 1,091
Likes: 2
From: Scottsdale, AZ
Looks good Tony. But by bolting in the floor mats and using blue locktite it does not sound like you are planning to get too much dirt or leaves in the jeep.
Btw I missed you at Audi today. Had to get my rear brakes done (that was not cheap).
Btw I missed you at Audi today. Had to get my rear brakes done (that was not cheap).
JK Enthusiast
Joined: Jul 2007
Posts: 336
Likes: 0
From: Scottsdale, AZ
Sorry I missed ya. The Jeep took priority today, so I didn't go in on my off day.
Oh and - German cars and cheap, do not go together.

Thread Starter
JK Newbie
Joined: Sep 2010
Posts: 70
Likes: 0
From: Mesa, AZ
Nice work Tony! I need to get around and put the nutserts in too. I've got a few extras from the kit; just need to find the time to do it. Whenever I get ready to order the kit (if you haven't already ordered one in the meantime), I'll get in touch with you and we can split it.
-WRM
-WRM

JK Enthusiast
Joined: Oct 2007
Posts: 392
Likes: 2
From: Jacksonville, North Carolina, United States
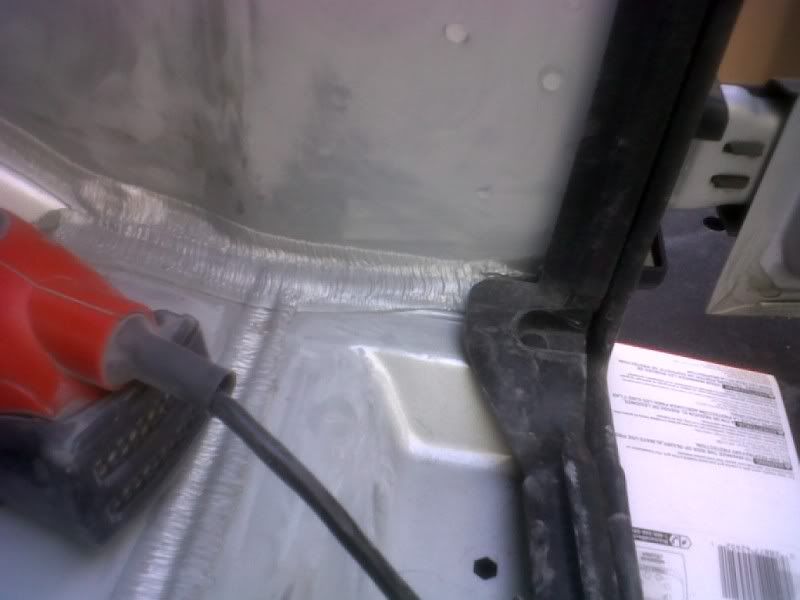
hey im still prepping mine right now and was wondering if you guys removed the rubber cement looking stuff that lines the edges of the tub?

Last edited by jonnyringo893; Oct 23, 2010 at 03:11 PM.
Thread Starter
JK Newbie
Joined: Sep 2010
Posts: 70
Likes: 0
From: Mesa, AZ
I removed all of that stuff completely, but plan to re-seal it all with black silicone.
-WRM

JK Enthusiast
Joined: Jul 2007
Posts: 336
Likes: 0
From: Scottsdale, AZ
The plan is to do it Wed/Thursday this week. If the weather and my work schedule cooperates.
Thread Starter
JK Newbie
Joined: Sep 2010
Posts: 70
Likes: 0
From: Mesa, AZ
Yup, you can use conduit to protect them. I am going to go a step further and solder enough extensions on them to run the wires up along the roll cage. They will still go under the front door jam where I'll protect them with conduit, but then I'll route up through the B pillar and along the cage on the way to the back.
The plan is to do it Wed/Thursday this week. If the weather and my work schedule cooperates.
The plan is to do it Wed/Thursday this week. If the weather and my work schedule cooperates.
-WRM
JK Enthusiast
Joined: Aug 2010
Posts: 366
Likes: 0
From: Kalamazoo, MI
If you have a hardtop you will also have to extend the washer fluid line on the driver side, I got some of that line at a local parts store. It took we a while to complete all of this but very glad I did so the harness is not exposed any more now that its not hidden behind the carpet