
Olympic Smuggler Rear Bumper Installation

Thread Starter
JK Newbie
Joined: Oct 2010
Posts: 90
Likes: 1
From: Bartlett, TN
Ok, so this is my 2nd attempt at writing this. The first time I got an error when I hit submit and lost the whole thing!
The directions from Olympic are decent. There are a few changes that should be made, but for the most part, they'll lead you in the right direction. The step numbers that you see in this write-up correspond with the steps on the instructions.
I was able to install this bumper alone. I had a little help that I'll talk about when I get to that point. I'm not mechanically inclined by any means, but I was able to install this bumper with few problems.
Make sure you inventory all the parts prior to installing the bumper! I was missing a piece, but I didn't realize it until it was too late. I had to drive around for 3 days with only half of the bumper on before I received the missing part!
I ordered the bumper in gloss black knowing that it would not match my AEV Premium front bumper. Thankfully, AEV sells their textured paint in spray cans so I painted the smuggler bumper to match.
Factory Rear Bumper Removal
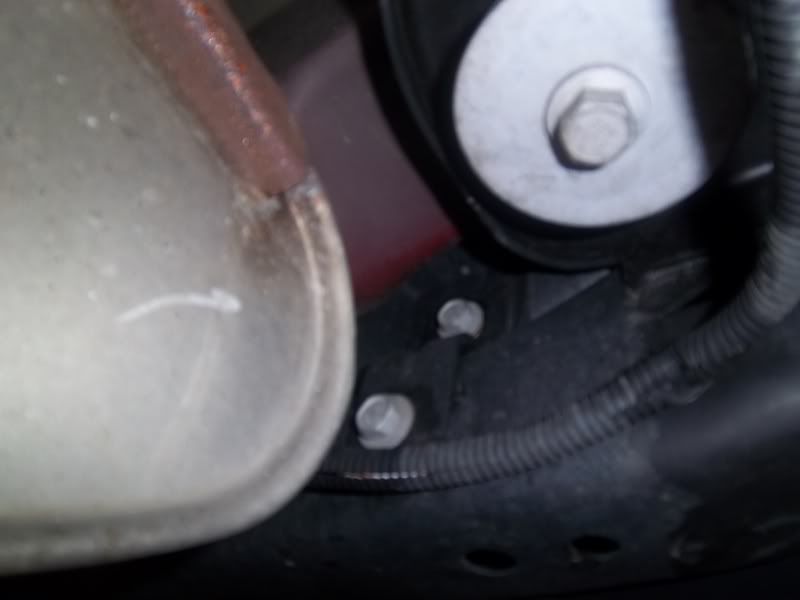
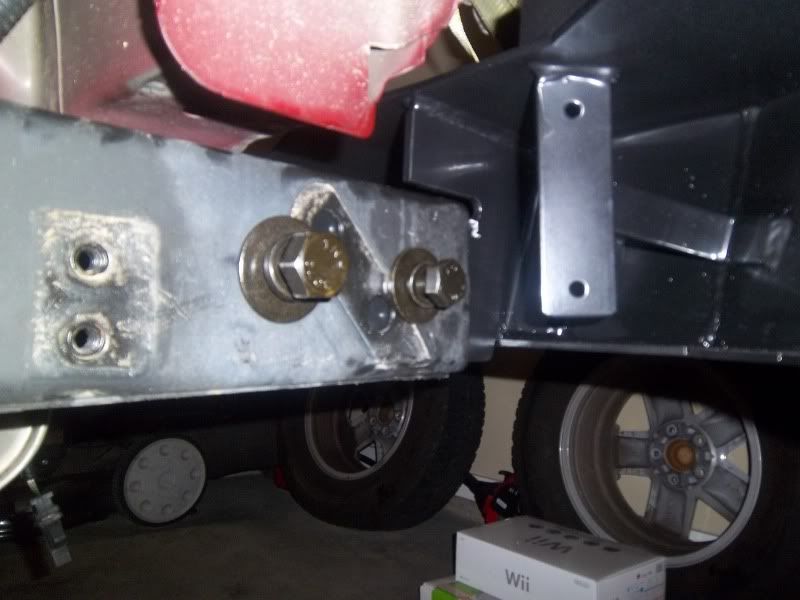
Remove the 4 outer bracket bolts from the frame just behind the rear wheels.
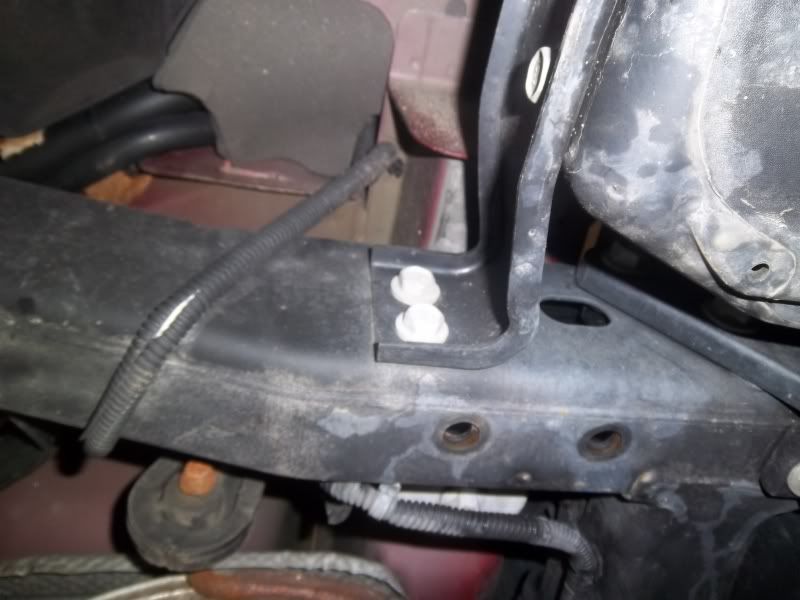
Remove the 4 inner bracket bolts as well as the brackets from the rear cross member. They are located behind the muffler. Be careful not to let the bumper fall on your legs when doing this!
Factory Tire Mount and Third Brake Light Removal
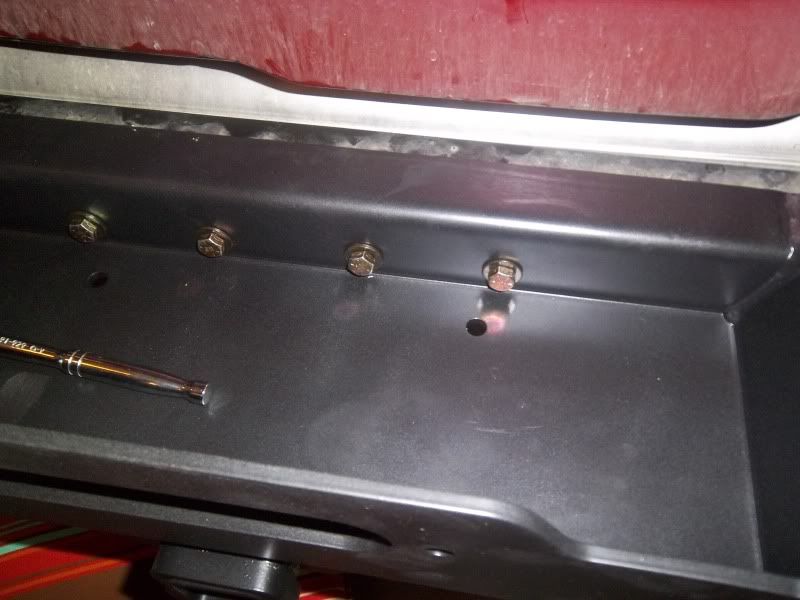
Remove the 2 screws on the back of the third brake light bracket. Disconnect the clip connector from the rear of the light housing. Remove the 8 bolts holding the tire mount to the tailgate. Dispose of the tire mount, but put the bolts back into their holes!
Step 1
This is where I had a little help. I used my ceiling mounted top hoist and a rachet strap to lift and hold the bumper in place. It worked great!
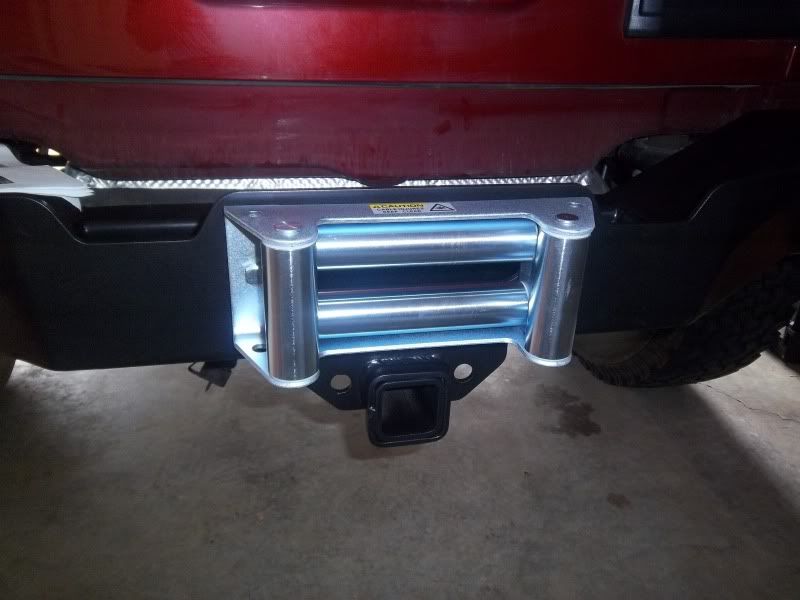
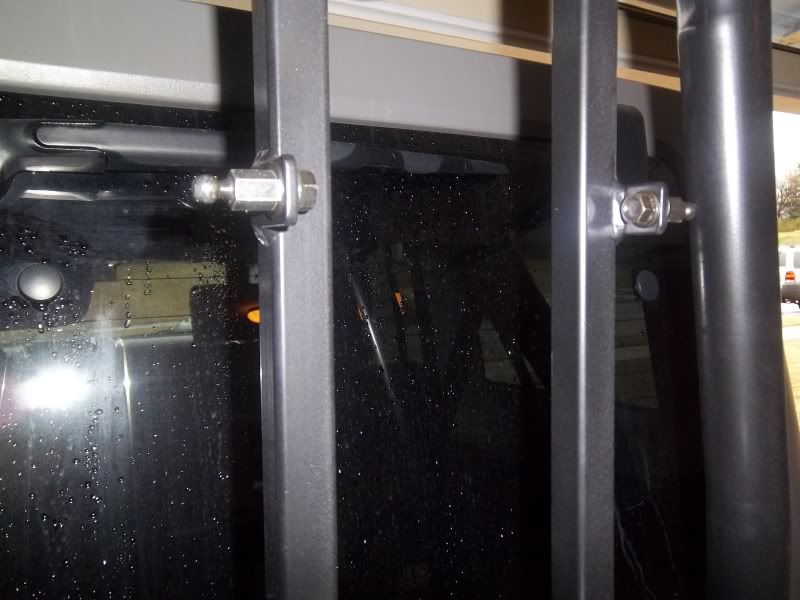
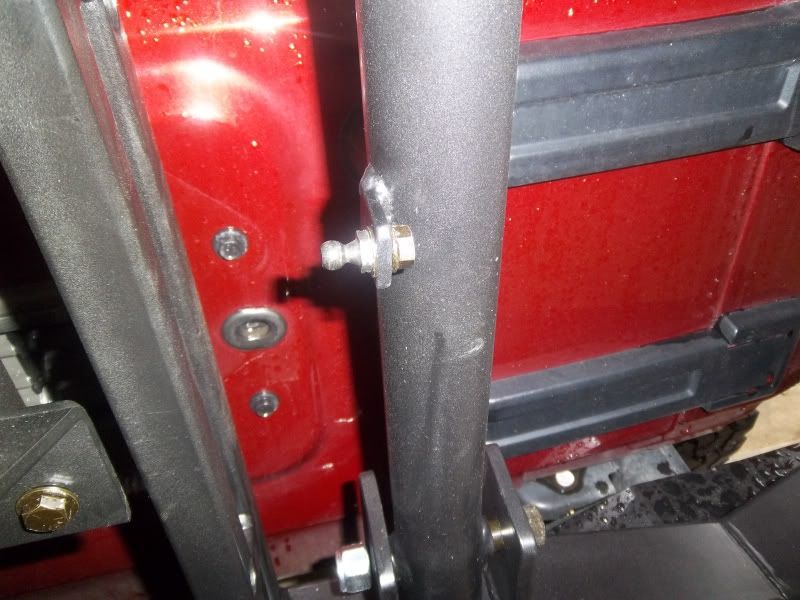
Slide the mounting brackets on the smuggler bumper into the frame rails on the Jeep. Secure in place with a 3/4" and a 5/8" bolt on each side. DO NOT TIGHTEN THE BOLTS!! (not in the instructions)
Step 2
Secure the bumper to the rear cross member using four 4" bolts inserted from the winch area. You may have to do a little wiggling to get them through. Once they're in and tightened down, you can go back and tighten down the bolts from Step 1.
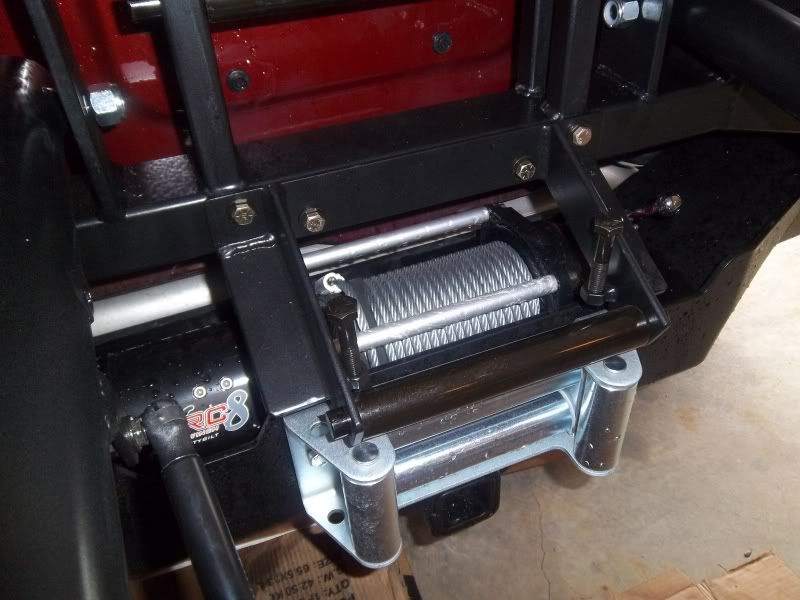
Now you'll need to install your roller fairing or your Hawse using the hardware that came with your winch.
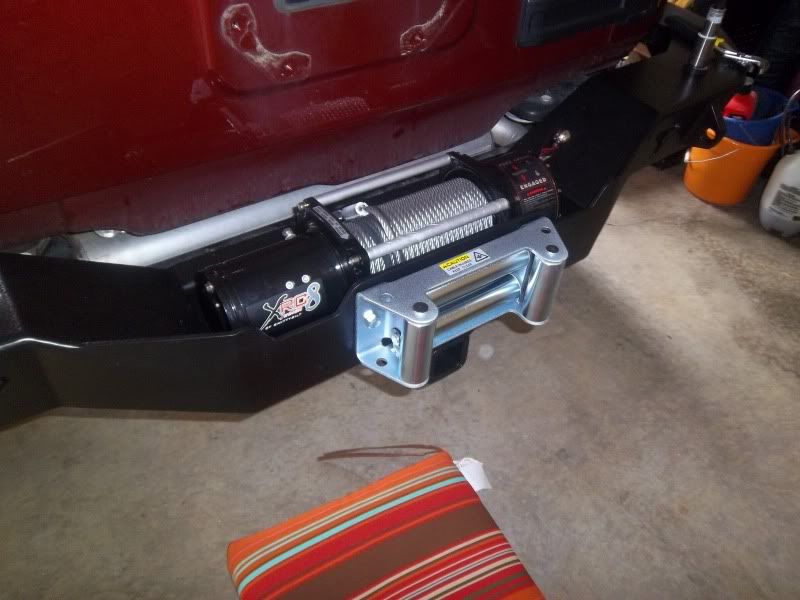
After you have that on, you can drop in your winch and bolt it down. You may have to wiggle everything around a few times to get the holes to line up, but once you can get the bolts in there just tighten it all down.
Step 3
My bumper was shipped with bearing assembly kit B which is what I'll talk about below.
Even though the instructions tell you to place the machined bushing over the spindle, you'll need to do something different. You'll have to pound the bushing into the bottom of the tire swing hub using the side of a hammer.
Once you get the machined bushing in there, slide the hub over the spindle. Now place the bearing over the spindle, skinny side down.

Slide the washer over the spindle on top of the bearing. Screw on the castle nut as tight as you can get it. Then back it off slightly so that you can fit the cotter pin through the hole in the spindle. Bend back the ends of the cotter pin tight to the castle nut.
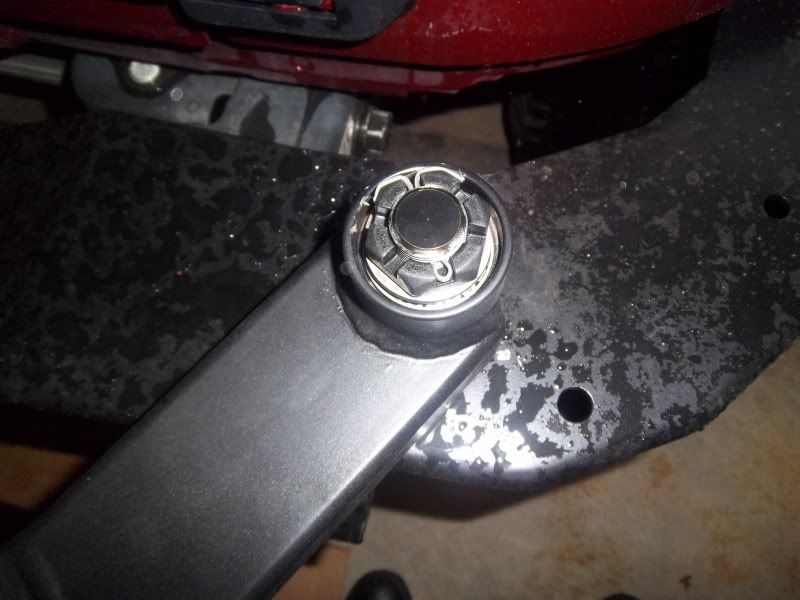
Next, place the dust cap on top of the spindle. Place the special dust cap insertion tool on top of it and bash it with a hammer until it is seated. Insert a grease zerk on the side of the hub and fill with grease.
Close the tire swing and secure in place by inserting the handle into the hole on the driver's side and screwing it in.
Step 4
I recommend doing part B first. It'll save you a headache...and maybe some bleeding.
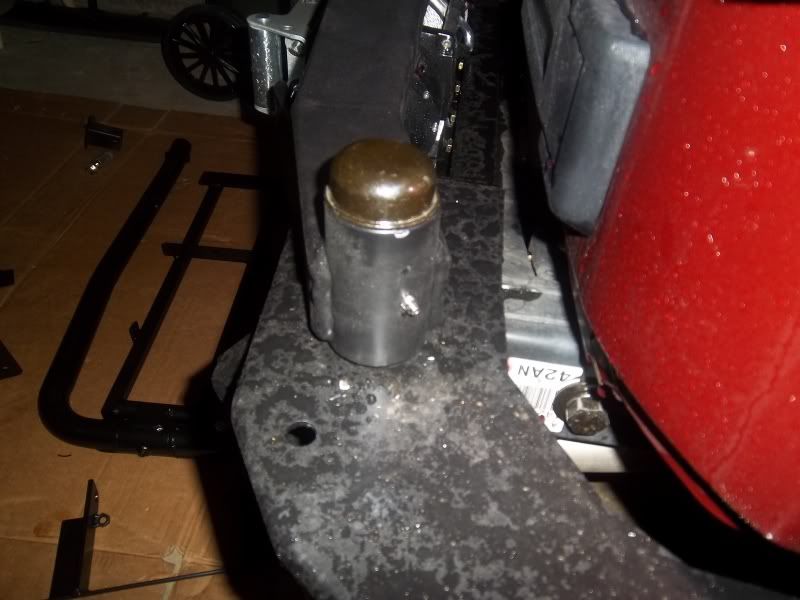
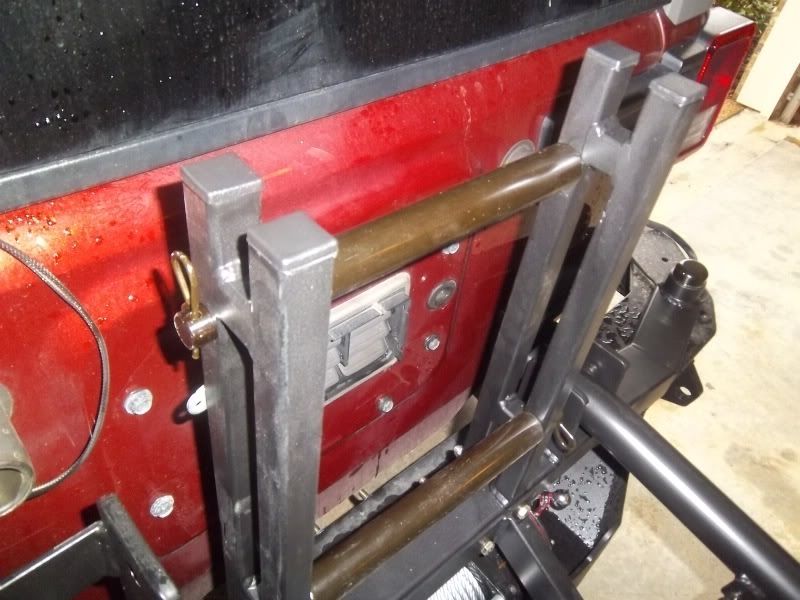
Secure the locking mechanism to the bracket on the vertical support with the 1/4" bolts and nuts.

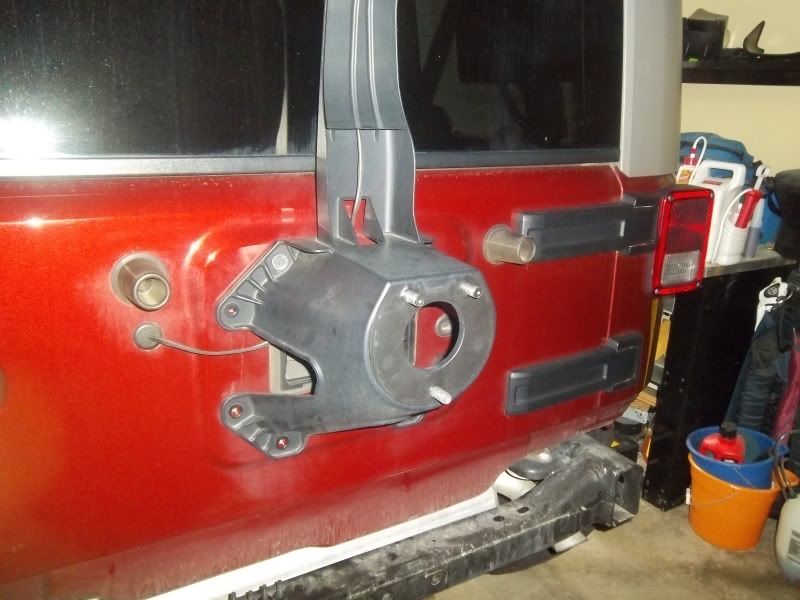
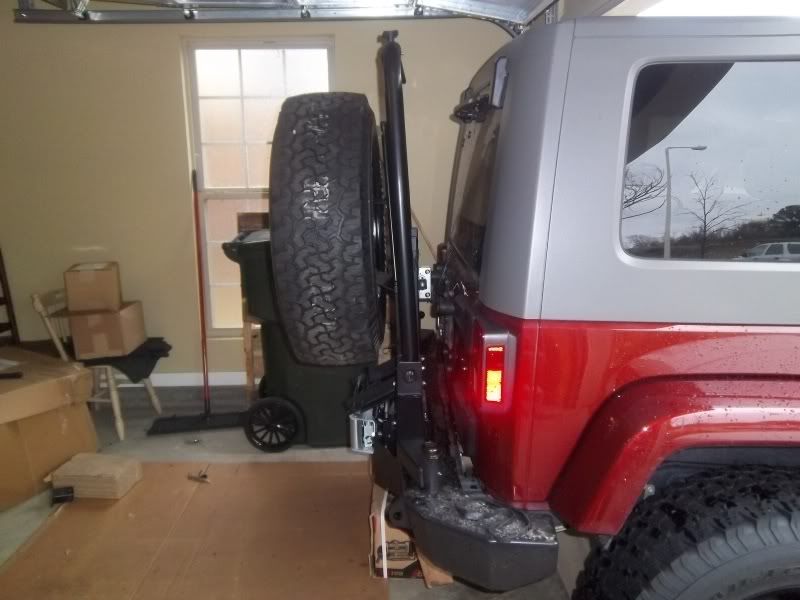
Now for part A. Install the vertical tire carrier using two 4" shoulder bolts. Place the security pin into the vertical tire carrier!!!
For some reason, this part was left out of the instructions.
Install the nader pin onto the lower swing out section of the vertical tire carrier. This pin will lock into the locking mechanism you just installed.
Step 5
This is the part of the install where you get to let your frustrations out. The instructions call for an arbor press. Not only do I not have one in my garage, I also don't even know what it is, SO find a sturdy object and place a few layers of cardboard on top of it. Slide the lug bolts through the holes in the tire mount so that they face rearward. Tighten down the lug nuts to keep the bolts from bouncing out. Place the tire mount on top of the card board so that the bolts are hanging freely. Now bash the bolts with a hammer to seat them into the holes. You'll need to retighten the lug nuts every few hits.
Next, mount the tire mount to the vertical tire carrier using the 5/16" nuts and bolts.
Step 6
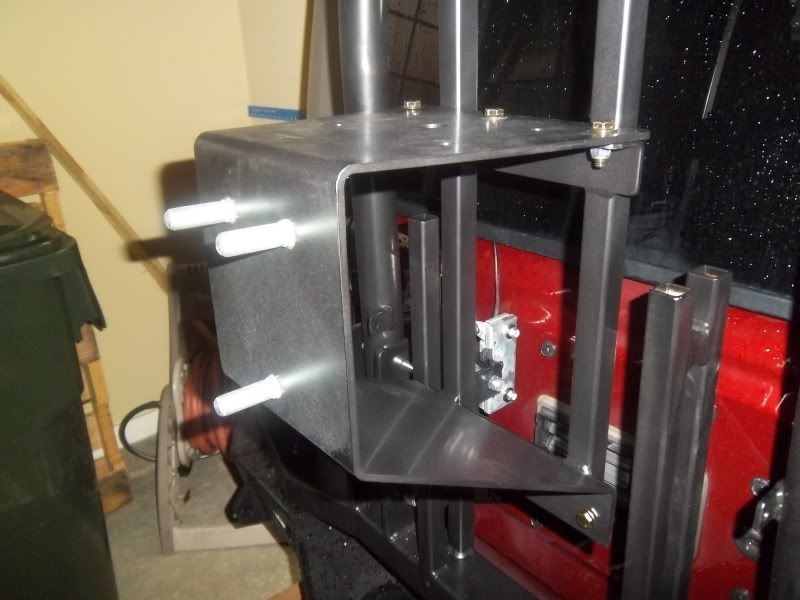
Install the two large ball studs on the upper brackets and the two smaller ball studs on the lower brackets. The two sets of studs should face each other.
Now, lower the vertical tire swing and snap on the gas struts.
Step 8
Yes, I'm aware that I skipped 7. Gimme a break, I'm not from Arkansas, I can count...
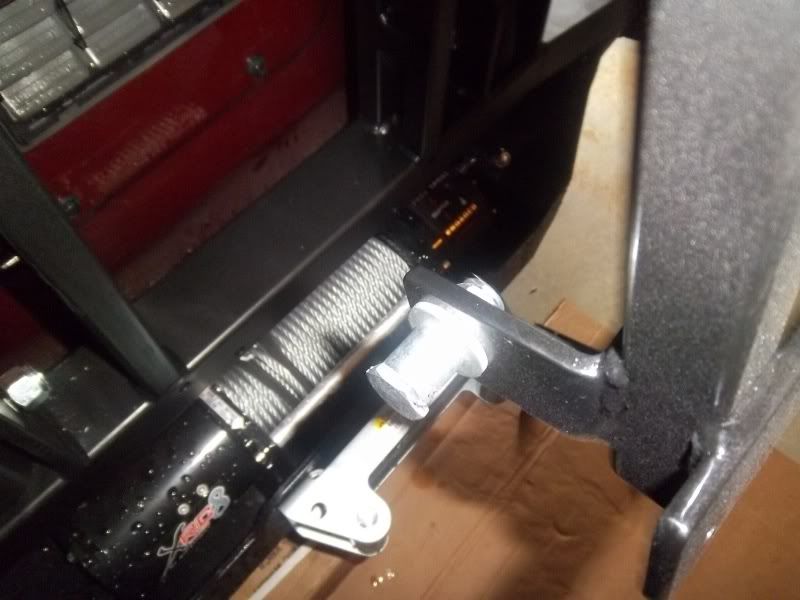
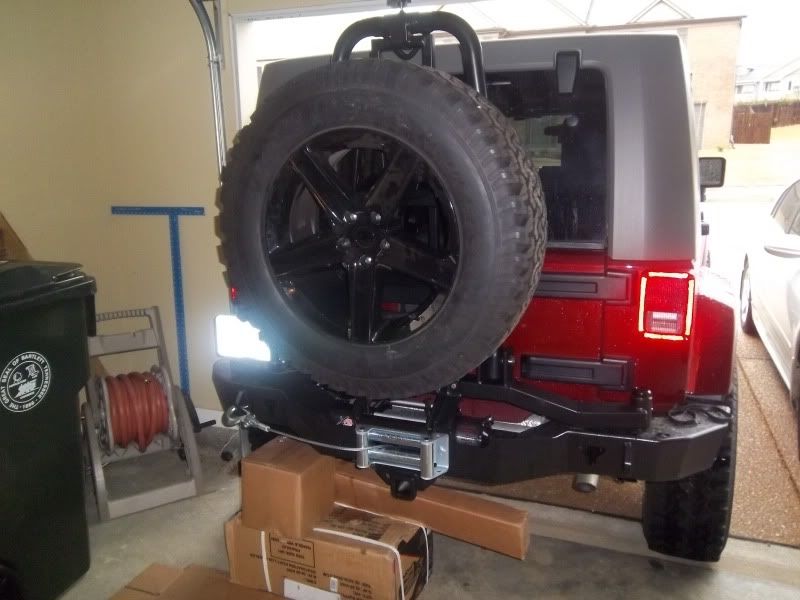
Slide the two longer pulley shafts through the holes in the vertical support and through the roller pulleys. Secure with a pin on each end. (not in the instructions)
Bolt on the lower roller bracket to the tire swing using four 4" bolts. Insert the short pulley shaft through the holes in the lower roller bracket and through the short roller pulley. Secure with a pin on each end.
I'm not sure I understand how screwing two bolts into the welded on nuts is going to allow for pulley tensioning and a reduction in vibration. Maybe someone from olympic can clarify this?
Step 7
Happy now?
Lower the vertical tire carrier and mount your spare. You may have to use the lug nuts that came with the bumper. I wasn't able to get my matching black lug nuts to thread.
DO NOT thread your winch cable through the pulleys unless your winch is wired in and working! FYI - It takes about 30 minutes to re-spool 3 feet of winch cable by hand.
Step 9
Screw the knob into the top of the vertical tire swing. Insert the grease zerk into the hole on the pivot joint of the vertical tire carrier and fill with grease.
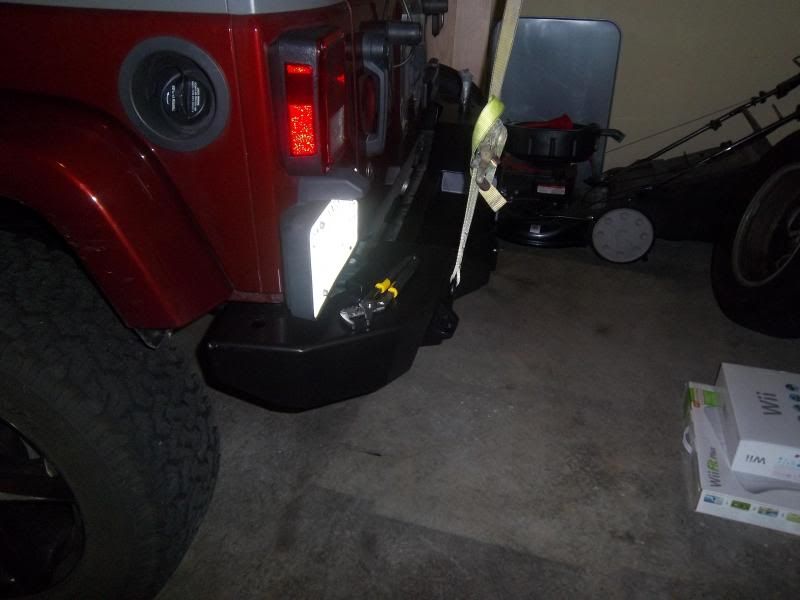
All Done!
I'll follow up with some PRO's and CON's after having this mounted for a few days.
The directions from Olympic are decent. There are a few changes that should be made, but for the most part, they'll lead you in the right direction. The step numbers that you see in this write-up correspond with the steps on the instructions.
I was able to install this bumper alone. I had a little help that I'll talk about when I get to that point. I'm not mechanically inclined by any means, but I was able to install this bumper with few problems.
Make sure you inventory all the parts prior to installing the bumper! I was missing a piece, but I didn't realize it until it was too late. I had to drive around for 3 days with only half of the bumper on before I received the missing part!
I ordered the bumper in gloss black knowing that it would not match my AEV Premium front bumper. Thankfully, AEV sells their textured paint in spray cans so I painted the smuggler bumper to match.
Factory Rear Bumper Removal
Remove the 4 outer bracket bolts from the frame just behind the rear wheels.
Remove the 4 inner bracket bolts as well as the brackets from the rear cross member. They are located behind the muffler. Be careful not to let the bumper fall on your legs when doing this!
Factory Tire Mount and Third Brake Light Removal
Remove the 2 screws on the back of the third brake light bracket. Disconnect the clip connector from the rear of the light housing. Remove the 8 bolts holding the tire mount to the tailgate. Dispose of the tire mount, but put the bolts back into their holes!
Step 1
This is where I had a little help. I used my ceiling mounted top hoist and a rachet strap to lift and hold the bumper in place. It worked great!
Slide the mounting brackets on the smuggler bumper into the frame rails on the Jeep. Secure in place with a 3/4" and a 5/8" bolt on each side. DO NOT TIGHTEN THE BOLTS!! (not in the instructions)
Step 2
Secure the bumper to the rear cross member using four 4" bolts inserted from the winch area. You may have to do a little wiggling to get them through. Once they're in and tightened down, you can go back and tighten down the bolts from Step 1.
Now you'll need to install your roller fairing or your Hawse using the hardware that came with your winch.
After you have that on, you can drop in your winch and bolt it down. You may have to wiggle everything around a few times to get the holes to line up, but once you can get the bolts in there just tighten it all down.
Step 3
My bumper was shipped with bearing assembly kit B which is what I'll talk about below.
Even though the instructions tell you to place the machined bushing over the spindle, you'll need to do something different. You'll have to pound the bushing into the bottom of the tire swing hub using the side of a hammer.
Once you get the machined bushing in there, slide the hub over the spindle. Now place the bearing over the spindle, skinny side down.
Slide the washer over the spindle on top of the bearing. Screw on the castle nut as tight as you can get it. Then back it off slightly so that you can fit the cotter pin through the hole in the spindle. Bend back the ends of the cotter pin tight to the castle nut.
Next, place the dust cap on top of the spindle. Place the special dust cap insertion tool on top of it and bash it with a hammer until it is seated. Insert a grease zerk on the side of the hub and fill with grease.
Close the tire swing and secure in place by inserting the handle into the hole on the driver's side and screwing it in.
Step 4
I recommend doing part B first. It'll save you a headache...and maybe some bleeding.
Secure the locking mechanism to the bracket on the vertical support with the 1/4" bolts and nuts.
Now for part A. Install the vertical tire carrier using two 4" shoulder bolts. Place the security pin into the vertical tire carrier!!!
For some reason, this part was left out of the instructions.
Install the nader pin onto the lower swing out section of the vertical tire carrier. This pin will lock into the locking mechanism you just installed.
Step 5
This is the part of the install where you get to let your frustrations out. The instructions call for an arbor press. Not only do I not have one in my garage, I also don't even know what it is, SO find a sturdy object and place a few layers of cardboard on top of it. Slide the lug bolts through the holes in the tire mount so that they face rearward. Tighten down the lug nuts to keep the bolts from bouncing out. Place the tire mount on top of the card board so that the bolts are hanging freely. Now bash the bolts with a hammer to seat them into the holes. You'll need to retighten the lug nuts every few hits.
Next, mount the tire mount to the vertical tire carrier using the 5/16" nuts and bolts.
Step 6
Install the two large ball studs on the upper brackets and the two smaller ball studs on the lower brackets. The two sets of studs should face each other.
Now, lower the vertical tire swing and snap on the gas struts.
Step 8
Yes, I'm aware that I skipped 7. Gimme a break, I'm not from Arkansas, I can count...
Slide the two longer pulley shafts through the holes in the vertical support and through the roller pulleys. Secure with a pin on each end. (not in the instructions)
Bolt on the lower roller bracket to the tire swing using four 4" bolts. Insert the short pulley shaft through the holes in the lower roller bracket and through the short roller pulley. Secure with a pin on each end.
I'm not sure I understand how screwing two bolts into the welded on nuts is going to allow for pulley tensioning and a reduction in vibration. Maybe someone from olympic can clarify this?
Step 7
Happy now?
Lower the vertical tire carrier and mount your spare. You may have to use the lug nuts that came with the bumper. I wasn't able to get my matching black lug nuts to thread.
DO NOT thread your winch cable through the pulleys unless your winch is wired in and working! FYI - It takes about 30 minutes to re-spool 3 feet of winch cable by hand.
Step 9
Screw the knob into the top of the vertical tire swing. Insert the grease zerk into the hole on the pivot joint of the vertical tire carrier and fill with grease.
All Done!
I'll follow up with some PRO's and CON's after having this mounted for a few days.

JK Enthusiast
Joined: Jun 2009
Posts: 195
Likes: 9
From: Tijeras, NM
Great right up I used it to help me install mine. I recently got this bumper and hope to post an opinion on it later. For now, I talked to the factory and the two bolts on the first roller arm are some sort of positive stop? Don�t quite get them either. The second thing I noticed was the hole for the positive stop for the swing arm, which is located next to the hole for the CB antenna. No info on it in the instructions but apparently the extra upright hinge bolt supplied is for a stop which only keeps it from swinging out further and not really a positive stop.
I�m guessing the bumper with winch adds about 150 Lbs and the tire carrier about 80 to 100 more.

I�m guessing the bumper with winch adds about 150 Lbs and the tire carrier about 80 to 100 more.
JK Enthusiast
Joined: Jun 2009
Posts: 195
Likes: 9
From: Tijeras, NM
Again great write up, very accurate, I recently purchased this bumper and here is why I did and my opinion of it now. Olympic sells this bumper with two different swing arms one as shown in the above install and one that is a basic swing arm that attaches to the tailgate for one open motion.

Now do to the cost of this bumper (2k+ with shipping) its difficult to find one on the street to check it out. So I bought it somewhat blind with the fascination of the easy swing down using the winch instead of my back. Disclaimer: I was rear-ended and decided to take the money and get this bumper so it really did not cost me much out of pocket.
To review this bumper kit one must look at the bumper separate from the tire carrier since Olympic sells it in two different combinations.
Lets start with the bumper I love it (A+) it has virtually everything one could need on the trail or street.
Pros:
Built in winch plate
Hi-Jack holes
D-Ring spots
2� Receiver hitch
Olympic makes a Light/Antenna bar which I have so having no lights does not bother me.
It�s �� thick steel so the next guy that rear-ends me is in for a surprise.
And I love the lines easy to stand on to reach the roof.
The latest version, which I have, has a spot for the winch solenoid and control switch plug. (I chose to install my solenoid inside my jeep though just to keep it away from the mud.)
Neutrals:
There�s no direct spot for a Hi-Jack mounting bracket but there are plenty of after market ones out there.
It�s �� thick steel so with a winch your adding about 150 lbs just for the bumper so you may need a 1� leveling kit for the rear.
Instructions I give a B- as they do have many pictures, but for the price I would expect color and lots more detail.
Cons:
Have none yet.
Now the Two-Way Swing Tire carrier I give it (C+):
Pros:
It�s also �� thick steel very heavy duty you can lift those 40�ers with ease.
If you have a back problem or you are running very heavy tires this is a great option for you. It does what is advertised.
Others have complained of rattles that did not bother me much as this is made so strong it�s not going to break.
Neutrals:
Visibility out the back window is near 0 but any lifted tire carrier will probably do that.
It angles the tire toward the back instead of straight up and down.
Instructions I give a B- as they do have many pictures, but for the price I would expect color and lots more detail.
The locking pin for arm in the closed position is strong but I would like to see some sort of easy squeeze handle.
Cons:
It�s also �� thick steel very heavy duty about 80 to 100 Lbs on top of the bumper weight I�m not an engineer but there�s go to be a way to make it out of something lighter.
It sticks up above the roofline.
The positive stop only prevents it from going two far out so if you are on a left slope it will swing back toward the driver side and hit you.
The locking mechanism for the vertical upright is the weakest point.
Here are two other winch bumpers that I found and why I did not go with them:
The Switchblade Bumper (C- winch issues) tire carrier (A+ Totally assume):
Nice tire carrier would have liked it, but I just did not like the bumpers lines and to use a winch one has to buy a separate mount and it goes where the muffler is so other modification may be necessary?


The JK Elite Rear Winch Bumper & Tire Carrier, Bumper (B+ no Hi-Jack holes) and tire carrier (B+ no tire lift):
Nice bumper also and nice options for other accessories, but it still has a swing tire carrier which I will explain later that I decided not to go with (just personal preference.)

Conclusion: In retrospect had I been able to see one of these I would have chosen the Olympic with the simple swing bar that attaches to the tailgate instead. I only run 33s so I can still lift my spear tire and with it attaching to the tailgate only one motion is needed to open up the back. I�ll keep the swing gate tell I can�t lift the tire or upgrade to 37�s.
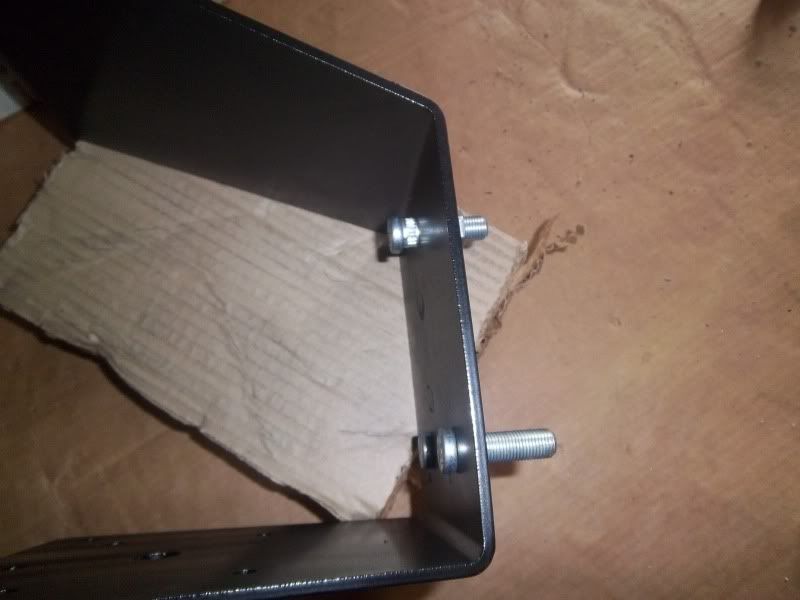
So what to do now? I have taken off the tire carrier and come up with this solution. I looked at tire lift brackets but they only give one a 2� max lift and to clear the winch one needs at least 4+�s with 33s so I had this plate made to relocate my stock tire carrier and it still maintains the 3d break light. Its �� thick steel, very strong and weights 14lbs. It gives me 5-1/2�s of clearance. I probably could have gone with aluminum but I�m not an engineer so I went with the stronger metal.
Diagram of my plate I used the stock bracket as a template for the holes and had a machinist do the drilling and cutting.

Painting the plate

Plate on Jeep with Olympic Light bar1. I drilled two holes into the tail gate to accommodate the two lower mount holes.
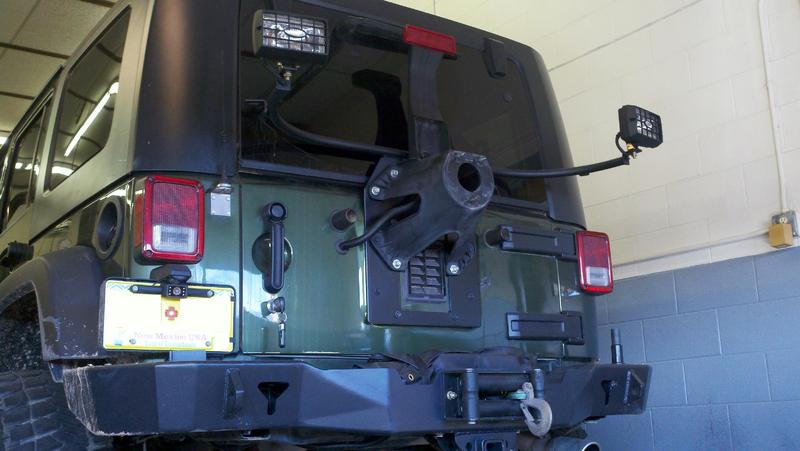
Plate on Jeep with Olympic Light bar2

Plate on jeep with spare tire has at least 1.5 more inches of clearance 1
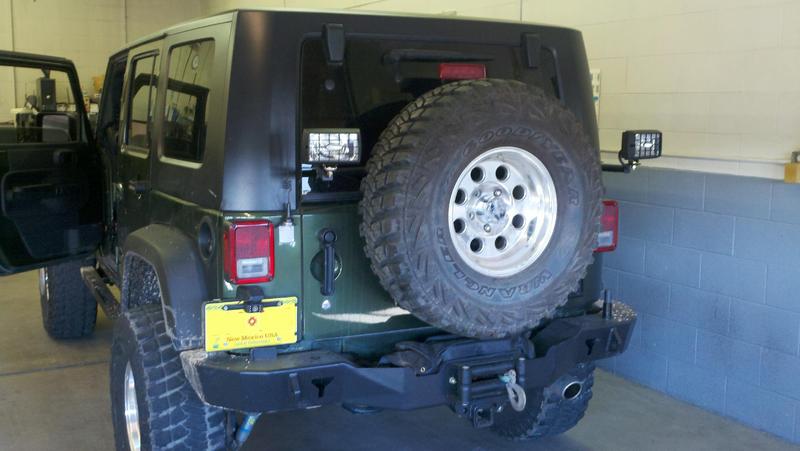
Plate on jeep with spare tire has at least 1.5 more inches of clearance 2

Oh look I can still open the window great for 2x4�s

As for the question of rear winches I have rescued 5 vehicles so far but not myself. The last rescue was a CJ-7 stuck in a snow bank and I came up behind him used my front wench to pull him back and out then went to his front left corner. I could not just put a strap on and pull him (the road did not corporate for that) so I used the back winch to move his front to the left.
Here is my earlier post on a cheep rear winch solution:
https://www.jk-forum.com/forums/show...our-rear-Winch.
Now do to the cost of this bumper (2k+ with shipping) its difficult to find one on the street to check it out. So I bought it somewhat blind with the fascination of the easy swing down using the winch instead of my back. Disclaimer: I was rear-ended and decided to take the money and get this bumper so it really did not cost me much out of pocket.
To review this bumper kit one must look at the bumper separate from the tire carrier since Olympic sells it in two different combinations.
Lets start with the bumper I love it (A+) it has virtually everything one could need on the trail or street.
Pros:
Built in winch plate
Hi-Jack holes
D-Ring spots
2� Receiver hitch
Olympic makes a Light/Antenna bar which I have so having no lights does not bother me.
It�s �� thick steel so the next guy that rear-ends me is in for a surprise.
And I love the lines easy to stand on to reach the roof.
The latest version, which I have, has a spot for the winch solenoid and control switch plug. (I chose to install my solenoid inside my jeep though just to keep it away from the mud.)
Neutrals:
There�s no direct spot for a Hi-Jack mounting bracket but there are plenty of after market ones out there.
It�s �� thick steel so with a winch your adding about 150 lbs just for the bumper so you may need a 1� leveling kit for the rear.
Instructions I give a B- as they do have many pictures, but for the price I would expect color and lots more detail.
Cons:
Have none yet.
Now the Two-Way Swing Tire carrier I give it (C+):
Pros:
It�s also �� thick steel very heavy duty you can lift those 40�ers with ease.
If you have a back problem or you are running very heavy tires this is a great option for you. It does what is advertised.
Others have complained of rattles that did not bother me much as this is made so strong it�s not going to break.
Neutrals:
Visibility out the back window is near 0 but any lifted tire carrier will probably do that.
It angles the tire toward the back instead of straight up and down.
Instructions I give a B- as they do have many pictures, but for the price I would expect color and lots more detail.
The locking pin for arm in the closed position is strong but I would like to see some sort of easy squeeze handle.
Cons:
It�s also �� thick steel very heavy duty about 80 to 100 Lbs on top of the bumper weight I�m not an engineer but there�s go to be a way to make it out of something lighter.
It sticks up above the roofline.
The positive stop only prevents it from going two far out so if you are on a left slope it will swing back toward the driver side and hit you.
The locking mechanism for the vertical upright is the weakest point.
Here are two other winch bumpers that I found and why I did not go with them:
The Switchblade Bumper (C- winch issues) tire carrier (A+ Totally assume):
Nice tire carrier would have liked it, but I just did not like the bumpers lines and to use a winch one has to buy a separate mount and it goes where the muffler is so other modification may be necessary?
The JK Elite Rear Winch Bumper & Tire Carrier, Bumper (B+ no Hi-Jack holes) and tire carrier (B+ no tire lift):
Nice bumper also and nice options for other accessories, but it still has a swing tire carrier which I will explain later that I decided not to go with (just personal preference.)
Conclusion: In retrospect had I been able to see one of these I would have chosen the Olympic with the simple swing bar that attaches to the tailgate instead. I only run 33s so I can still lift my spear tire and with it attaching to the tailgate only one motion is needed to open up the back. I�ll keep the swing gate tell I can�t lift the tire or upgrade to 37�s.
So what to do now? I have taken off the tire carrier and come up with this solution. I looked at tire lift brackets but they only give one a 2� max lift and to clear the winch one needs at least 4+�s with 33s so I had this plate made to relocate my stock tire carrier and it still maintains the 3d break light. Its �� thick steel, very strong and weights 14lbs. It gives me 5-1/2�s of clearance. I probably could have gone with aluminum but I�m not an engineer so I went with the stronger metal.
Diagram of my plate I used the stock bracket as a template for the holes and had a machinist do the drilling and cutting.
Painting the plate
Plate on Jeep with Olympic Light bar1. I drilled two holes into the tail gate to accommodate the two lower mount holes.
Plate on Jeep with Olympic Light bar2
Plate on jeep with spare tire has at least 1.5 more inches of clearance 1
Plate on jeep with spare tire has at least 1.5 more inches of clearance 2
Oh look I can still open the window great for 2x4�s
As for the question of rear winches I have rescued 5 vehicles so far but not myself. The last rescue was a CJ-7 stuck in a snow bank and I came up behind him used my front wench to pull him back and out then went to his front left corner. I could not just put a strap on and pull him (the road did not corporate for that) so I used the back winch to move his front to the left.
Here is my earlier post on a cheep rear winch solution:
https://www.jk-forum.com/forums/show...our-rear-Winch.

JK Newbie
Joined: Jan 2011
Posts: 14
Likes: 0
From: The Dalles, OR
I just installed my Smuggler Rear Winch Bumper with the new tire swing that opens/closes with the tailgate. I don't have the winch in yet but so far the install was simple enough. The included instructions were pretty much worthless and the tire carrier instructions were missing a page. I used the instructions and pictures from this thread with success. So far I agree with the Pros above and have a couple Cons to add. The power coat is terrible and peeling in places. Second con is that the tire carrier lug bolts aren't 1/2x20 like the JK wheel studs. I replaced the Olympic studs with some 1/2x20 studs and can now use the same lug nuts and lug wrench as came with the Jeep. This ruined the powder coat in the wheel stud area but looking at the rest of the bumper, paint will likely be just as durable.

JK Newbie
Joined: Sep 2010
Posts: 7
Likes: 0
From: Sacramento, CA
I've had mine on for 2 years now, I still love it. No more broken backs lifting the tires up. The rear winch has saved my wife several times on the Rubicon. She hasn't learned to drive on top of the rocks, not straddle them.
Trending Topics

JK Newbie
Joined: Feb 2013
Posts: 35
Likes: 0
From: Maine
I have had this bumper for a year or so and still love it, its nice to have a solid 2 inch reciever hitch.
I got the swing out tire carrier. The arm that links the carrier to the tailgate seemed a little flimsy and started to rattle.
I replaced it with a steering tie rod out of a snowmachine for $25. Now it has quality ball joints on each end with an aluminum rod.
No more rattle.
I got the swing out tire carrier. The arm that links the carrier to the tailgate seemed a little flimsy and started to rattle.
I replaced it with a steering tie rod out of a snowmachine for $25. Now it has quality ball joints on each end with an aluminum rod.
No more rattle.
Thread Starter
JK Newbie
Joined: Oct 2010
Posts: 90
Likes: 1
From: Bartlett, TN
Holy thread revival Batman! Ok, so I've had this bumper on for a while. I can't say I'm as happy now as when I first put it on. It's loud going down the road, has several areas that keep rusting, and it's a pain in the ass to get to the trunk.