Transmission Cooler
 04-25-2011, 05:48 AM
#401
JK Freak
Join Date: Jan 2010
Location: N. Prov. , RI
Posts: 969
Likes: 0
Received 0 Likes
on
0 Posts
Originally Posted by GCM 2
Thanks for posting your exact list of parts. I have been running with the old school/cheap hose clamps and fuel line tubing for about 6 months. Amazingly enough, it has not leaked once, even after hard wheeling with max line pressures. But, that splice is always on my mind while the JK is running. I followed your original write up months ago, but now I am going to spend the coin and do it right. Thanks again EarlyJK

Jason
 04-25-2011, 03:21 PM
#402
JK Enthusiast

Join Date: Oct 2009
Location: TEXAS
Posts: 154
Likes: 0
Received 0 Likes
on
0 Posts
Great setup! any chance you can be a bit more specific where you did the splice on the OEM hoses, pictures too?
04-26-2011, 07:16 AM
#403
JK Super Freak
Join Date: Feb 2009
Location: Montreal
Posts: 1,023
Likes: 0
Received 0 Likes
on
0 Posts
Thanks to OP for this thread.
This is my attempt at installing the cooler. Everything went well but I routed the lower hose which connects to the supply end of the OEM hose a little differently. I didn't like the way the hose had to make a hard bend in order for the two hoses to meet where I had to cut the OEM. Instead I enlarged one of the drain holes on the lower plastic shield below the radiator and I slipped the hose threw there. I also bedlined the brackets which the B&M cooler fastened to because the one thing that really bothered me was seeing the silver brackets which made the job look like crap. With the black brackets things just look clean and properly done.


This is my attempt at installing the cooler. Everything went well but I routed the lower hose which connects to the supply end of the OEM hose a little differently. I didn't like the way the hose had to make a hard bend in order for the two hoses to meet where I had to cut the OEM. Instead I enlarged one of the drain holes on the lower plastic shield below the radiator and I slipped the hose threw there. I also bedlined the brackets which the B&M cooler fastened to because the one thing that really bothered me was seeing the silver brackets which made the job look like crap. With the black brackets things just look clean and properly done.
04-26-2011, 05:23 PM
#405
JK Newbie

Join Date: Sep 2010
Location: North Carolina
Posts: 2
Likes: 0
Received 0 Likes
on
0 Posts
just to update mine-- I was able to cut the ferrules off & go straight to the OEM lines. I just made two cuts with a cut-off wheel through the aluminum ferrules and then pried them off with diagonal cutters. I like the idea of less hoseclamps & no restrictive barb unions.

04-27-2011, 09:07 AM
#406
JK Newbie
Join Date: Sep 2010
Location: North Carolina
Posts: 2
Likes: 0
Received 0 Likes
on
0 Posts
I know that this write up has been done before, but I had some unanswered questions when I went to do mine, so here is my write up:
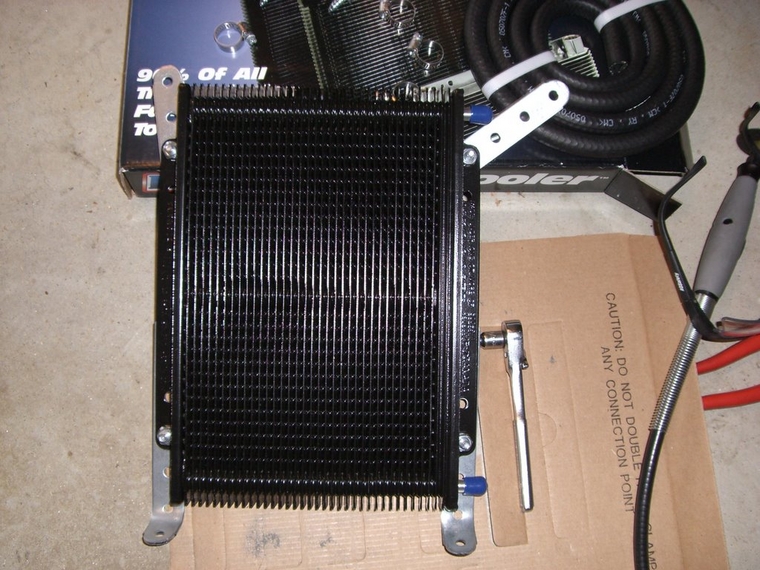
The parts I used:
B&M cooler #70268 from Summit Racing
2- 3/8” to 3/8” hose barb connectors (home depot)
2 additional hose clamps for a 3/8” ID hose
1 quart of Mopar ATF-4 Tranny fluid
1. Remove the front grill. Use a Philips screwdriver to remove the 6 plastic retaining screws (for on 07 – for an 08, you will just pop them off with a flat head). I used a flat head to pop the retainers out after that.

2007 Grill Screw

2008 Grill Clip
The grill will just pop off – don’t forget to unplug the parking lights.

2. Unpack your cooler.

The mounting orientation of the cooler is VERY important. I called B&M on this, because I was not sure. The least efficient way to cool is by having the hose outlets facing down. The MOST efficient is to have the cooler mounted with the outlets up or on the side. If you choose on the side, make sure the INLET (from the factory cooler) is on the bottom and the top hose goes to the tranny. This is VERY important.
I did not feel comfortable pushing the plastic zip tie things through my condenser and radiator, so I mounted my cooler with the supplied brackets. This also puts the cooler a couple inches away from the condenser for better cooling. I cut the brackets to length with a Dremel and used the supplied hardware to bolt it in. I had to drill holes in the lower grill brace to bolt the lower cooler brackets to. You could paint your brackets black (which would look nice) – I did not.


3. Route the first hose from the bottom of the cooler under the Jeep and to the upper tranny hose. Make a cut here. Use the remaining hose, and run it from the top of the cooler, route it the same way to the same location. Note which hose is which. At this point, attach a 3/8” hose to 3/8” hose barb adapter to the end of each hose and secure with a clamp.

4. Next, I put the font of the Jeep back together (remember to plug the lights back in!).

5. Place a drain pan under the tranny hoses. Get 2 hose clams ready, use some cutters, and cut the UPPER tranny line in the center of the rubber section. I worked from the top (under the hood). Slide a hose clamp on each side of the tranny line and slide the hoses with the hose barbs into the tranny lines. The one from the bottom of the cooler will go to the hose coming from the front of the Jeep. The one from the top of the cooler will go to the hose going towards the transmission. Secure the clamps. Wipe up the little tranny fluid that dripped.
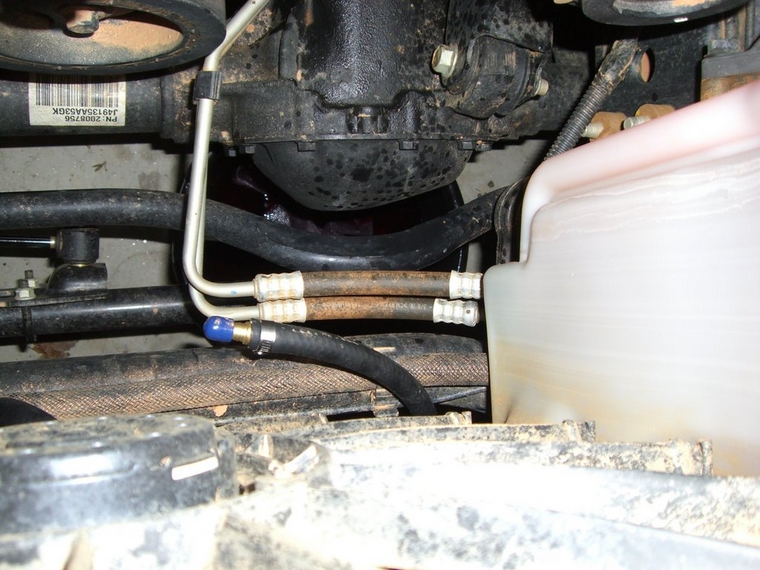

Crawl under the Jeep, check the hoses to be sure they are not hanging. If so, secure them. Take it for a drive and get it good and warm. Check the fluid. I had to add about half a quart.
This dropped my temp from ~220 to ~170 (on the Unlimited with 4.10's)
The parts I used:
B&M cooler #70268 from Summit Racing
2- 3/8” to 3/8” hose barb connectors (home depot)
2 additional hose clamps for a 3/8” ID hose
1 quart of Mopar ATF-4 Tranny fluid
1. Remove the front grill. Use a Philips screwdriver to remove the 6 plastic retaining screws (for on 07 – for an 08, you will just pop them off with a flat head). I used a flat head to pop the retainers out after that.
2007 Grill Screw
2008 Grill Clip
The grill will just pop off – don’t forget to unplug the parking lights.
2. Unpack your cooler.
The mounting orientation of the cooler is VERY important. I called B&M on this, because I was not sure. The least efficient way to cool is by having the hose outlets facing down. The MOST efficient is to have the cooler mounted with the outlets up or on the side. If you choose on the side, make sure the INLET (from the factory cooler) is on the bottom and the top hose goes to the tranny. This is VERY important.
I did not feel comfortable pushing the plastic zip tie things through my condenser and radiator, so I mounted my cooler with the supplied brackets. This also puts the cooler a couple inches away from the condenser for better cooling. I cut the brackets to length with a Dremel and used the supplied hardware to bolt it in. I had to drill holes in the lower grill brace to bolt the lower cooler brackets to. You could paint your brackets black (which would look nice) – I did not.
3. Route the first hose from the bottom of the cooler under the Jeep and to the upper tranny hose. Make a cut here. Use the remaining hose, and run it from the top of the cooler, route it the same way to the same location. Note which hose is which. At this point, attach a 3/8” hose to 3/8” hose barb adapter to the end of each hose and secure with a clamp.
4. Next, I put the font of the Jeep back together (remember to plug the lights back in!).
5. Place a drain pan under the tranny hoses. Get 2 hose clams ready, use some cutters, and cut the UPPER tranny line in the center of the rubber section. I worked from the top (under the hood). Slide a hose clamp on each side of the tranny line and slide the hoses with the hose barbs into the tranny lines. The one from the bottom of the cooler will go to the hose coming from the front of the Jeep. The one from the top of the cooler will go to the hose going towards the transmission. Secure the clamps. Wipe up the little tranny fluid that dripped.
Crawl under the Jeep, check the hoses to be sure they are not hanging. If so, secure them. Take it for a drive and get it good and warm. Check the fluid. I had to add about half a quart.
This dropped my temp from ~220 to ~170 (on the Unlimited with 4.10's)
04-27-2011, 04:53 PM
#408
JK Freak
Join Date: Feb 2011
Location: Baton Rouge, Louisiana
Posts: 585
Likes: 0
Received 0 Likes
on
0 Posts
I have my cooler ready to go in. Will give everyone some feedback once it's complete. Not sure if I will cut the ferrule off or just cut the hose. Will make that decision when I get it started. Looks cleaner with the hoses mounted right on the aluminum. I would like to use the nicer fittings described earlier but I'm not really sure how they're installed so I may start with the supplied stuff.
04-27-2011, 05:32 PM
#409
JK Super Freak
Originally Posted by Goeagles88
I have my cooler ready to go in. Will give everyone some feedback once it's complete. Not sure if I will cut the ferrule off or just cut the hose. Will make that decision when I get it started. Looks cleaner with the hoses mounted right on the aluminum. I would like to use the nicer fittings described earlier but I'm not really sure how they're installed so I may start with the supplied stuff.
05-01-2011, 11:20 AM
#410
JK Freak
Join Date: Apr 2009
Location: Houston, Texas, United States
Posts: 537
Likes: 0
Received 2 Likes
on
2 Posts
Took me about 2 hrs from begin to end, hardest part was using the mounting brackets and forming them the way I wanted. I didn't want to use the zipp-tie mounts. Sprayed everything black.
Instant results: a 20 minute drive of mixed fwy/city driving showed good results. Outside temp of 91 the tranny never got above 172 and stayed around 168 once on the fwy. Normally 180s would be normal for a day like today. (Temps monitored through BullydogGT)
Instant results: a 20 minute drive of mixed fwy/city driving showed good results. Outside temp of 91 the tranny never got above 172 and stayed around 168 once on the fwy. Normally 180s would be normal for a day like today. (Temps monitored through BullydogGT)