
Warrior trunk install

Thread Starter
JK Freak
Joined: Jun 2011
Posts: 606
Likes: 6
From: Evergreen, CO
It's an "ok" product. Has the potential to be a perfect product with so little work to be "right" out of the box. I'd really love it if it came with a better (real security) latch but oh well.
The rivets used for the latch were loose and there were spare holes that needed to be plugged. Re-rivet with backing washers and then undercoat exterior to seal them.
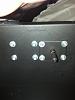
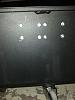
The instructions will have you drilling holes from underneath. I preferred to be a bit more accurate and made a template to do so from above as the hole will be smaller and a better fit IMO. In doing this, it's also important to know that the vital measurement is to do so behind the crossmember (so the box clears) and that the lid will fit exactly between the bed plastic molding. So, find center and measure out from there for a precise fit and centered lid.

The rivets used for the latch were loose and there were spare holes that needed to be plugged. Re-rivet with backing washers and then undercoat exterior to seal them.
The instructions will have you drilling holes from underneath. I preferred to be a bit more accurate and made a template to do so from above as the hole will be smaller and a better fit IMO. In doing this, it's also important to know that the vital measurement is to do so behind the crossmember (so the box clears) and that the lid will fit exactly between the bed plastic molding. So, find center and measure out from there for a precise fit and centered lid.
Last edited by fredrok; Aug 21, 2013 at 07:47 AM.
Thread Starter
JK Freak
Joined: Jun 2011
Posts: 606
Likes: 6
From: Evergreen, CO
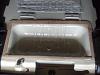
Started to use a small air-powered saw that failed so I had to go to a sawzall. Had I known it would cut so well with that and a 32tpi blade, I wouldn't have bothered with the small one in the first place.

It would be another improvement if some pre drilled holes for rivets were better thought out in some spots but no big deal.
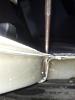
Weather strip and box placed. The rivets supplied are 3/16" most are 1/4" grip with a few 1/2" grip for the aft edge. Make sure to cut the carpet close so you'll have enough to tuck it in and make a nice finish. You can always trim it more if you go too small the first time. It also helps to stand inside the box when you rivet so your weight will compress the weatherstriping instead of relying on the rivet to do so.

All of my rivets are backed with #8 washers (as they really should be), but I still would have needed to pick up 3/4" grip rivets for the back edge even if I wasn't backing them. 1/2" grip was also required for the hinges.

It would be another improvement if some pre drilled holes for rivets were better thought out in some spots but no big deal.
Weather strip and box placed. The rivets supplied are 3/16" most are 1/4" grip with a few 1/2" grip for the aft edge. Make sure to cut the carpet close so you'll have enough to tuck it in and make a nice finish. You can always trim it more if you go too small the first time. It also helps to stand inside the box when you rivet so your weight will compress the weatherstriping instead of relying on the rivet to do so.
All of my rivets are backed with #8 washers (as they really should be), but I still would have needed to pick up 3/4" grip rivets for the back edge even if I wasn't backing them. 1/2" grip was also required for the hinges.
Last edited by fredrok; Aug 26, 2013 at 08:45 PM.
Thread Starter
JK Freak
Joined: Jun 2011
Posts: 606
Likes: 6
From: Evergreen, CO
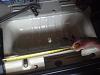
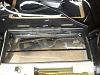
The cover is a tight fit between the trim which I like and I didn't find it necessary to remove the subwoofer as instructed.

Same process for the stock compartment cover


Line with cork (or something)....and fill

Same process for the stock compartment cover
Line with cork (or something)....and fill
Last edited by fredrok; Aug 19, 2013 at 03:43 PM.
Thread Starter
JK Freak
Joined: Jun 2011
Posts: 606
Likes: 6
From: Evergreen, CO
...........and I wish we had more Pattons...
