
This Weekend's Project


Thread Starter
JK Newbie
Joined: Oct 2014
Posts: 2
Likes: 0
From: Orlando, FL
New to the forum, hopefully I'm doing a write-up correctly - figured I'd share this weekend's mods to some other jeep people because I've shown all my friends and they all say "it looks exactly the same"
My dad and I did the good ol' JK fender cutting procedure to my 2012 JK Sport, as well as some bumper chopping (front and rear) and some trim installationg.
Aftermarket products used:
VDP Stubby End Cap Kit ($64.99 on Quadratec)
HighRock 4x4 Rocker Trim ($69.99 on Quadratec)
Tools used:
Dremel 4000 w/ EZ-lock attachment
Dremel SawMax (rotary saw)
Sawzall (reciprocating saw)
Ryobi "Corner Cat" (detail sander)
electric drill w/ 1/4" bit (capable of drilling through metal)
Other supplies used:
masking tape
china marker (white pencil for marking)
black zipties
two 1/4" x 1" hex bolts + washers + nuts
Rustoleum Custom Shop matte black spraypaint
36' of Cowles black edge trim (two packages)
Here are the results:
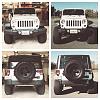
We did the front bumper first. The VDP kit came with good directions and all the necessary hardware and it took all of twenty minutes. We measured and marked where the directions told us to, cut the ends off with the sawzall, drilled the necessary holes and installed the end caps with the supplied rivets.
Then we got to work on the fenders (technically, flares). For the mostpart, we followed along with a youtube video by Charles Bloyer who explains the process step-by-step. If you search "JK fender cutting" it is the first result. The video is about 23 minutes long. The front flares take much longer than the rear.
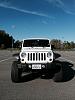
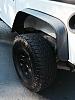
For the front flares, we first used the sawzall to saw off the rivets on the underside of the fender. There's no need to keep them. We then removed the light, which is keyed so that the bulb twists into the orange reflector/lens. We used tape to mark the fender at the very edge before cutting. The Dremel SawMax (or other small rotary saw) works best for cutting the flares. We used wood & plastic blades, although metal blades would work. The Dremel 4000 with an EZ-lock metal cutting blade was used for small details, and finally we sanded the edge smooth with the Ryobi Corner Cat (100g sanding paper on a black or a fine metal file will work too) Unlike the video, we cut the fenders at the most aggressive angle possible. Most videos and write-ups on this mod for some reason say the first step of cutting the flares is to get under the flare with a Dremel and cut along where the interior part of the fender ends. We found this to be unnecessary, and found it more aesthetically pleasing to cut at an aggressive angle. We followed the video's advice when it came to cutting the inner fender liner for re-use and rivit-ed it black in place with the existing rivets when finished. We drilled a 1/4" hole through the liner where it was now flimsy due to part of it being removed and another hole into the body mount directly behind it and fastened it together with 1/4" bolts with washers and hex nuts on the opposide side. You could probably get away without reusing the inner liner, but some rocks and debris may fly into the engine bay. Black edge trim was used to finish the edges of the flare per usual, and it went on easily and the adhesive seems strong enough to hold. We ziptied the light to the vehicle as shown in the video. As far as painting is concerned, we drew a horizontal line from where the edge of the fender contacts the body inward toware the wheel and painted upwards on every surface inside of the fender.
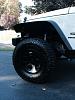
The rear fenders were a lot easier. We used the same cutting technique. The liner can be discarded as there is nothing to protect in the rear. The same method was used for painting. Most people paint the wheel well as well as the outer body, but I decided that since my jeep is white, the wheel well remaining white would add contrast between the black fender and black tire.
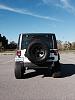
Next we did the rear bumper. We cut the ends in as for as they could possibly be without exposing the chasis. Cutting the rear bumper left the sides open, so we used edge trim to give a finished look on the parts that were thing enough for it to be applied. It doesn't look as neat as some of the other DIY rear bumper chops, but it's as stubby as stubby gets and it will do. It's more or less a temporary solution but honestly a rear bumper is probably the last aftermarket part I'm going to spend $400 on, so it's going to end up being more permanent than less. The bumper is now held to the chasis by only two bolts rather than the usual six, but I think it will hold without problems.
Lastly we installed the HighRock rocker trim which came with circular trim peices for the door handle recesses, which I think looks nice. It was applied easily. The trim pieces come with 3M adhesive tape, which is activated by a liquid primer. The kit gives you more than enough primer. The trim pieces are held on by six bolts, which it supplies (as well as the adhesive). The directions on the primer say to wait five minutes after applying before adhesion, but these directions come from 3M rather than HighRock and probably don't apply to adhering something to a finished vehicle. In my opinion, 2-3 minutes is a better waiting period. The door handle recess pieces go on in the same fashion.
My dad and I did the good ol' JK fender cutting procedure to my 2012 JK Sport, as well as some bumper chopping (front and rear) and some trim installationg.
Aftermarket products used:
VDP Stubby End Cap Kit ($64.99 on Quadratec)
HighRock 4x4 Rocker Trim ($69.99 on Quadratec)
Tools used:
Dremel 4000 w/ EZ-lock attachment
Dremel SawMax (rotary saw)
Sawzall (reciprocating saw)
Ryobi "Corner Cat" (detail sander)
electric drill w/ 1/4" bit (capable of drilling through metal)
Other supplies used:
masking tape
china marker (white pencil for marking)
black zipties
two 1/4" x 1" hex bolts + washers + nuts
Rustoleum Custom Shop matte black spraypaint
36' of Cowles black edge trim (two packages)
Here are the results:
We did the front bumper first. The VDP kit came with good directions and all the necessary hardware and it took all of twenty minutes. We measured and marked where the directions told us to, cut the ends off with the sawzall, drilled the necessary holes and installed the end caps with the supplied rivets.
Then we got to work on the fenders (technically, flares). For the mostpart, we followed along with a youtube video by Charles Bloyer who explains the process step-by-step. If you search "JK fender cutting" it is the first result. The video is about 23 minutes long. The front flares take much longer than the rear.
For the front flares, we first used the sawzall to saw off the rivets on the underside of the fender. There's no need to keep them. We then removed the light, which is keyed so that the bulb twists into the orange reflector/lens. We used tape to mark the fender at the very edge before cutting. The Dremel SawMax (or other small rotary saw) works best for cutting the flares. We used wood & plastic blades, although metal blades would work. The Dremel 4000 with an EZ-lock metal cutting blade was used for small details, and finally we sanded the edge smooth with the Ryobi Corner Cat (100g sanding paper on a black or a fine metal file will work too) Unlike the video, we cut the fenders at the most aggressive angle possible. Most videos and write-ups on this mod for some reason say the first step of cutting the flares is to get under the flare with a Dremel and cut along where the interior part of the fender ends. We found this to be unnecessary, and found it more aesthetically pleasing to cut at an aggressive angle. We followed the video's advice when it came to cutting the inner fender liner for re-use and rivit-ed it black in place with the existing rivets when finished. We drilled a 1/4" hole through the liner where it was now flimsy due to part of it being removed and another hole into the body mount directly behind it and fastened it together with 1/4" bolts with washers and hex nuts on the opposide side. You could probably get away without reusing the inner liner, but some rocks and debris may fly into the engine bay. Black edge trim was used to finish the edges of the flare per usual, and it went on easily and the adhesive seems strong enough to hold. We ziptied the light to the vehicle as shown in the video. As far as painting is concerned, we drew a horizontal line from where the edge of the fender contacts the body inward toware the wheel and painted upwards on every surface inside of the fender.
The rear fenders were a lot easier. We used the same cutting technique. The liner can be discarded as there is nothing to protect in the rear. The same method was used for painting. Most people paint the wheel well as well as the outer body, but I decided that since my jeep is white, the wheel well remaining white would add contrast between the black fender and black tire.
Next we did the rear bumper. We cut the ends in as for as they could possibly be without exposing the chasis. Cutting the rear bumper left the sides open, so we used edge trim to give a finished look on the parts that were thing enough for it to be applied. It doesn't look as neat as some of the other DIY rear bumper chops, but it's as stubby as stubby gets and it will do. It's more or less a temporary solution but honestly a rear bumper is probably the last aftermarket part I'm going to spend $400 on, so it's going to end up being more permanent than less. The bumper is now held to the chasis by only two bolts rather than the usual six, but I think it will hold without problems.
Lastly we installed the HighRock rocker trim which came with circular trim peices for the door handle recesses, which I think looks nice. It was applied easily. The trim pieces come with 3M adhesive tape, which is activated by a liquid primer. The kit gives you more than enough primer. The trim pieces are held on by six bolts, which it supplies (as well as the adhesive). The directions on the primer say to wait five minutes after applying before adhesion, but these directions come from 3M rather than HighRock and probably don't apply to adhering something to a finished vehicle. In my opinion, 2-3 minutes is a better waiting period. The door handle recess pieces go on in the same fashion.