
Wheel Stud Replacement.


Thread Starter
JK Jedi Master
Joined: Nov 2006
Posts: 15,170
Likes: 0
From: .
I you didn't already know the process for replacing a broken wheel stud I hope these steps will help you out.
You will need a lug wrench, a small flat head screw driver, a pair on needle nose pliers, an 18mm wrench, a hammer, a jack, jack stand, a torque wrench, and replacement wheel stud.

You will need to break loose the wheel lug nuts then jack up the axle until the tire is off of the ground. I used a jack stand under the frame rail to help support the weight and give some stability.

Remove the wheel nuts and wheel. You will then need to remove the brake caliper. There are two 18mm bolts on the back of the caliper that need to be removed in order to get the caliper off of the rotor.

After removing the two 18mm bolts you can slip off the brake caliper.

After removing the caliper set it aside until it is time to replace it. You do not need to remove the brake line.
NOTE: Do not mash the brake pedal while the caliper is not in place. This will cause many more problems.

Next remove the rotor retainers. I reused them, but it is not necessary to keep them.

You can now pull off the rotor and set aside.

I used a hammer to beat out the old/broken wheel stud.

The old/broken wheel stud.

I then inserted the new wheel stud from the back and pulled it into place using a stack of large washers and a lug nut. Be sure to use washers that are big enough to go over the shank at the bottom of the wheel stud.
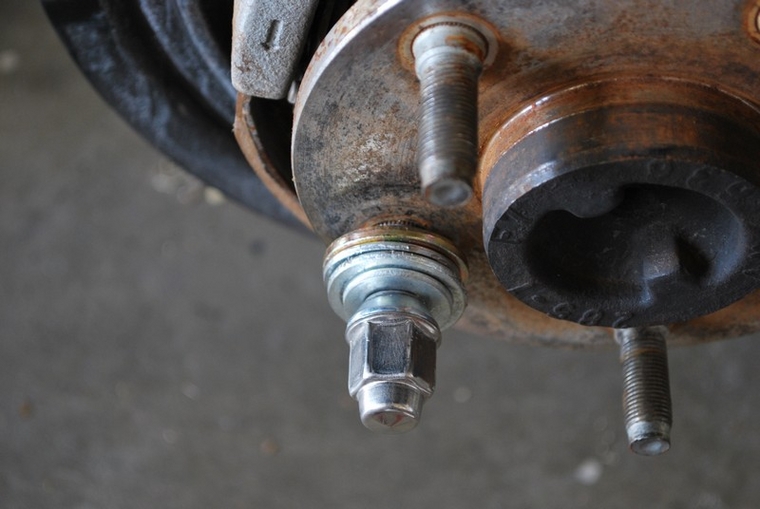
Pay attention to the back of the wheel stud, as you tighten the lug nut, so you can see when it is in place. When it is seated correctly your new wheel stud should look something like this.

To put it back together replace the rotor and retainers, if you wish, replace the brake caliper and securely tighten the 18mm bolts that hold it on, replace the wheel and torque the lug nuts to 95 ft lbs.

After getting it back together take it for a drive and upon returning recheck the torque on the lugs.
You will need a lug wrench, a small flat head screw driver, a pair on needle nose pliers, an 18mm wrench, a hammer, a jack, jack stand, a torque wrench, and replacement wheel stud.
You will need to break loose the wheel lug nuts then jack up the axle until the tire is off of the ground. I used a jack stand under the frame rail to help support the weight and give some stability.
Remove the wheel nuts and wheel. You will then need to remove the brake caliper. There are two 18mm bolts on the back of the caliper that need to be removed in order to get the caliper off of the rotor.
After removing the two 18mm bolts you can slip off the brake caliper.
After removing the caliper set it aside until it is time to replace it. You do not need to remove the brake line.
NOTE: Do not mash the brake pedal while the caliper is not in place. This will cause many more problems.
Next remove the rotor retainers. I reused them, but it is not necessary to keep them.
You can now pull off the rotor and set aside.
I used a hammer to beat out the old/broken wheel stud.
The old/broken wheel stud.
I then inserted the new wheel stud from the back and pulled it into place using a stack of large washers and a lug nut. Be sure to use washers that are big enough to go over the shank at the bottom of the wheel stud.
Pay attention to the back of the wheel stud, as you tighten the lug nut, so you can see when it is in place. When it is seated correctly your new wheel stud should look something like this.
To put it back together replace the rotor and retainers, if you wish, replace the brake caliper and securely tighten the 18mm bolts that hold it on, replace the wheel and torque the lug nuts to 95 ft lbs.
After getting it back together take it for a drive and upon returning recheck the torque on the lugs.
Last edited by Robar; Jun 20, 2009 at 07:16 PM.
Thread Starter
JK Jedi Master
Joined: Nov 2006
Posts: 15,170
Likes: 0
From: .
It took about three good hits with the hammer and two or three light taps, so I didn't jettison it into the emergency break, to remove the stud. It may be more professional to use a press of some sort to install the stud, but this worked fine for what I had in my garage. 
JK Newbie
Joined: May 2009
Posts: 61
Likes: 0
From: Rochester, NY
i had to do this a couple months back, because I snapped a lug stud off each rear wheel?! wasn't too bad of a job. The only differences i had where i used a dead blow sledge hammer
 (My Lug Studs were real Stubborn
 ) and i used one of the older style open end acorn style lug nuts to pull the stud through. I didn't want to take the chance of blowing the capped end off my brand new lug nuts
 . Also, You don't have to worry so much about lining the teeth up on the stud to your hub. it will self correct itself.
Awesome write up! Pics are exactly what i remember seeing under there
(My Lug Studs were real Stubborn) and i used one of the older style open end acorn style lug nuts to pull the stud through. I didn't want to take the chance of blowing the capped end off my brand new lug nuts. Also, You don't have to worry so much about lining the teeth up on the stud to your hub. it will self correct itself. Awesome write up! Pics are exactly what i remember seeing under there

Trending Topics
JK Enthusiast
Joined: Feb 2009
Posts: 237
Likes: 0
From: Saint Joseph, MO