Wild Boar Products - Fastback Roof Installation
 12-27-2014, 11:19 AM
#1
JK Enthusiast
Thread Starter
Join Date: Mar 2014
Location: Bothell, WA
Posts: 356
Likes: 0
Received 0 Likes
on
0 Posts
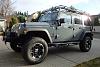
I decided on this particular rack due to the style matching my Trektop NX fastback soft top that I run in the summer and that it does not look too out of place with the hard top on.
Unfortunately, my memory card became corrupted so I only have after installed pictures. I did video tape the installation and will eventually edit that and post it to youtube.
I ordered it directly from Wildboar and received it within three weeks. It was packaged extremely well, and I am very impressed with the overall quality of the rack.
You first have to download the instruction manual from Wildboar's website and print the 32 page thing out. It gave the list of tools needed as the following:
5/16" drill bit, a 1/2" wrench, and an Allen wrench.
This is what I needed:
13/32" drill bit
7/32" Allen Wrench
3/8" Sockets
9/16" Socket
#40 star bit
19mm open end wrench, or adjustable wrenches
two ratchet straps.
The instructions were pretty good with the exceptions of the proper size hardware and tools to use.
I assembled the rack, ensuring to use the silicone sealant at ALL of the connections, and on the set screws. Because the insides of the tubes are raw steel, I would hate to have water be able to get in and then leak rusty water on the Jeep.
This came with six plain rectangular rubber gaskets to put between the rack and the body of the Jeep. I had to take some time to cut them to the right shape and punch holes in them for the bolts. For the cost of this rack, you'd think they could get a local shop cut these out with a standard die.
Mounting the rack on the Jeep got tricky. It was too heavy for two of us to maneuver over the Jeep and try to place the mounting bolts, so I hung it off the garage door track with some ratchet straps.
Drilling the holes in body in the rear was a little nerve-racking. The instructions said to drill the top hole 2 1/4" down from the top of the top bend of the body, and 1/2" back from the seam.
I found the first measurement too vague as it is not a definite point from which to measure. Multiple emails to Wildboar asking for the dimension from the bottom of the hard top remain unanswered. So I started looking at the few pictures I could find online to get a feel for how it should be located compared to the tail light and ended up measuring down from where the sheet metal just starts to bend inward. Do not drill the bottom hole until you have all the front mounting bolts in place.
Now I lowered rack into place and put the front bolts in loosely. I then went to the back.
It appeared the rack was about 4 inches too long as the rear mount stuck out to the rear of the jeep in midair about that far. I was able to push on it to get it close to the hole I drilled, but ended up placing a ratchet strap from that to the upper front of the rack to pull it in and keep it their while I attached the bolt. This was the same on both sides.
I located the lower rear hole location and marked it, removed the upper bolt and moved the mount out of the way in order to drill the bottom hole.
I took some primer and painted the holes for corrosion prevention. Once that was dry, I placed the rear mount in place and bolted it to the body using the heavy backing plates that were provided.
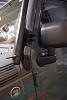
I then went and tightened the front bolts. It seems like due to the thickness of the mount, and the weather striping the stock bolts are too short. The bottom one I only got a good two solid turns out of. I have the Rugged Ridge mirror brackets which I placed on the top two bolts. On the top most I think I only got about 1 1/2 complete turns on that bolt.
So I will have to go down to the local nut and bolt store (Tacoma Screw) and see if they have any that are about 1/4" longer.
With having to ratchet strap the rear mounts into place it caused the rack to have a slight upward bow to it.

I am not sure if this is a design feature for the capacity, but it is not too noticeable.
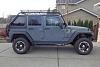
The final look I like. It has a slight forward rake to it, so had I known, I would have drilled the rear holes about 1/4" lower to fix that. EDIT: I actually redrilled the holes about 1/2 lower to get the look right and the rack completely level to the top of the Jeep doors. ( In know, more holes, but I made a nifty cover plate for if I ever remove the rack)
The cat approved of the final install as well.
My next concern was wind noise on the freeway. Unbelievably, it only slightly affected my fuel mileage by less than 1/2 mile per gallon, and the wind noise is almost unnoticeable and less than it is when driving stock, into a headwind.
Unfortunately, my memory card became corrupted so I only have after installed pictures. I did video tape the installation and will eventually edit that and post it to youtube.
I ordered it directly from Wildboar and received it within three weeks. It was packaged extremely well, and I am very impressed with the overall quality of the rack.
You first have to download the instruction manual from Wildboar's website and print the 32 page thing out. It gave the list of tools needed as the following:
5/16" drill bit, a 1/2" wrench, and an Allen wrench.
This is what I needed:
13/32" drill bit
7/32" Allen Wrench
3/8" Sockets
9/16" Socket
#40 star bit
19mm open end wrench, or adjustable wrenches
two ratchet straps.
The instructions were pretty good with the exceptions of the proper size hardware and tools to use.
I assembled the rack, ensuring to use the silicone sealant at ALL of the connections, and on the set screws. Because the insides of the tubes are raw steel, I would hate to have water be able to get in and then leak rusty water on the Jeep.
This came with six plain rectangular rubber gaskets to put between the rack and the body of the Jeep. I had to take some time to cut them to the right shape and punch holes in them for the bolts. For the cost of this rack, you'd think they could get a local shop cut these out with a standard die.
Mounting the rack on the Jeep got tricky. It was too heavy for two of us to maneuver over the Jeep and try to place the mounting bolts, so I hung it off the garage door track with some ratchet straps.
Drilling the holes in body in the rear was a little nerve-racking. The instructions said to drill the top hole 2 1/4" down from the top of the top bend of the body, and 1/2" back from the seam.
I found the first measurement too vague as it is not a definite point from which to measure. Multiple emails to Wildboar asking for the dimension from the bottom of the hard top remain unanswered. So I started looking at the few pictures I could find online to get a feel for how it should be located compared to the tail light and ended up measuring down from where the sheet metal just starts to bend inward. Do not drill the bottom hole until you have all the front mounting bolts in place.
Now I lowered rack into place and put the front bolts in loosely. I then went to the back.
It appeared the rack was about 4 inches too long as the rear mount stuck out to the rear of the jeep in midair about that far. I was able to push on it to get it close to the hole I drilled, but ended up placing a ratchet strap from that to the upper front of the rack to pull it in and keep it their while I attached the bolt. This was the same on both sides.
I located the lower rear hole location and marked it, removed the upper bolt and moved the mount out of the way in order to drill the bottom hole.
I took some primer and painted the holes for corrosion prevention. Once that was dry, I placed the rear mount in place and bolted it to the body using the heavy backing plates that were provided.
I then went and tightened the front bolts. It seems like due to the thickness of the mount, and the weather striping the stock bolts are too short. The bottom one I only got a good two solid turns out of. I have the Rugged Ridge mirror brackets which I placed on the top two bolts. On the top most I think I only got about 1 1/2 complete turns on that bolt.
So I will have to go down to the local nut and bolt store (Tacoma Screw) and see if they have any that are about 1/4" longer.
With having to ratchet strap the rear mounts into place it caused the rack to have a slight upward bow to it.
I am not sure if this is a design feature for the capacity, but it is not too noticeable.
The final look I like. It has a slight forward rake to it, so had I known, I would have drilled the rear holes about 1/4" lower to fix that. EDIT: I actually redrilled the holes about 1/2 lower to get the look right and the rack completely level to the top of the Jeep doors. ( In know, more holes, but I made a nifty cover plate for if I ever remove the rack)
The cat approved of the final install as well.
My next concern was wind noise on the freeway. Unbelievably, it only slightly affected my fuel mileage by less than 1/2 mile per gallon, and the wind noise is almost unnoticeable and less than it is when driving stock, into a headwind.
Last edited by Dodge4me; 06-18-2015 at 09:33 AM.
 12-27-2014, 11:30 AM
#2
JK Enthusiast
Thread Starter
Join Date: Mar 2014
Location: Bothell, WA
Posts: 356
Likes: 0
Received 0 Likes
on
0 Posts
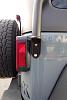
The only thing I had not noticed was the lack of clearance of the antenna to the rack.

I had been driving through a parking lot and started to hear a tick tick tick sound. I was really bothered that there might be something wrong with my Jeep, and then noticed later in the day it was coming from that side. I am not sure how I will fix this, but it is minor.
I had been driving through a parking lot and started to hear a tick tick tick sound. I was really bothered that there might be something wrong with my Jeep, and then noticed later in the day it was coming from that side. I am not sure how I will fix this, but it is minor.
12-27-2014, 12:23 PM
#3
JK Newbie

Join Date: Feb 2013
Location: Fort Worth, Texas
Posts: 66
Likes: 0
Received 0 Likes
on
0 Posts
The only thing I had not noticed was the lack of clearance of the antenna to the rack. <img src="https://www.jk-forum.com/forums/attachment.php?attachmentid=589267"/> I had been driving through a parking lot and started to hear a tick tick tick sound. I was really bothered that there might be something wrong with my Jeep, and then noticed later in the day it was coming from that side. I am not sure how I will fix this, but it is minor.
AntennaX Off-Road (13-inch) Antenna for (07 thru 15) Jeep Wrangler JK https://www.amazon.com/dp/B00651CLCS..._4mYNub0GJHN3F
