
Write up for the my $100 custom made rear panel/light set up!


Thread Starter
JK Newbie
Joined: Feb 2009
Posts: 10
Likes: 0
From: fayetteville, nc
I decided one day that i wanted to make my own rear panel light set up just to do it and to come up with something I haven't seen. I did it for about a $100 bucks. This is just a guide for you to use a lot of work was done by making small cuts and working my way to a perfect fit. My back up plan was riverraiders crusher panels!!!
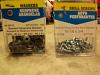
Tools & misc items used jig saw, drill, dremel, phillips screw driver, marker, cardboard, double sided tape, sheet metal screws w/washers
I started by going to a local metal shop and purchased two sheets of 08 aluminum 28"x16 3/4". I also had them bend it in icrements every 1/2" starting from 8 3/4" from one side for 2 1/4" till it reached a semi rolled 90*(note i did this because the didn't have a roller smaller than 3" and i wanted a tighter bend)overall measurement = gate/light side 8 3/4"-2 1/4"bend-16 3/4" fender side


Next I selected what style of lights I wanted to use, which was a set of oval trailer led brake/turn signal lights($30 for a pair with wiring harness and rubber gromets) I also purchase oval shape reverse lights non led for $11 a pair, because reverse leds were $60 a pair and didn't have the money for them. Purchased at local trailer shop. Way cheaper than any auto shops. NOTE can use any style shape or pattern you want as long as you can make them fit, my design may not be for all because i wanted a aggressive look
STEPS:
1. Remove Rear right tl and fender (may need to buy extra panel fasteners if you bust some)
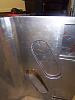
2. Use a sheet of cardboard and make a template that will fit around tailgate hinges,(NOTE I did remove the hidge caps before doing this and cut out light screw mounts to get a more accurate fit) transfer to sheet metal, trace and cut out pattern. I used a jigsaw with metal cutting blade and it worked great and used dremel to cut out the tail light srew mounts, be careful not to cut to much of the top.

3. Now its time to trim the fender side. I used the fender to get a quick start of the shape and trimmed it out, but left room for corrections. next i placed the fender back on the jeep using tape to hold it in place and then shoved a marker behind it to trace the fender line while on the jeep. remove fender and cut again repeat till accurate becareful not to get cut happy and cut too much.

4. Once the fender curve is good trace it to the other panel and cut it!

Will continue with thread. ran out of picture space
Tools & misc items used jig saw, drill, dremel, phillips screw driver, marker, cardboard, double sided tape, sheet metal screws w/washers
I started by going to a local metal shop and purchased two sheets of 08 aluminum 28"x16 3/4". I also had them bend it in icrements every 1/2" starting from 8 3/4" from one side for 2 1/4" till it reached a semi rolled 90*(note i did this because the didn't have a roller smaller than 3" and i wanted a tighter bend)overall measurement = gate/light side 8 3/4"-2 1/4"bend-16 3/4" fender side
Next I selected what style of lights I wanted to use, which was a set of oval trailer led brake/turn signal lights($30 for a pair with wiring harness and rubber gromets) I also purchase oval shape reverse lights non led for $11 a pair, because reverse leds were $60 a pair and didn't have the money for them. Purchased at local trailer shop. Way cheaper than any auto shops. NOTE can use any style shape or pattern you want as long as you can make them fit, my design may not be for all because i wanted a aggressive look
STEPS:
1. Remove Rear right tl and fender (may need to buy extra panel fasteners if you bust some)
2. Use a sheet of cardboard and make a template that will fit around tailgate hinges,(NOTE I did remove the hidge caps before doing this and cut out light screw mounts to get a more accurate fit) transfer to sheet metal, trace and cut out pattern. I used a jigsaw with metal cutting blade and it worked great and used dremel to cut out the tail light srew mounts, be careful not to cut to much of the top.
3. Now its time to trim the fender side. I used the fender to get a quick start of the shape and trimmed it out, but left room for corrections. next i placed the fender back on the jeep using tape to hold it in place and then shoved a marker behind it to trace the fender line while on the jeep. remove fender and cut again repeat till accurate becareful not to get cut happy and cut too much.
4. Once the fender curve is good trace it to the other panel and cut it!
Will continue with thread. ran out of picture space
Thread Starter
JK Newbie
Joined: Feb 2009
Posts: 10
Likes: 0
From: fayetteville, nc
STEPS CONTINUED
5. Now figure out your light layout.
6.Trace it and cut it out, test fit lights once perfect, trace to other panel and cut them out and test fit that side.
7. Now the the fun of chopping up your jeep. I did this by trial and error till i got them to fit. Your pattern may differ and/or the amount needed to be trimmed. NOTE if you do the same as i did the right side can be a pain in the but because the is a brace of metal behind hindges to support door. I made the cut right along it between the to braces. also I used the a drill to make entry points in order to use a jigsaw because the dremel blades didn't last RECOMMEND if you have a pnuematic cutting tool use IT in place of both.
8. Make a template of that side and trace and cut to other
9. Now remove your fuel door be sure to place cap back on. Then do a tial fit off your panels. used double sided tape to hold in place

10. Next you need to make the hole for the fuel door fitting. remove lights from panel and place it back on with tape. Reach through the light hole with a small marker work your way around and trace the hole this can be a pain, then cut or you can make all the measurements and hope it works.

will continue...
5. Now figure out your light layout.
6.Trace it and cut it out, test fit lights once perfect, trace to other panel and cut them out and test fit that side.
7. Now the the fun of chopping up your jeep. I did this by trial and error till i got them to fit. Your pattern may differ and/or the amount needed to be trimmed. NOTE if you do the same as i did the right side can be a pain in the but because the is a brace of metal behind hindges to support door. I made the cut right along it between the to braces. also I used the a drill to make entry points in order to use a jigsaw because the dremel blades didn't last RECOMMEND if you have a pnuematic cutting tool use IT in place of both.
8. Make a template of that side and trace and cut to other
9. Now remove your fuel door be sure to place cap back on. Then do a tial fit off your panels. used double sided tape to hold in place
10. Next you need to make the hole for the fuel door fitting. remove lights from panel and place it back on with tape. Reach through the light hole with a small marker work your way around and trace the hole this can be a pain, then cut or you can make all the measurements and hope it works.
will continue...
Thread Starter
JK Newbie
Joined: Feb 2009
Posts: 10
Likes: 0
From: fayetteville, nc
continued

11. This step I skipped at the time to get my jeep legal for driving to work. But next mount panels with tape and make template for top corner to close off the top bend were it 90's. trace and cut out using scraps of metal from earlier and weld in or take them in to be welded as i need to do, because i don't know how to weld. shouldn't cost much. note lights are usually sealed and will not hurt them if you can't get this done right away.NOTE may want to have panels on jeep and have them tac weld it on to insure proper fit then remove and finish welding.


12. Paint them or rhino line
13. Wiring of the lights.... I used male portion of the original light so i could easily disconnect them. cut wires leaving as much wire as possible.
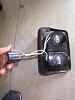
14. Attached wires using wire taps. NOTE im no electrical guerue and had a some ?'s after I wired lights they worked great but the blinkers blinked twice as fast as before don't really know why but they are still working 2 weeks later. If anyone knows why it is doing that let me know thanks?
Here is the diagram that i used.
FACTORY COLORS/NEW LIGHTS COLORS/WHAT IT DOES
1. brake/turn signals
white & yellow/red/brake
white & purple/black/parking
black of male harness/white/ground
2.reverse lights
black/white/ground
white & green/red/reverse

To be continued for the last time...
11. This step I skipped at the time to get my jeep legal for driving to work. But next mount panels with tape and make template for top corner to close off the top bend were it 90's. trace and cut out using scraps of metal from earlier and weld in or take them in to be welded as i need to do, because i don't know how to weld. shouldn't cost much. note lights are usually sealed and will not hurt them if you can't get this done right away.NOTE may want to have panels on jeep and have them tac weld it on to insure proper fit then remove and finish welding.
12. Paint them or rhino line
13. Wiring of the lights.... I used male portion of the original light so i could easily disconnect them. cut wires leaving as much wire as possible.
14. Attached wires using wire taps. NOTE im no electrical guerue and had a some ?'s after I wired lights they worked great but the blinkers blinked twice as fast as before don't really know why but they are still working 2 weeks later. If anyone knows why it is doing that let me know thanks?
Here is the diagram that i used.
FACTORY COLORS/NEW LIGHTS COLORS/WHAT IT DOES
1. brake/turn signals
white & yellow/red/brake
white & purple/black/parking
black of male harness/white/ground
2.reverse lights
black/white/ground
white & green/red/reverse
To be continued for the last time...
Thread Starter
JK Newbie
Joined: Feb 2009
Posts: 10
Likes: 0
From: fayetteville, nc
Rapping it up
Step 15. Figure out how you want to mount them. I drilled pilot holes in the panels i built about 3/4" from the sides of panel spaced evenly and trace to other side minus one on top right side on the small piece over the gate hinge i just used 3m double sided tape there. Then mounted the rest with sheet metal screws. You can rivet in too.

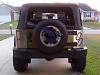
Here are some other pics showing finished product and lighting.
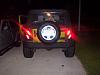
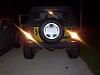
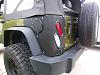
Hoped this write up helped some of you thinking of doing your own panels too.
That is it. Thanks for your feedback.
Step 15. Figure out how you want to mount them. I drilled pilot holes in the panels i built about 3/4" from the sides of panel spaced evenly and trace to other side minus one on top right side on the small piece over the gate hinge i just used 3m double sided tape there. Then mounted the rest with sheet metal screws. You can rivet in too.
Here are some other pics showing finished product and lighting.
Hoped this write up helped some of you thinking of doing your own panels too.
That is it. Thanks for your feedback.


