
Did the 19/60 spring upgrade today. Few pictures.
 08-15-2014, 04:42 PM
#1
JK Newbie
Thread Starter

Join Date: Jul 2014
Location: Blue Springs, MO
Posts: 3
Likes: 0
Received 0 Likes
on
0 Posts
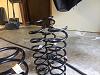
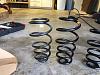
My stock springs on my Willys were 14/56. I found the 19/60s online. About $175 shipped. The two fronts are brand new and the rear set had 100 miles on them. You could probably find a little cheaper if you tried and are patient for them to show up somewhere online. The front set cost twice as much as the rears since I had to buy them new. Couldn't find 19s anywhere.
I netted 1.75" in front and 1.25" in the rear. After install everything is fine. Did a nice long test drive on the highway, bumpy roads, big speed bumps, etc. Everything is good. The steering wheel is still straight, camber looks good along with the toe. Im gonna wait a few days for it to settle then have an alignment shop just do a double check for me.
The install was really easy. Took exactly 2 hours and 15 minutes including cleanup and smoke breaks (need to quit). Did it by myself in my driveway with a floor jack, jack stands, 18mm wrench, 18mm socket, socket extension, 10mm socket, needle nose pliers, and standard wheel removal tools. Pretty sure I didn't miss anything there.
Its super easy.
1) Jack up the jeep. I used the center of each axle.
2) Put jack stands just behind the lower control arm brackets on frame.
3) Remove wheels.
4) Lower axle.
5) Remove bolts holding brake lines in place. (There are two. One on the frame, one next to the shock bracket)
6) Remove lower sway bar link bolt and lower shock bolt on both sides. This is easier if you just lower the axle into full droop. They slide right off and right back in when your done.
7) Lower the axle again until you have enough room to take springs out and put new springs in. (You MIGHT need to jack up the ends of the axles to get the springs in, also a slim chance you might have to remove the track bar bolt on the axle). If doing just the 19/60 springs you should not need to do anything with the track bar. I just pushed down on the axle ends and that gave me enough room to get the new springs in.
**Important** When putting everything back together. DO NOT tighten the sway bar bolts or shock bolts. Put the bolts in, tighten them to where there is still just a smidge of play. Get all the wheels back on and torqued. Lower the jeep on the ground. Push up and down on the front and rear of the jeep. I got in the back and pretty much jumped up and down and did the same on the front bumper. Now get under the jeep and torque the bolts down. Theres PLENTY of room to get down there. Should do this every time you replace anything suspension wise. Could cause damage to bushings/brackets.
This process works with the fronts and rears. Only difference with the rears is removing the parking brake bracket (above the axle pumpkin on the bottom of the jeep, 10mm deep socket) and use a pair of needle nose pliers to pull out the ABS/Speed sensor wiring (pretty sure thats what that wiring is for??). They are just held it with push clips, only need to pull one clip. Also watch the breather line to the axle. It will be a little tight when you get into a far enough droop to remove the rear springs.
Heres some comparison shots of the springs and before & afters of the jeep.
BEFORE
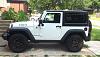
AFTER
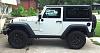
I netted 1.75" in front and 1.25" in the rear. After install everything is fine. Did a nice long test drive on the highway, bumpy roads, big speed bumps, etc. Everything is good. The steering wheel is still straight, camber looks good along with the toe. Im gonna wait a few days for it to settle then have an alignment shop just do a double check for me.
The install was really easy. Took exactly 2 hours and 15 minutes including cleanup and smoke breaks (need to quit). Did it by myself in my driveway with a floor jack, jack stands, 18mm wrench, 18mm socket, socket extension, 10mm socket, needle nose pliers, and standard wheel removal tools. Pretty sure I didn't miss anything there.
Its super easy.
1) Jack up the jeep. I used the center of each axle.
2) Put jack stands just behind the lower control arm brackets on frame.
3) Remove wheels.
4) Lower axle.
5) Remove bolts holding brake lines in place. (There are two. One on the frame, one next to the shock bracket)
6) Remove lower sway bar link bolt and lower shock bolt on both sides. This is easier if you just lower the axle into full droop. They slide right off and right back in when your done.
7) Lower the axle again until you have enough room to take springs out and put new springs in. (You MIGHT need to jack up the ends of the axles to get the springs in, also a slim chance you might have to remove the track bar bolt on the axle). If doing just the 19/60 springs you should not need to do anything with the track bar. I just pushed down on the axle ends and that gave me enough room to get the new springs in.
**Important** When putting everything back together. DO NOT tighten the sway bar bolts or shock bolts. Put the bolts in, tighten them to where there is still just a smidge of play. Get all the wheels back on and torqued. Lower the jeep on the ground. Push up and down on the front and rear of the jeep. I got in the back and pretty much jumped up and down and did the same on the front bumper. Now get under the jeep and torque the bolts down. Theres PLENTY of room to get down there. Should do this every time you replace anything suspension wise. Could cause damage to bushings/brackets.
This process works with the fronts and rears. Only difference with the rears is removing the parking brake bracket (above the axle pumpkin on the bottom of the jeep, 10mm deep socket) and use a pair of needle nose pliers to pull out the ABS/Speed sensor wiring (pretty sure thats what that wiring is for??). They are just held it with push clips, only need to pull one clip. Also watch the breather line to the axle. It will be a little tight when you get into a far enough droop to remove the rear springs.
Heres some comparison shots of the springs and before & afters of the jeep.
BEFORE
AFTER
Last edited by WhiteWillysJK; 08-15-2014 at 05:02 PM.

