jeep build with a super 60/sterling setup

 07-07-2014, 02:58 PM
#122
JK Super Freak
Thread Starter
Ok, mounted all brackets for the rear axle on both frame and axle, thought I factored everything but of course I missed one small detail as I welded everything in.

While all my mounting positions are designed to provide me with near stock handling... I overlooked the minor fact that I have clearance issues at full stuff with my top frame mount. Agh!!!!
The top control arms hits my upper control braket on the frame side close to the alxe. So, need suggestions on how to fix this screw-up! My second major setback.
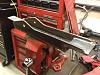
You can see in this slide where my frame mount is stretched across two cross members... The issue that I am having is at full stuff, the control arm is hitting the end of the frame mount close to the axle
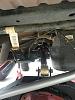
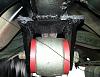
This is the point where the control mount is touching the frame mount. I could cut it back a bit, but not sure that may get me another inch or so of more up travel. I am currently sitting at 2 inches. If that.
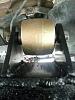
Axle mount bracket... not much room to bring it down
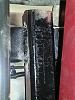
Here is the frame mount brackets... I could cut off these brackets and weld on longer brackets... this will change some of my suspension dynamics, but the easiest to do.
I am open to changing the design all together for the top mount if anyone has any suggestions. I don't want to move the gas tank though. Eventually, I may end up doing that but for now... prefer to keep it where its at.
While all my mounting positions are designed to provide me with near stock handling... I overlooked the minor fact that I have clearance issues at full stuff with my top frame mount. Agh!!!!
The top control arms hits my upper control braket on the frame side close to the alxe. So, need suggestions on how to fix this screw-up! My second major setback.
You can see in this slide where my frame mount is stretched across two cross members... The issue that I am having is at full stuff, the control arm is hitting the end of the frame mount close to the axle
This is the point where the control mount is touching the frame mount. I could cut it back a bit, but not sure that may get me another inch or so of more up travel. I am currently sitting at 2 inches. If that.
Axle mount bracket... not much room to bring it down
Here is the frame mount brackets... I could cut off these brackets and weld on longer brackets... this will change some of my suspension dynamics, but the easiest to do.
I am open to changing the design all together for the top mount if anyone has any suggestions. I don't want to move the gas tank though. Eventually, I may end up doing that but for now... prefer to keep it where its at.
07-08-2014, 05:36 AM
#124
JK Enthusiast
Join Date: Jul 2010
Location: coatesville pa
Posts: 272
Likes: 0
Received 0 Likes
on
0 Posts
Ok, mounted all brackets for the rear axle on both frame and axle, thought I factored everything but of course I missed one small detail as I welded everything in.
While all my mounting positions are designed to provide me with near stock handling... I overlooked the minor fact that I have clearance issues at full stuff with my top frame mount. Agh!!!!
The top control arms hits my upper control braket on the frame side close to the alxe. So, need suggestions on how to fix this screw-up! My second major setback.
You can see in this slide where my frame mount is stretched across two cross members... The issue that I am having is at full stuff, the control arm is hitting the end of the frame mount close to the axle
Attachment 564126
This is the point where the control mount is touching the frame mount. I could cut it back a bit, but not sure that may get me another inch or so of more up travel. I am currently sitting at 2 inches. If that.
Attachment 564127
Axle mount bracket... not much room to bring it down
Attachment 564124
Here is the frame mount brackets... I could cut off these brackets and weld on longer brackets... this will change some of my suspension dynamics, but the easiest to do.
Attachment 564125
I am open to changing the design all together for the top mount if anyone has any suggestions. I don't want to move the gas tank though. Eventually, I may end up doing that but for now... prefer to keep it where its at.
07-08-2014, 05:37 PM
#125
JK Jedi

You can add bump stop to prevent contact when stuffed. I am not being a dick or trying to be mean but your brackets and welding have have a lot to be desired and doubt if they will last any really wheeling. Running a 3 link needs more meat and some gussets on those link mounts or you are going to rip them apart. The poly bushings are going to wear out pretty quick as well. I got about 3 wheeling trips out of synergy poly joints befor they were shot.
I would agree with mounting the driveshaft and doing some flexing with what you have now as you may have clearacne and binding issues with the mounts like you have them.
I would agree with mounting the driveshaft and doing some flexing with what you have now as you may have clearacne and binding issues with the mounts like you have them.
07-08-2014, 05:46 PM
#126
JK Enthusiast
Join Date: Jul 2010
Location: coatesville pa
Posts: 272
Likes: 0
Received 0 Likes
on
0 Posts
Same here Ive destroyed several sets of builder joints and poly joints. Also I have my rear link mounted the same place thats why I suggested checking clearance cause that is in a critical spot for driveshaft stuff at full compression
07-08-2014, 06:30 PM
#127
JK Super Freak
Thread Starter
Thanks and dirtman, while I always appreciate your constructive criticism, I am some what surprised of your general disdain. I always figured that one should help those that try. In the end, I will get it right as I always do... but it is always great to get feedback.
As for my welds... they are ugly, but never had one fail. In fact, they do remain a joke within my circle of friends... but bottom line, they have good penetration and hold up well.
I do plan on adding support to the cross members and if I cant make the 3 link work, I will move the gas tank.
As for my welds... they are ugly, but never had one fail. In fact, they do remain a joke within my circle of friends... but bottom line, they have good penetration and hold up well.
I do plan on adding support to the cross members and if I cant make the 3 link work, I will move the gas tank.
07-08-2014, 06:34 PM
#128
JK Jedi
can you move the cross member brace left or right more? or put on on each side possibly? or maybe y or v out from the rear cross member you used?
Last edited by Maertz; 07-08-2014 at 06:39 PM.
07-08-2014, 07:08 PM
#129
JK Enthusiast
Join Date: Aug 2011
Location: Chardon, OH
Posts: 365
Likes: 0
Received 0 Likes
on
0 Posts
I would cut out that mount completely and build a new one that is more of a C channel to allow for the clearance. Also add some additional gussets.
Here is what I had when I ran a 3 link.
If you don't want to go this path, try notching out the end of your current one and adding some additional plating around it.
Here is what I had when I ran a 3 link.
If you don't want to go this path, try notching out the end of your current one and adding some additional plating around it.
Last edited by Ringer; 07-08-2014 at 07:21 PM.
07-08-2014, 07:14 PM
#130
JK Jedi
