
Ring and pinion contact pattern


Thread Starter
JK Newbie
Joined: Dec 2016
Posts: 4
Likes: 0
From: Atlanta
Hi all. Have done some diffs in some other kinds of vehicles (transaxles) and they went well, but never in a Jeep.
This is a brand new spicer 4:88 (or 4:28, I can't remember which) ring and pinion with an Eaton locker going into an '07 that has a Dana 44.
I'm posting this here because I have never seen this kind of contact pattern before. The drive side looks good to me.... but I wanted to validate that here. The issue is the coast side. It seems fairly well centered from the face to the flank, though the contact is out toward the heel of the ring gear. Normally, you'd fix that by increasing backlash, but I've tried .005 and .008 backlash and it doesn't make any noticeable difference on this.
I've read in a PDF from Dana that you shouldn't worry too much about this so long as your face-flank is centered and backlash measures out correctly, and I've read elsewhere that when checking brand-new gears, the drive side is the most important side. So my consensus here is that I'm good based on the backlash I have now, and based on the pattern I'm seeing on the ring gear. Would you agree?
One add-on question: All the documentation I've been able to find talks about using shims to set the pinion pre-load. This jeep has a crush sleeve for the pinion and I haven't been able to locate a write-up that discusses setting the pinion preload when using the crush sleeve. When I took apart this Jeep, there was just one shim that sits between the yoke and the outer pinion bearing, and below that bearing there was a crush sleeve. I'm guessing the shim I found in there was not really a shim but a thrust sleeve? From the random forum posts I've found when searching, I think I understand that when using a crush sleeve, you don't use shims to set that pinion pre-load - instead you torque the pinion lock nut down, anywhere from 150-250 ft/lbs until the desired pre-load is reached (as tested by an inch/pound gauge, which I do have). Can anyone confirm or correct this please?
Thanks in advance for the help.
Last edited by nibs; Dec 18, 2016 at 08:39 PM.
JK Junkie


Joined: Nov 2011
Posts: 2,199
Likes: 218
From: Over the hill
It's been over 30 years since I set up a Dana, and my shop manual is in the pole barn -- a long cold walk at midnight. So instead I found this long article that addresses your question:
http://www.pirate4x4.com/tech/billavista/Gear_Setup/
Search for "pinion depth" and "pinion-bearing preload" in the above. Also search for "Figure 11", which talks about using the markings on the old and new pinions to calculate the inner pinion shim stack.

http://www.pirate4x4.com/tech/billavista/Gear_Setup/
Search for "pinion depth" and "pinion-bearing preload" in the above. Also search for "Figure 11", which talks about using the markings on the old and new pinions to calculate the inner pinion shim stack.
JK Freak
Joined: Jul 2012
Posts: 710
Likes: 3
From: Lexington Park, MD
Ya regarding the pinion shim and the crush sleeve... yes, there should be a shim that goes between the pinion and the pinion inner bearing. That's how you set pinion depth. The crush sleeve is used as you describe, for bearing preload. But they are two different things and you need both. If you left out the pinion shim, that might be why you aren't getting the correct gear pattern, but it's been 2+ years since I did my gears and my memory is fuzzy. The Pirate writeup is a good one. There's also this one:
https://www.jk-forum.com/forums/jk-w...gearing-82262/
Give those a look and see if maybe you missed a step.
https://www.jk-forum.com/forums/jk-w...gearing-82262/
Give those a look and see if maybe you missed a step.
JK Jedi Master

Joined: Feb 2008
Posts: 12,904
Likes: 185
From: Maine
For those who may not have a good mental picture of the crush sleeve and its function:
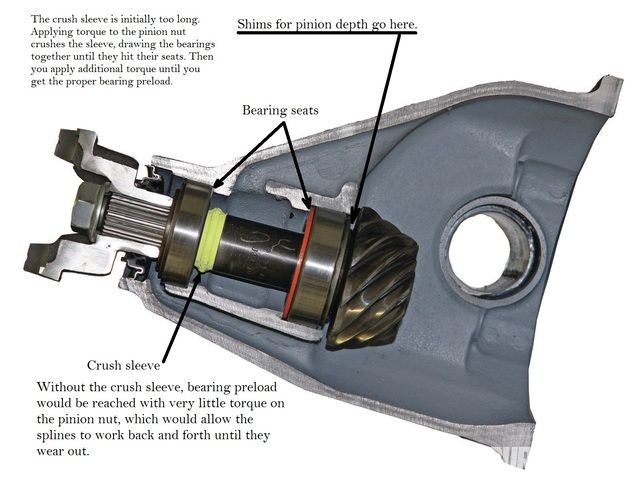
Some pinions use shims for bearing preload rather than a crush sleeve.
With shims, you would assemble and torque the pinion nut to check preload. If not correct, you disassemble to adjust the shims, then reassemble and torque the nut. Repeat until it's correct.
With the crush sleeve, you simply apply torque until the preload is correct.
Last edited by ronjenx; Dec 19, 2016 at 07:32 AM.

JK Enthusiast
Joined: Feb 2013
Posts: 287
Likes: 3
From: Littleton, Colorado
It's been over 30 years since I set up a Dana, and my shop manual is in the pole barn -- a long cold walk at midnight. So instead I found this long article that addresses your question:
http://www.pirate4x4.com/tech/billavista/Gear_Setup/
Search for "pinion depth" and "pinion-bearing preload" in the above. Also search for "Figure 11", which talks about using the markings on the old and new pinions to calculate the inner pinion shim stack.
http://www.pirate4x4.com/tech/billavista/Gear_Setup/
Search for "pinion depth" and "pinion-bearing preload" in the above. Also search for "Figure 11", which talks about using the markings on the old and new pinions to calculate the inner pinion shim stack.
Thread Starter
JK Newbie
Joined: Dec 2016
Posts: 4
Likes: 0
From: Atlanta
Wrapped the rear up yesterday.
I followed the write-ups I came across which suggest removing the old bearings and honing out the inside mating surface of them so they can be re-installed and removed by hand multiple times. Had to buy a couple extra new bearings for this since I was unable to save all the originals when pulling them the first time. One thing mentioned in the write-ups that I didn't like was everyone said, "After you've set the backlash and pinion depth with your setup bearings, install your new bearings and re-check.... *hopefully* everything will still be the same." Yeah, hopefully, but it wasn't. The backlash stayed the same but the pinion depth changed which changed the contact pattern toward the top of the tooth. I see no reason as to how or why this happened and the unfortunate part about it is that you then have to pull the pinion again, pull the bearings back out (probably ruining them in the process unless you have the $300 clam-shell bearing remover tool which may or may not work to save the bearings), and start over again. It is almost like you need to buy a few sets of bearings, knowing you'll scrap a bunch of them in the process which just doesn't make sense to me.
I followed the write-ups I came across which suggest removing the old bearings and honing out the inside mating surface of them so they can be re-installed and removed by hand multiple times. Had to buy a couple extra new bearings for this since I was unable to save all the originals when pulling them the first time. One thing mentioned in the write-ups that I didn't like was everyone said, "After you've set the backlash and pinion depth with your setup bearings, install your new bearings and re-check.... *hopefully* everything will still be the same." Yeah, hopefully, but it wasn't. The backlash stayed the same but the pinion depth changed which changed the contact pattern toward the top of the tooth. I see no reason as to how or why this happened and the unfortunate part about it is that you then have to pull the pinion again, pull the bearings back out (probably ruining them in the process unless you have the $300 clam-shell bearing remover tool which may or may not work to save the bearings), and start over again. It is almost like you need to buy a few sets of bearings, knowing you'll scrap a bunch of them in the process which just doesn't make sense to me.
Trending Topics
JK Freak
Joined: Jul 2012
Posts: 710
Likes: 3
From: Lexington Park, MD
I had the exact same issue. I used setup bearings just as you described and how the threads had recommended. But when I was happy with the contact pattern and reassembled using the "real" bearing, my pattern was way off. Went through a couple bearings because of that. Frustrating for sure and I don't know why I had that issue. In the end, I was "happy enough" with the pattern despite it not being the exact same as when I had done the initial setup with the setup bearings. I can't explain the change. But you aren't alone.
JK Junkie
Joined: Nov 2011
Posts: 2,199
Likes: 218
From: Over the hill
Wrapped the rear up yesterday.
I followed the write-ups I came across which suggest removing the old bearings and honing out the inside mating surface of them so they can be re-installed and removed by hand multiple times. Had to buy a couple extra new bearings for this since I was unable to save all the originals when pulling them the first time. One thing mentioned in the write-ups that I didn't like was everyone said, "After you've set the backlash and pinion depth with your setup bearings, install your new bearings and re-check.... *hopefully* everything will still be the same." Yeah, hopefully, but it wasn't. The backlash stayed the same but the pinion depth changed which changed the contact pattern toward the top of the tooth. I see no reason as to how or why this happened and the unfortunate part about it is that you then have to pull the pinion again, pull the bearings back out (probably ruining them in the process unless you have the $300 clam-shell bearing remover tool which may or may not work to save the bearings), and start over again. It is almost like you need to buy a few sets of bearings, knowing you'll scrap a bunch of them in the process which just doesn't make sense to me.
I followed the write-ups I came across which suggest removing the old bearings and honing out the inside mating surface of them so they can be re-installed and removed by hand multiple times. Had to buy a couple extra new bearings for this since I was unable to save all the originals when pulling them the first time. One thing mentioned in the write-ups that I didn't like was everyone said, "After you've set the backlash and pinion depth with your setup bearings, install your new bearings and re-check.... *hopefully* everything will still be the same." Yeah, hopefully, but it wasn't. The backlash stayed the same but the pinion depth changed which changed the contact pattern toward the top of the tooth. I see no reason as to how or why this happened and the unfortunate part about it is that you then have to pull the pinion again, pull the bearings back out (probably ruining them in the process unless you have the $300 clam-shell bearing remover tool which may or may not work to save the bearings), and start over again. It is almost like you need to buy a few sets of bearings, knowing you'll scrap a bunch of them in the process which just doesn't make sense to me.
Somewhere I've got a set of "dummy" bearings I made on a lathe ~30 years ago, just a bushing with the same dimensions as bearing + race with a slip fit to adjust shims. The slight difference between actual bearing/race and dummy bearing thickness was added/subtracted from the final shimpack. So if anyone has access to a lathe, this is an option.
Thread Starter
JK Newbie
Joined: Dec 2016
Posts: 4
Likes: 0
From: Atlanta
AM
PsychoCupcake: Thank you for taking the time to share your experience! It makes me feel a lot better.
Mr.T: Good input. I did measure the thickness of the new bearings, but not the races, and the bearings seemed to be the same (new to old).
Further complicating this particular install was the fact that this Dana 44 had outboard shims for the differential carrier adjustment, instead of inboard. While that makes it actually a little easier to work with since you don't have to slide bearings on and off for the carrier, none of the rebuild kits come with outboard shims so you have to order them separately and they are not locally available.

