Notices
SoCal If you live in Southern California and would like to meet some of the great JK-Forum members near to you and/or discuss upcoming trail events, this is the forum for you.

So What Was Done to Your Jeep This Week?

Thread Tools
 
Old Dec 21, 2013 | 04:48 PM
  #2591  
H8MUD's Avatar
JK Enthusiast
 
Joined: Sep 2013
Posts: 191
Likes: 0
From: Brick, NJ
Default

Started installing the Synergy steel grab handles but only got the passenger side done. Tomorrow will finish the driver's side and post pics.
Reply
Old Dec 22, 2013 | 12:40 PM
  #2592  
Jeepstin12's Avatar
JK Junkie
 
Joined: Mar 2012
Posts: 2,482
Likes: 1
From: Denver, CO
Default

Added a JCR rear dagger to the Rubi
Attached Thumbnails Click image for larger version

Name:	image-4036751557.jpg
Views:	141
Size:	65.2 KB
ID:	518503   Click image for larger version

Name:	image-1289971674.jpg
Views:	152
Size:	54.6 KB
ID:	518504   Click image for larger version

Name:	image-3009975648.jpg
Views:	139
Size:	58.9 KB
ID:	518505   Click image for larger version

Name:	image-563755904.jpg
Views:	133
Size:	51.1 KB
ID:	518506   Click image for larger version

Name:	image-4286325670.jpg
Views:	144
Size:	51.7 KB
ID:	518507  

Click image for larger version

Name:	image-1124050622.jpg
Views:	146
Size:	50.1 KB
ID:	518508  
Reply
Old Dec 22, 2013 | 01:03 PM
  #2593  
ignatius504's Avatar
JK Enthusiast
 
Joined: Nov 2011
Posts: 195
Likes: 0
From: Harahan, LA.
Default

Originally Posted by Jeepstin12
Added a JCR rear dagger to the Rubi
I've got the same bumper and its great!
Reply
Old Dec 22, 2013 | 01:13 PM
  #2594  
k0260's Avatar
JK Jedi
 
Joined: Dec 2011
Posts: 5,234
Likes: 4
From: Nevada City California
Default

Originally Posted by H8MUD
Started installing the Synergy steel grab handles but only got the passenger side done. Tomorrow will finish the driver's side and post pics.
these work great. For a cleaner appearance, I cut out a large hole in the pillar plastic in stead of cutting a large slot like Synergy suggests. Very stout handles
Click image for larger version

Name:	P1030839.jpg
Views:	719
Size:	77.2 KB
ID:	518513
Reply
Old Dec 22, 2013 | 01:29 PM
  #2595  
Jeepstin12's Avatar
JK Junkie
 
Joined: Mar 2012
Posts: 2,482
Likes: 1
From: Denver, CO
Default

Originally Posted by ignatius504
I've got the same bumper and its great!
pita to install. Holes all needed to be opened up. Yours?
Reply
Old Dec 22, 2013 | 01:56 PM
  #2596  
H8MUD's Avatar
JK Enthusiast
 
Joined: Sep 2013
Posts: 191
Likes: 0
From: Brick, NJ
Default

Originally Posted by k0260
these work great. For a cleaner appearance, I cut out a large hole in the pillar plastic in stead of cutting a large slot like Synergy suggests. Very stout handles
Attachment 518513
I wound up with a slot on the passenger side. Going for a larger hole like you did and see how it comes out. Didn't do the driver's side yet...hoping to finish tomorrow as long as no more family members decide on surprise visits.
Reply
Old Jan 1, 2014 | 02:20 PM
  #2597  
kaptkrappy's Avatar
JK Super Freak
 
Joined: Aug 2011
Posts: 1,220
Likes: 1
From: Punta Gorda, FL.
Default

Originally Posted by brian3033
Bumper refresh and UFOs
Click image for larger version

Name:	End Caps 1.jpg
Views:	385
Size:	89.2 KB
ID:	520514
Hey Brian, what brand of end caps are those ? Never seen them before.

.
Reply
Old Jan 2, 2014 | 04:33 PM
  #2598  
brian3033's Avatar
JK Junkie
 
Joined: Jul 2011
Posts: 2,171
Likes: 0
From: Fenwick Island, Delaware
Default

Originally Posted by choper2009
what bumper ends are those? that looks good!!
. They are made by VDP, same company that makes the stubby conversion. I purchased them from Quadratec for around $90. I added these, the light bar from MBRP and painted the stock bumper appliqué. I like the look and it was pretty cheap to put together... It needed to be. I have a few more dollars behind the grill!

Last edited by brian3033; Jan 2, 2014 at 04:37 PM.
Reply
Old Jan 2, 2014 | 05:28 PM
  #2599  
BRUT4CE's Avatar
Former Member
 
Joined: Aug 2012
Posts: 1,748
Likes: 1
From: Oceanside - san diego, Ca.
Default

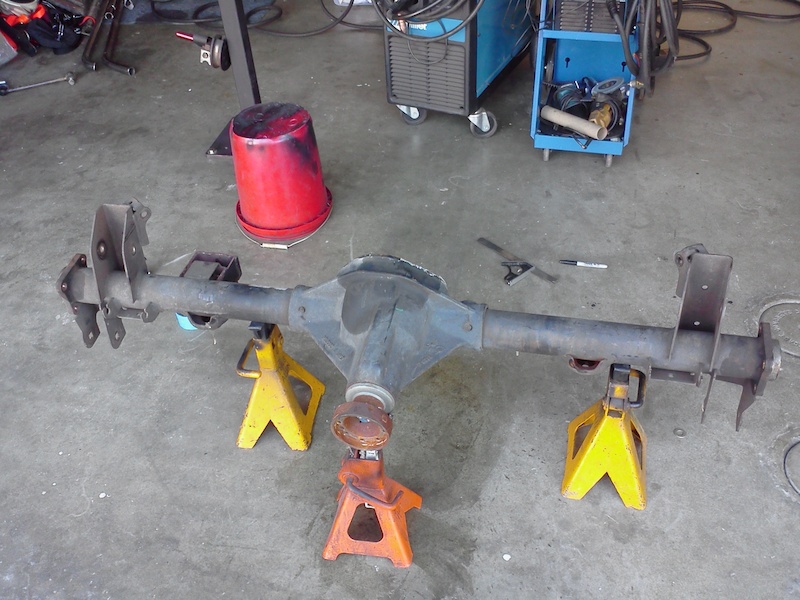
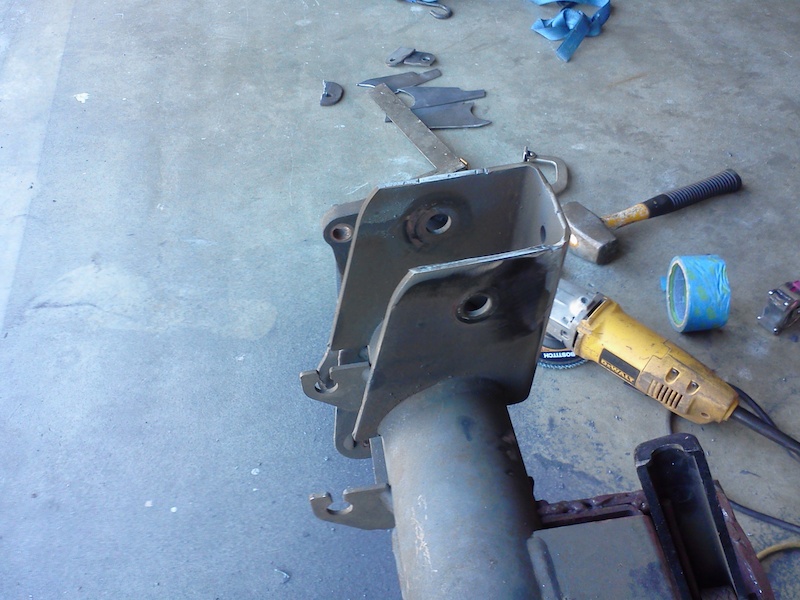
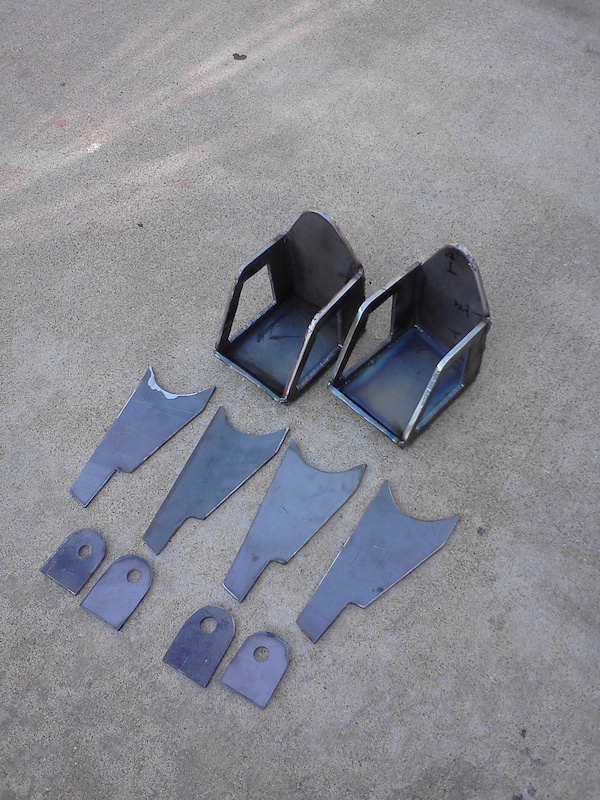
So made some rear lower control arm mount pockets to cut 1.5" off bottom and move shock up while adding a skid.

I can make em with bolt holes but did side cutouts on mine to to go around the bolt and reduce e weight since the rear control arm bracket is still what's welded to axle...
They will be welded both sides of the channels...so inside the cutout gets welded as well...

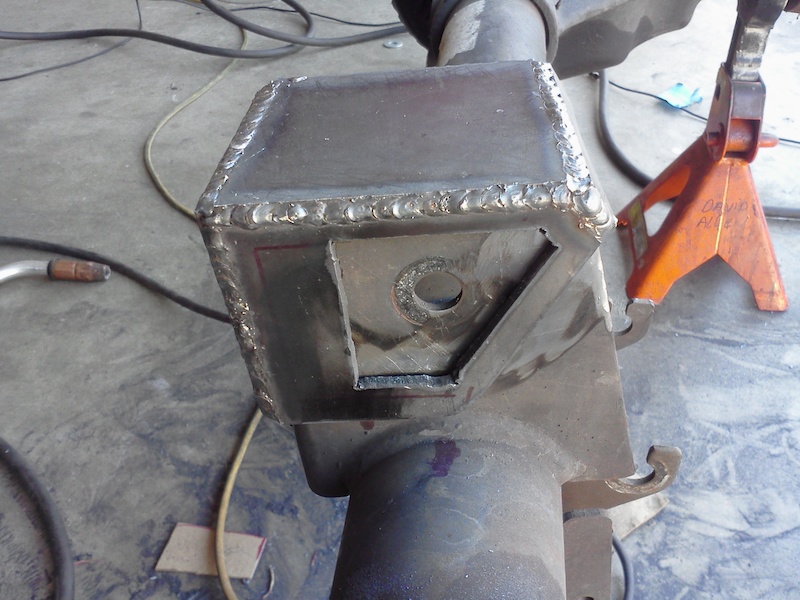
The small cut out parts are for front shock relocation brackets they take shock out 1.5" up 1.3" and rotate the shock end 90*.

So tomorrow is cutting day and all the mounts will be redone and modified...then adjust bumps and go put it on the wall for flex and check. Getting it dialed for the 16th annual superstition run this month...


Have a spare rear axle sitting here so started making stuff on it....


Last edited by BRUT4CE; Jan 2, 2014 at 05:32 PM.
Reply
Old Jan 2, 2014 | 08:57 PM
  #2600  
Jeek.OlllllllO's Avatar
JK Jedi
 
Joined: Feb 2012
Posts: 6,546
Likes: 2
From: Panorama city,Ca
Default

Rubi sway bar with manual disconnect, hard to install because it's so damn heavy lol
Attached Thumbnails Click image for larger version

Name:	image-2331574911.jpg
Views:	168
Size:	33.2 KB
ID:	520824   Click image for larger version

Name:	image-414976056.jpg
Views:	209
Size:	52.3 KB
ID:	520825  
Reply


All times are GMT -8. The time now is 11:47 AM.