Soft top window issues
#11
Super Moderator
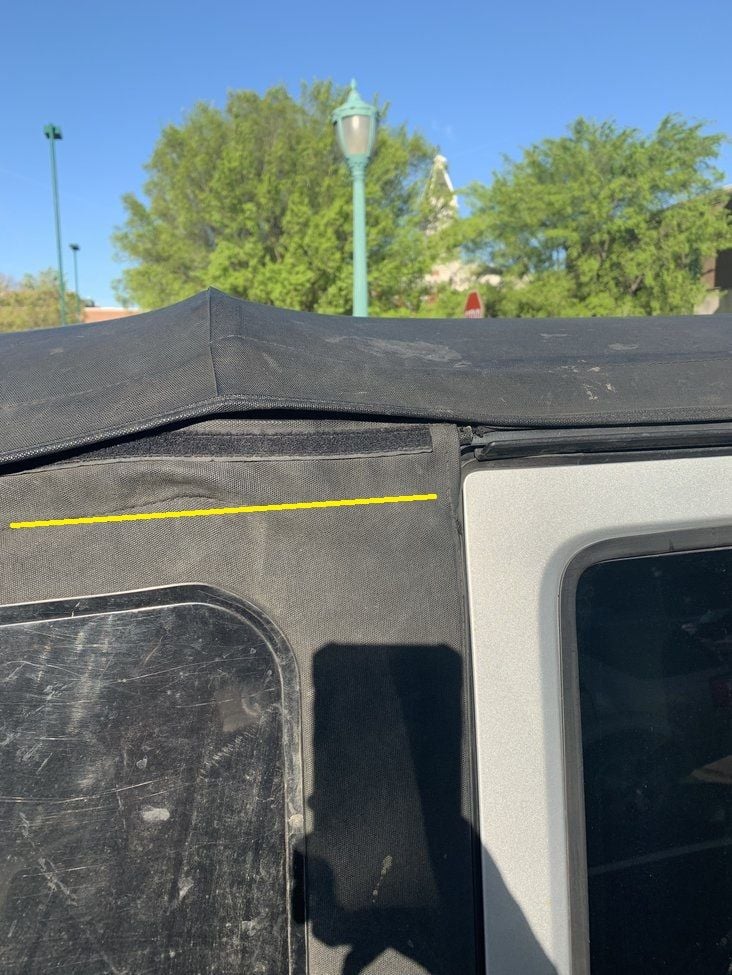
I don't have the spring assisted top, but when I look at the pics it seems that cross member by the window is sitting up too high. I've run into this problem before where the cross member was not properly seated. It has 2 plastic ends where those ends need to fit around the side rail pipes. I've had it where those ends pop up and unseat themselves from the side rails and it cause the cross member to rest on top of the side pipe rails and then it sits up too high and you get a bad fit like shown.
Snap a pic from the inside of how that cross member by the window is seated. I'm willing to bet it's not properly seated where it should be. It's easy to do, I've done it multiple times when I've been in a hurry to put my soft top back up.
Snap a pic from the inside of how that cross member by the window is seated. I'm willing to bet it's not properly seated where it should be. It's easy to do, I've done it multiple times when I've been in a hurry to put my soft top back up.
Last edited by Rednroll; 04-18-2019 at 04:27 AM.
#12
JK Jedi

I don't have the spring assisted top, but when I look at the pics it seems that cross member by the window is sitting up too high. I've run into this problem before where the cross member was not properly seated. It has 2 plastic ends where those ends need to fit around the side rail pipes. I've had it where those ends pop up and unseat themselves from the side rails and it cause the cross member to rest on top of the side pipe rails and then it sits up too high and you get a bad fit like shown.
For OP, here's direct comparison highlighting the window's seam with a yellow line. First pic is OP, second pic is mine -


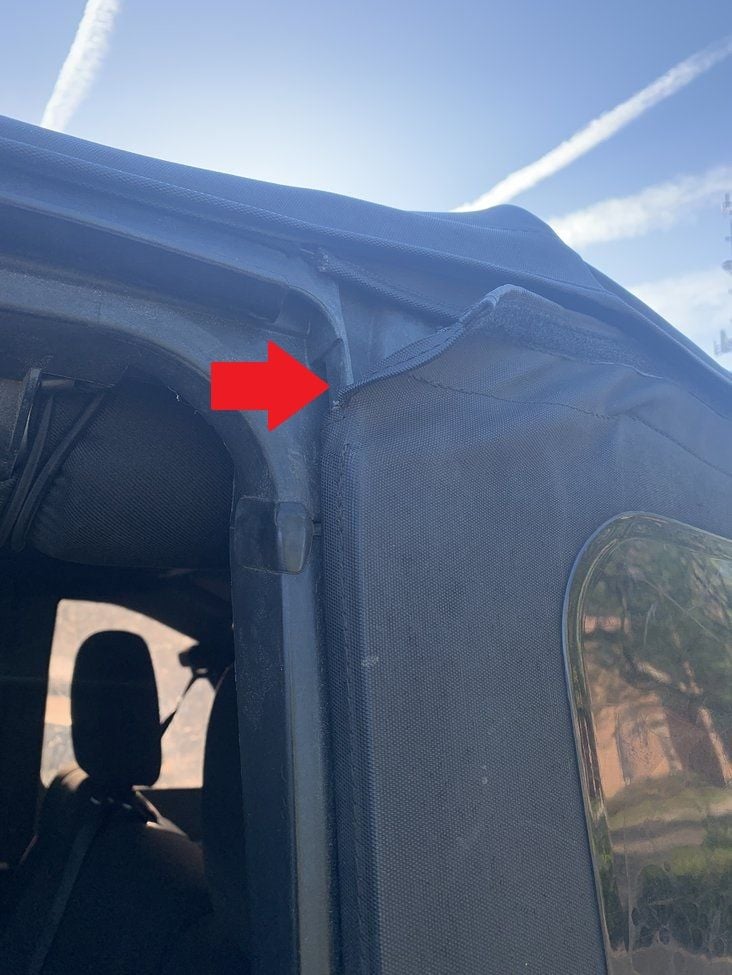
Also, reviewing the original pictures, I just noticed this -

That window should clip in to the door surround all the way to the top of that groove. It's easily an inch short, which again now leads me to believe that is not the proper window for that year of top. I think the top is an '11+, and the side windows are '07 - '10. I've had an '07 top before (what a piece of crap those were), but I can't recall at all if the actual tops came down a little further (off the frame) to mate up with a shorter window. I tend to think they did, cuz those tops had to clip around the entire length of the door surrounds.
If this is indeed the case, it's not the end of the world. Maybe just set some Craigslist alerts or eBay and pick up some cheap used windows if it's problematic. I see them float around my area from time to time. You could then in turn list the current windows out to recoup that cost. If you want, I can take actual measurements of my windows for comparison. I probably should have anyhow, but I typically have sporadic thinking and hadn't considered that until just now (and I'm at work).
#13
Super Moderator
^Good points. When looking at the comparison pics, I still think his cross member bar is sitting on top of the side pipe rails. Where I'm thinking a combo of just sliding that window up further as you pointed out and properly seating that cross member may do the trick. That should close that gap at least 2inches.
See how this section I have circled looks different from yours? That end of the cross member looks like it is slightly protruding under the material in that area and the top is pulled up further in that area than yours. I'm willing to make a bet his cross member is sitting on top of the side rails.

I have a feeling you may be trying to over analyze the problem due to knowing the top came from someone on Craigslist where there's always that chance there could be some mix and match of parts going on. I think there's a much simpler explanation going on where if someone with my experience has made that cross member mistake many times, a 1st time installer could easily overlook it.
I'll also add one of the tricks of the trades we all use from experience which the OP likely hasn't done and that is to make sure you secure the velcro at the top of the window with the roof before securing the bottom. You need to secure the top 1st then you pull the bottom of the window downwards and secure the bottom. It works much better that way since you are now stretching and pulling the top down with the window AND the top of the window is at the proper height within that front of the window grove. It seems to me that he secured that bottom plastic piece 1st then is trying to get that top pulled together, which is much more difficult and will lead to this type of problem.
Here's the order of steps which need to be performed for those windows.
1. Make sure those cross members are seated properly with the side rails on both sides.
2. Zip the window in, (I recommend leaving 10-12 inches unzipped at the bottom this will make step 6 simpler)
3. Tuck the front side into the groove near the door jam.
4. Secure the window at the top with the velcro (This will slide the front side up to the proper height in the side groove, ie the problem Resharp pointed out).
5. Pull the bottom of the window down, stretching and pulling the top with it, and bend the plastic piece at the bottom so the edge is facing towards the Jeep.
6. Push that plastic piece straight on into the bottom metal groove, once you have the edge of the plastic caught on the edge of the metal groove, then push the plastic piece towards the Jeep, so it slides upwards into the metal groove.
7. Re-adjust the front side in the groove if necessary.
8. Re-adjust the top velcro if necessary
9. Finish zipping the (10-12in )rest of the zipper
10. Secure the velcro at the back of the window of the flap that covers the zipper
*And one more tip, make sure you have not secured those front latches near the sun visors before doing any of this. Securing those front latches should always be the last step.
I highly doubt the OP followed those steps in that sequence, since if you've never done it before, you initially realize inserting that plastic piece at the bottom is much easier to do before securing the velcro at the top. If he did any of the steps 1-4 after steps 5&6...that is where the problem is likely occurring. Those cross members will easily pop out if you do step 6, then try to secure the top of the window afterwards since you're having to pull more on that top section which easily knocks that cross member out of place.
If he is able to understand and follows those steps in that order, I'm positive this problem goes away. Of course I'm speaking from personal experience after having witnessed and made the same mistakes to cause this same problem.
See how this section I have circled looks different from yours? That end of the cross member looks like it is slightly protruding under the material in that area and the top is pulled up further in that area than yours. I'm willing to make a bet his cross member is sitting on top of the side rails.
I have a feeling you may be trying to over analyze the problem due to knowing the top came from someone on Craigslist where there's always that chance there could be some mix and match of parts going on. I think there's a much simpler explanation going on where if someone with my experience has made that cross member mistake many times, a 1st time installer could easily overlook it.
I'll also add one of the tricks of the trades we all use from experience which the OP likely hasn't done and that is to make sure you secure the velcro at the top of the window with the roof before securing the bottom. You need to secure the top 1st then you pull the bottom of the window downwards and secure the bottom. It works much better that way since you are now stretching and pulling the top down with the window AND the top of the window is at the proper height within that front of the window grove. It seems to me that he secured that bottom plastic piece 1st then is trying to get that top pulled together, which is much more difficult and will lead to this type of problem.
Here's the order of steps which need to be performed for those windows.
1. Make sure those cross members are seated properly with the side rails on both sides.
2. Zip the window in, (I recommend leaving 10-12 inches unzipped at the bottom this will make step 6 simpler)
3. Tuck the front side into the groove near the door jam.
4. Secure the window at the top with the velcro (This will slide the front side up to the proper height in the side groove, ie the problem Resharp pointed out).
5. Pull the bottom of the window down, stretching and pulling the top with it, and bend the plastic piece at the bottom so the edge is facing towards the Jeep.
6. Push that plastic piece straight on into the bottom metal groove, once you have the edge of the plastic caught on the edge of the metal groove, then push the plastic piece towards the Jeep, so it slides upwards into the metal groove.
7. Re-adjust the front side in the groove if necessary.
8. Re-adjust the top velcro if necessary
9. Finish zipping the (10-12in )rest of the zipper
10. Secure the velcro at the back of the window of the flap that covers the zipper
*And one more tip, make sure you have not secured those front latches near the sun visors before doing any of this. Securing those front latches should always be the last step.
I highly doubt the OP followed those steps in that sequence, since if you've never done it before, you initially realize inserting that plastic piece at the bottom is much easier to do before securing the velcro at the top. If he did any of the steps 1-4 after steps 5&6...that is where the problem is likely occurring. Those cross members will easily pop out if you do step 6, then try to secure the top of the window afterwards since you're having to pull more on that top section which easily knocks that cross member out of place.
If he is able to understand and follows those steps in that order, I'm positive this problem goes away. Of course I'm speaking from personal experience after having witnessed and made the same mistakes to cause this same problem.

Last edited by Rednroll; 04-18-2019 at 08:08 AM.

