KevinMac's Semi-Budget Build...Project Deathstar
 10-19-2014, 05:09 PM
#191
JK Enthusiast
Thread Starter
I spent a majority of Saturday prepping, wiring and installing my new OTRATTW A-pillar switches. I ordered a total of (8), (4) for each side. At current, I don't have most of the hardware installed that the switches will operate but I wanted into install and wire everything at once. This gives you a bit on insight on what I'll be installing in the future, e.g. lockers. 

From a switch standpoint, these things are great. Jim at OTRATTW turned them around in about 3 days. They fit well into the RR A-pillar covers, with some grinding, of course! I reference this thread for all the notes needed on the actual switch installation itself:
https://www.jk-forum.com/forums/jk-e...3/#post3095602
From a wiring perspective, it wasn't too terrible, 5 wires per switch. 2 per can be daisy chained as they are grounds, 2 are the in/out for the item the switch controls and the final wire is the power for the light. I pulled my light power from the dash illumination circuit, it is an orange wire with gray tracer. You can pick this wire up from the door harness or from the power window switch harness. Although I only have 2 position switches and not 3, this is a good thread on the wiring. I borrowed his ideas of making harnesses for easy access, if ever required.
https://www.jk-forum.com/forums/jk-e...-mount-263893/


Here is a shot of the installed harnesses hanging down at the side dash panel for easy access:

Tapped into the dash light circuit:

Final installation:

Final installation - Illuminated:


- Costs:
* Switches - $135
* Misc wiring, weather-pak connectors, shrink tubing - $30

From a switch standpoint, these things are great. Jim at OTRATTW turned them around in about 3 days. They fit well into the RR A-pillar covers, with some grinding, of course!
I reference this thread for all the notes needed on the actual switch installation itself:https://www.jk-forum.com/forums/jk-e...3/#post3095602
From a wiring perspective, it wasn't too terrible, 5 wires per switch. 2 per can be daisy chained as they are grounds, 2 are the in/out for the item the switch controls and the final wire is the power for the light. I pulled my light power from the dash illumination circuit, it is an orange wire with gray tracer. You can pick this wire up from the door harness or from the power window switch harness.
Although I only have 2 position switches and not 3, this is a good thread on the wiring. I borrowed his ideas of making harnesses for easy access, if ever required. https://www.jk-forum.com/forums/jk-e...-mount-263893/


Here is a shot of the installed harnesses hanging down at the side dash panel for easy access:

Tapped into the dash light circuit:

Final installation:

Final installation - Illuminated:


- Costs:
* Switches - $135
* Misc wiring, weather-pak connectors, shrink tubing - $30
Last edited by KevinMac; 10-20-2014 at 03:14 PM.

The following users liked this post:
Alextorello (09-17-2018)
10-20-2014, 08:21 AM
#192
JK Enthusiast
Thread Starter
So when I installed my heated seat kit last winter I wasn't too keen on trying to find a clean wiring solution to the TIPM until Spring. As a quick and dirty, I used a plug-in cigarette lighter adapter to gain power for them. Since then, I've done a good bit of reading and came across 2 threads started by the resident TIPM guru, ronjenx that detail a clean, solution.
The 1st was how to wire a Switchable Power Source from empty TIPM slots from the top: https://www.jk-forum.com/forums/jk-e...source-191552/
The 2nd was how to do it from the bottom, which turned out to be my preference: https://www.jk-forum.com/forums/jk-e...source-189556/
The issue I had with the 2nd installation method was simple. For the life of me, I couldn't find a TIPM connector with the correct terminal to power fuse M8 for the life of me! I combed our local boneyards and NOTHING.
Well, I am happy to report that today I received and installed said lead...from none less than ronjenx himself! He had a single terminal lead left, which was 18 AWG. My seats needed 16 AWG minimum but I was able to cut off the 18 AWG wire and solder on a 16 AWG lead that still fit inside the C6 connector. I admit this was a bit of a pain ass it is a tight fit but I was able to make it cleanly work. A super huge THANK YOU to ronjenx for not only the threads he shared his expertise in but also for coming to my rescue with the lead. 

Lead I needed:
Fuse that I added:

The 1st was how to wire a Switchable Power Source from empty TIPM slots from the top: https://www.jk-forum.com/forums/jk-e...source-191552/
The 2nd was how to do it from the bottom, which turned out to be my preference: https://www.jk-forum.com/forums/jk-e...source-189556/
The issue I had with the 2nd installation method was simple. For the life of me, I couldn't find a TIPM connector with the correct terminal to power fuse M8 for the life of me!
I combed our local boneyards and NOTHING. Well, I am happy to report that today I received and installed said lead...from none less than ronjenx himself!
He had a single terminal lead left, which was 18 AWG. My seats needed 16 AWG minimum but I was able to cut off the 18 AWG wire and solder on a 16 AWG lead that still fit inside the C6 connector. I admit this was a bit of a pain ass it is a tight fit but I was able to make it cleanly work. A super huge THANK YOU to ronjenx for not only the threads he shared his expertise in but also for coming to my rescue with the lead. Lead I needed:
Fuse that I added:
 10-25-2014, 03:43 AM
#193
JK Enthusiast
Thread Starter
A quick addendum on my underhood lighting.
When I did the install I tested all my wiring for function before soldering it all together. When I did this, I tested it without the inline switch. Well, when I put the switch inline, it just dimmed the lights, it didn't turn them off as expected.
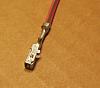
This made me scratch my head quite a bit, as I inspected all my connections thinking maybe I had a loose ground or something. Well, turns out the problem was in the switch itself...there is a resistor bridging the 2 terminals!  I'm not sure how this switch is supposed to function but I knew how I wanted it to function, so I took my needle nose pliers and tore that resistor out!
  putting it back inline, it now functions as intended!!
Here is where the resistor was located:

Also, here is a shot of it installed in the bracket:

When I did the install I tested all my wiring for function before soldering it all together. When I did this, I tested it without the inline switch.
Well, when I put the switch inline, it just dimmed the lights, it didn't turn them off as expected. This made me scratch my head quite a bit, as I inspected all my connections thinking maybe I had a loose ground or something.
Well, turns out the problem was in the switch itself...there is a resistor bridging the 2 terminals! I'm not sure how this switch is supposed to function but I knew how I wanted it to function, so I took my needle nose pliers and tore that resistor out! putting it back inline, it now functions as intended!! Here is where the resistor was located:

Also, here is a shot of it installed in the bracket:
 11-30-2014, 11:52 AM
#194
JK Enthusiast
Thread Starter
I've been slowly starting to collect some parts for upcoming winter projects. I installed all those nice OTRATTW switches...it's about time I get the parts to hook them up to and make them functional!!
Here is a sneak peek preview of what's coming!
I scored this little beauty from Motech out in Las Vegas. They do a bunch of LS1 swaps into Jeeps. The Rubicon cases aren't geared well for the LS's, so they sell them off. I will admit, the cases for autos are quite a bit harder to come by than for the manuals, so if you find one for a good price...jump on it!


Costs - $1315 (included freight)
Last edited by KevinMac; 11-30-2014 at 12:47 PM.
11-30-2014, 12:25 PM
#195
JK Enthusiast
Thread Starter
I had a set of takeoff Rubi axles lined up locally but unfortunately the deal fell through last minute. With a bit of patience though, I'm still working to piece together what I need. I picked this guy up yesterday from a guy in suburban Cincinnati.
It was a great deal, a 0 mile Rubi service axle. It has the 4.10 gearing which is exactly what I wanted with my 35" tires. Hopefully, it will eliminate the hunting between 4th and 5th gear that I expierence.
I'm just looking for a rear axle now and I'm all set to pull it in the garage and tear the drivetrain out of it!


- Cost: $1650!!
With a bit of patience though, I'm still working to piece together what I need. I picked this guy up yesterday from a guy in suburban Cincinnati.It was a great deal, a 0 mile Rubi service axle. It has the 4.10 gearing which is exactly what I wanted with my 35" tires. Hopefully, it will eliminate the hunting between 4th and 5th gear that I expierence.
I'm just looking for a rear axle now and I'm all set to pull it in the garage and tear the drivetrain out of it!


- Cost: $1650!!
11-30-2014, 07:36 PM
#196
JK Enthusiast
Thread Starter
So now that I gave a sneak peek of what my upcoming mods are. Here is a quick list of what I ordered up over this Black Friday/Cyber Monday weekend...I do love a sale!!! 
To compliment my new front Rubi axle, I ordered up the following:
- Ace upper & lower gusset set - $50
- Teraflex lower control arm skids - $12
- Nitro D44 sleeves - $108
They should be here this week. From there, the welding will begin!
To compliment my new front Rubi axle, I ordered up the following:
- Ace upper & lower gusset set - $50
- Teraflex lower control arm skids - $12
- Nitro D44 sleeves - $108
They should be here this week. From there, the welding will begin!
12-02-2014, 05:35 AM
#197
JK Junkie
So now that I gave a sneak peek of what my upcoming mods are. Here is a quick list of what I ordered up over this Black Friday/Cyber Monday weekend...I do love a sale!!!
To compliment my new front Rubi axle, I ordered up the following:
- Ace upper & lower gusset set - $50
- Teraflex lower control arm skids - $12
- Nitro D44 sleeves - $108
They should be here this week. From there, the welding will begin!
To compliment my new front Rubi axle, I ordered up the following:
- Ace upper & lower gusset set - $50
- Teraflex lower control arm skids - $12
- Nitro D44 sleeves - $108
They should be here this week. From there, the welding will begin!
And you'll want the axle under the Jeep to sleeve, which sort of stinks because it is nice to weld off the Jeep. I do have a work around if you want to weld first though. Tested it a week ago on a new crate axle, same as yours.
12-02-2014, 12:28 PM
#199
JK Super Freak
How has the high idle switch been working out for you ... any troubles?
I was pretty sure I remembered reading awhile back (been following your thread) that you got one.
I was pretty sure I remembered reading awhile back (been following your thread) that you got one.
12-09-2014, 04:39 AM
#200
JK Enthusiast
Thread Starter