KevinMac's Semi-Budget Build...Project Deathstar

 01-04-2014, 07:23 AM
#92
JK Newbie

Join Date: Jan 2014
Location: Los Angeles, Ca.
Posts: 7
Likes: 0
Received 0 Likes
on
0 Posts
Knocked this one out after work this evening. Gotta love the Teraflex videos! 
http://youtu.be/jkfLGjzH7Z4 Cost: Freebie!!
http://youtu.be/jkfLGjzH7Z4 Cost: Freebie!!
WOW! That's a real great and simple idea.
01-05-2014, 10:19 AM
#93
JK Enthusiast
Thread Starter
Glad you folks enjoyed! Good info there on the SWR meters. Lots of truck stops down south of the city.
I'm kind of unmotivated this weekend but I did come into possession of a new toy...a Starscan! I was able to power it on but for some reason it would not connect to my ECU. It is running software version 9.05 and I know there is a v9.07 out there. The person who lent it to me will see if they can figure out what the issue is.
It tries to connect for a few minutes and then times out.

It then gives me the option to try to manually tell it my vehicle type but it only lists up to 2010 model year. If anyone out there is a Jeep Tech, I'd love to hear from you!

Since I have a 2013 I just told it I had a 2008 JK. From there I could at least look into my vehicle to see how things are set from the factory, I'm just not able to change the settings. I did find quite a list of DTC's. Most of these are from my installation of the new ATC system.

I'm kind of unmotivated this weekend but I did come into possession of a new toy...a Starscan!
I was able to power it on but for some reason it would not connect to my ECU. It is running software version 9.05 and I know there is a v9.07 out there. The person who lent it to me will see if they can figure out what the issue is. It tries to connect for a few minutes and then times out.

It then gives me the option to try to manually tell it my vehicle type but it only lists up to 2010 model year. If anyone out there is a Jeep Tech, I'd love to hear from you!

Since I have a 2013 I just told it I had a 2008 JK. From there I could at least look into my vehicle to see how things are set from the factory, I'm just not able to change the settings. I did find quite a list of DTC's. Most of these are from my installation of the new ATC system.
 01-14-2014, 02:29 PM
#94
JK Enthusiast
Thread Starter
Parts are slow to arrive and it is driving me nuts!! 
One thing that did come in yesterday was this little beauty that I snatched off of eBay!
Retail for this new is $375...I got it for $100!!
It was as simple as taking the old one out (3 fasteners). Plugging the harness into the body harness and putting those 3 fasteners back in!
A few things to point out though.
1. The upper trim that goes around the back portion of the roll bar is specific. Meaning, the piece that was on mine is different than the one that goes with the subwoofer piece. I will have to buy it separate, it's $16. As best I can tell, the p/n is: 1SK80DX9AE.
2. The power outlet works, the subwoofer does not...yet. I have the base 130 RES with no amp. I have an RHR that should be here tomorrow. Then I will need an amp to tie them together. I will also be shopping for a Lockpick!
3. The cargo area slush mat needs to be trimmed to accommodate the sub. It is already done in the picture below for a nice clean look!

- Costs:
* Subwoofer Panel Assy - $100!
01-16-2014, 04:28 AM
#95
JK Enthusiast
Thread Starter
As I mentioned the other day, I found a takeout RHR on eBay. A dealership in Dallas does some export work and they pull the NAFTA specific head units out and put in the correct head unit for where ever the vehicle is shipping to. The dealer was great to work with, they answered all my questions and really took care of me.
The unit is blue backlit, instead of green. Not what I wanted, but not a show stopper. It is an anti-theft unit and they wiped the radio and linked it to my VIN prior to shipping it to me. Once they shipped it, they called me with the 4 digit PIN. I put the new radio in, typed in the PIN they gave me and WHAMO...the Jeep splash screen came up! The bonus was they also updated my vehicle configuration to include the new radio under my existing facotry warranty...a bit of peace of mind. 
This is the 730n radio so it has all the bells and whistles like Sirius, Navigation, 30GB Hard Drive and integrated uConnect. This was important because my Jeep didn't come with connectivty so I didn't have uConnect or a microphone. I'll be shopping for a microphone in the coming days, I am also going to add an auxilary USB port in the armrest like the OEM solution. There is an unused USB port on the back of the radio to plug in to. Oh yeah, the steering wheel buttons that upgraded a few months ago seem to be working. I happy for that too!
I bought my Jeep back in June so have about 7 months left on my Sirius radio trial. I was able to call Sirius yesterday with the old radio ESN and new radio ESN and they easily switched it over for me. All in all, I'm quite happy with it. With the new sub I got I now just need to get an amp and do some wiring and should have a nice little system, a bit cheaper than what I would have paid for new when I bought it.


- Costs:
* RHR 730n - $860
The unit is blue backlit, instead of green. Not what I wanted, but not a show stopper. It is an anti-theft unit and they wiped the radio and linked it to my VIN prior to shipping it to me. Once they shipped it, they called me with the 4 digit PIN. I put the new radio in, typed in the PIN they gave me and WHAMO...the Jeep splash screen came up!
The bonus was they also updated my vehicle configuration to include the new radio under my existing facotry warranty...a bit of peace of mind. This is the 730n radio so it has all the bells and whistles like Sirius, Navigation, 30GB Hard Drive and integrated uConnect. This was important because my Jeep didn't come with connectivty so I didn't have uConnect or a microphone. I'll be shopping for a microphone in the coming days, I am also going to add an auxilary USB port in the armrest like the OEM solution. There is an unused USB port on the back of the radio to plug in to. Oh yeah, the steering wheel buttons that upgraded a few months ago seem to be working. I happy for that too!
I bought my Jeep back in June so have about 7 months left on my Sirius radio trial. I was able to call Sirius yesterday with the old radio ESN and new radio ESN and they easily switched it over for me. All in all, I'm quite happy with it. With the new sub I got I now just need to get an amp and do some wiring and should have a nice little system, a bit cheaper than what I would have paid for new when I bought it.


- Costs:
* RHR 730n - $860
01-16-2014, 04:32 PM
#96
JK Enthusiast
Thread Starter
5 minute update for a $5 part. To round out the install of the CB, I mounted my Uniden 510xl in the console. I already had a 12v power source in there so it was an easy choice. Plus, I really didn't want it visible in the cabin. The only drawback to that is that the depth of the console isn't quite enough with the stock mic connector. If you look closely, you can see I went to a 90* connector and did a bit of soldering on it. The console lid now clears and the mic cord isn't bound up like it was.

- Costs:
* 90* Connector - $5
- Costs:
* 90* Connector - $5
 01-20-2014, 03:31 PM
#98
JK Enthusiast
Thread Starter
No problem, I'm glad you enjoyed the read!
A couple of quick updates from this long weekend. The big brown buggy brought a couple of boxes for me.
1st off, I got the uConnect iPod integration harness for the new RHR radio. It is basically a male mini-USB connector on one end and an normal female on the other. The male end though has a special clip feature that snaps into the back of the radio, preventing the chance of it falling out. There are a few different harnesses out there and I was only about 80% confident when I ordered the one I did. Luckily, it turned out to be the correct one. If you are in a similar scenario, it is p/n 85512160. After plugging into the head unit and then connecting it to my iPhone 5, it started playing music...very nice!
Next up, is I started work on a recovery bag. With the AEV rear bumper I thought I could get the 7/8" pin D rings but it was about .020" too big for the hole. This forced me into the 3/4 rings which are a bit sloppy. Since they are guaranteed to clank around, I took a quick picture of them and then pulled them back off. Into the bag they went!

I've got the myGIG Microphone on order too and that should be here tomorrow. With any luck, I can test out the Voice Command features on the RHR...fun times!
- Costs:
* 3/4" D Rings - $13ea.
* iPod harness - $36
01-20-2014, 03:41 PM
#99
JK Enthusiast
Thread Starter
Paraphrased from a 12/30/13 post I made in another thread...
So I'm getting older and there are a few creature comforts I'm missing that I've had in other vehicles, includeing ATC. I've done quite a bit of homework on the ATC and feel I have a pretty good handle on it. A bit of background, I have a 2013 JKU Sport S that came with AC, rear defrost and fog lights. On the ATC side, I've found the following 3 threads quite valuable:
Upgrade-climate-controls-auto-ac-heat/
Cabin-air-temperature-sensor-location
Upgrade-heat-c-automatic-temperature-control
mattro, sircody, ATLJeepsTer among others did a great job of breaking down what was needed. In short, I needed the Sun sensor, the cabin temp sensor, the cabin temp sensor connector, some wiring and the HVAC control unit itself.
I've ordered and received the following:
Sun Sensor - 55111275AA (does both auto headlight and sun sensor functions)
Cabin Temp Sensor - 55111178AC
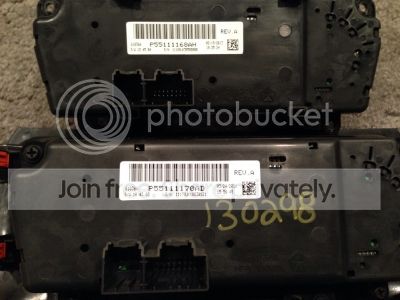
HVAC controller - P55111170AD (takeoff I found on eBay)
Once I got those, for shits and giggles, I tried plugging the cabin temp sensor into the sun sensor connector and it fit! This was important as there is no part number listed for a cabin temp sensor replacement connector. So now I've ordered another sun sensor connector for which a p/n does exist...68080566AA. While I wait for that, I've gotten a bit done on the install
1. The dash is torn apart to allow access to the HVAC controller:

2. I inspected the sun sensor area under the dash. You can see in the next picture there is indeed a harness running up there. Upon closer inspection (2nd photo) you can see the connector plugged onto a dummy clip molded into the underside of the dash. There are only 2 wires in this connector, the ground and the auto headlight wire. I will be adding 2 additional wires for the sun sensor. These will run to pins 9 and 10 of the blue HVAC connector.

3. I removed the dash panel under the steering wheel and inspected the nearby harnesses. As suspected, no loose connector is there as I have a Sport. You can see in this photo though that I did mount the cabin temperature sensor in place.
Once I receive the connector I ordered, I can start wiring this up. Below are the 16 and 4 way connector pin outs for the HVAC connector and Cabin Temp Sensor.
Control-a/c-heater c1 16 way (2012)
Attachment 520062
1
c56 18 db/lb
blower control
2
a417 20 rd (except start stop system)
fused b(+) (i.o.d.)
2
a977 18 rd (start stop system)
b(+)
3
f921 20 pk/yl
fused run relay output
4
z916 22 bk
ground
5
d264 22 wt/or
can interior bus (125k) (-)
6
d265 22 wt/gy
can interior bus (125k) (+)
7
c121 22 db/dg
sensor ground
8
c21 22 db/lg
evaporator temperature sensor signal
9
g39 22 vt/lb
sun sensor 1 signal
10
g139 22 vt/or
sun sensor 2 signal
11
c32 22 db/tn
recirculation door driver (a)
12
c35 22 lb/or
mode door driver
13
c61 22 db/lg
driver blend door driver
14
c34 22 db/lb
common door driver
15
l24 22 wt/vt
auto headlamps signal
16
c36 22 lb/br
blend door feedback signal
SENSOR-IN CAR-TEMPERATURE - BLACK (IP) 4 WAY
Attachment 520061
CAV CIRCUIT FUNCTION
Pin 1
C36 22 LB/BR
BLEND DOOR FEEDBACK SIGNAL
Pin 2
C121 22 DB/DG
SENSOR GROUND
Pin 3
F921 22 PK/YL
FUSED RUN RELAY OUTPUT
Pin 4
Z903 22 BK
GROUND
4. For clarification, here is the blue HVAC connector I referenced to. Notice pins 9, 10 and 16 are currently empty (bottom row).
5. While that's open for discussion, I drilled about a .750 hole in the dash for the sun sensor. It's tough to make a clean hole as the windshield keeps you from getting in there with a drill. I used a 90 degree pneumatic angle grinder with about a 1/4" drill bit in the collet. That made the initial hole. Not having anything larger that would still fit my grinder collet, I put a .685 countersink in there. It made a mess with chips flying all over but I ended up with a hole that the sensor fits snuggly into. Those are the next 2 photos:


6. That is about as far as I got. I did mount and plug into the new HVAC controller unit. It powered up fine and as mattro noted, the rear defrost button blinks with no other function for about 30 seconds. After that, it does begin to function more normally. Manual mode for heat/AC and fan level work fine. The rear defrost works fine too. Obviously, until I wire up the 2 sensors, Automatic mode doesn't work as intended.
So I'm getting older and there are a few creature comforts I'm missing that I've had in other vehicles, includeing ATC. I've done quite a bit of homework on the ATC and feel I have a pretty good handle on it. A bit of background, I have a 2013 JKU Sport S that came with AC, rear defrost and fog lights. On the ATC side, I've found the following 3 threads quite valuable:
Upgrade-climate-controls-auto-ac-heat/
Cabin-air-temperature-sensor-location
Upgrade-heat-c-automatic-temperature-control
mattro, sircody, ATLJeepsTer among others did a great job of breaking down what was needed. In short, I needed the Sun sensor, the cabin temp sensor, the cabin temp sensor connector, some wiring and the HVAC control unit itself.
I've ordered and received the following:
Sun Sensor - 55111275AA (does both auto headlight and sun sensor functions)
Cabin Temp Sensor - 55111178AC
HVAC controller - P55111170AD (takeoff I found on eBay)
Once I got those, for shits and giggles, I tried plugging the cabin temp sensor into the sun sensor connector and it fit! This was important as there is no part number listed for a cabin temp sensor replacement connector. So now I've ordered another sun sensor connector for which a p/n does exist...68080566AA. While I wait for that, I've gotten a bit done on the install
1. The dash is torn apart to allow access to the HVAC controller:


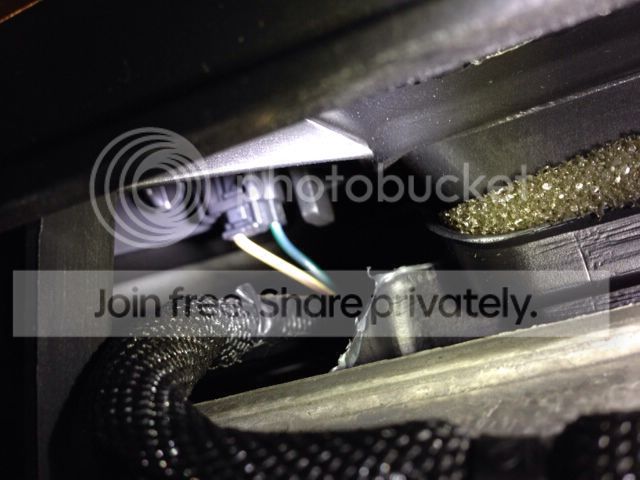
2. I inspected the sun sensor area under the dash. You can see in the next picture there is indeed a harness running up there. Upon closer inspection (2nd photo) you can see the connector plugged onto a dummy clip molded into the underside of the dash. There are only 2 wires in this connector, the ground and the auto headlight wire. I will be adding 2 additional wires for the sun sensor. These will run to pins 9 and 10 of the blue HVAC connector.


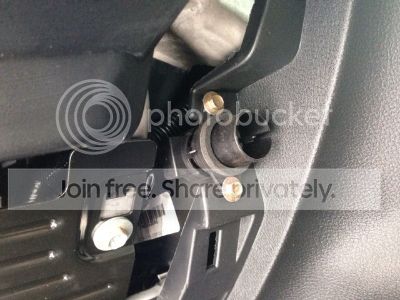
3. I removed the dash panel under the steering wheel and inspected the nearby harnesses. As suspected, no loose connector is there as I have a Sport. You can see in this photo though that I did mount the cabin temperature sensor in place.

Once I receive the connector I ordered, I can start wiring this up. Below are the 16 and 4 way connector pin outs for the HVAC connector and Cabin Temp Sensor.
Control-a/c-heater c1 16 way (2012)
Attachment 520062
1
c56 18 db/lb
blower control
2
a417 20 rd (except start stop system)
fused b(+) (i.o.d.)
2
a977 18 rd (start stop system)
b(+)
3
f921 20 pk/yl
fused run relay output
4
z916 22 bk
ground
5
d264 22 wt/or
can interior bus (125k) (-)
6
d265 22 wt/gy
can interior bus (125k) (+)
7
c121 22 db/dg
sensor ground
8
c21 22 db/lg
evaporator temperature sensor signal
9
g39 22 vt/lb
sun sensor 1 signal
10
g139 22 vt/or
sun sensor 2 signal
11
c32 22 db/tn
recirculation door driver (a)
12
c35 22 lb/or
mode door driver
13
c61 22 db/lg
driver blend door driver
14
c34 22 db/lb
common door driver
15
l24 22 wt/vt
auto headlamps signal
16
c36 22 lb/br
blend door feedback signal
SENSOR-IN CAR-TEMPERATURE - BLACK (IP) 4 WAY
Attachment 520061
CAV CIRCUIT FUNCTION
Pin 1
C36 22 LB/BR
BLEND DOOR FEEDBACK SIGNAL
Pin 2
C121 22 DB/DG
SENSOR GROUND
Pin 3
F921 22 PK/YL
FUSED RUN RELAY OUTPUT
Pin 4
Z903 22 BK
GROUND
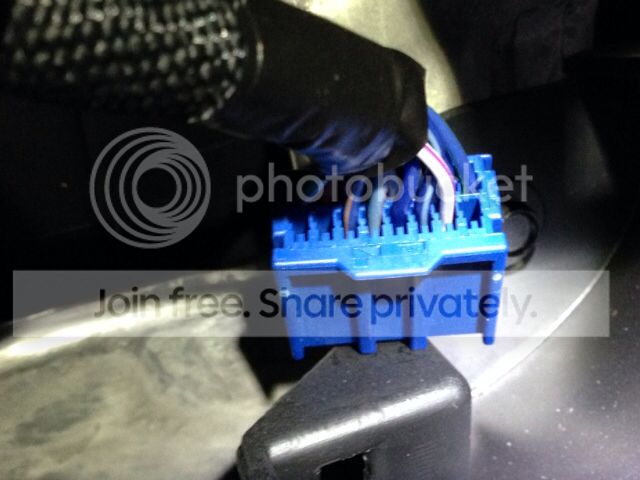
4. For clarification, here is the blue HVAC connector I referenced to. Notice pins 9, 10 and 16 are currently empty (bottom row).

5. While that's open for discussion, I drilled about a .750 hole in the dash for the sun sensor. It's tough to make a clean hole as the windshield keeps you from getting in there with a drill. I used a 90 degree pneumatic angle grinder with about a 1/4" drill bit in the collet. That made the initial hole. Not having anything larger that would still fit my grinder collet, I put a .685 countersink in there. It made a mess with chips flying all over but I ended up with a hole that the sensor fits snuggly into. Those are the next 2 photos:


6. That is about as far as I got. I did mount and plug into the new HVAC controller unit. It powered up fine and as mattro noted, the rear defrost button blinks with no other function for about 30 seconds. After that, it does begin to function more normally. Manual mode for heat/AC and fan level work fine. The rear defrost works fine too. Obviously, until I wire up the 2 sensors, Automatic mode doesn't work as intended.
01-20-2014, 04:11 PM
#100
JK Enthusiast
Thread Starter
So, the 4 way connector I ordered for the Cabin Temperature Sensor has arrived. It did indeed include the terminal leads, splice connectors and shrink tubing.
Then, the last missing piece of the puzzle finally came together! Since the HVAC connector isn't available from MOPAR, I wasn't sure how I was going to get the terminal leads I needed to add to the connector. That is, until I was late night perusing eBay one evening and came across this beauty!!! The exact 16 way connector with about 4" of the harness intact. BUY IT NOW!!!!!!!!!!!!!!!!! The plan is to simply remove the leads from this connector, solder them to the new harnesses I'm making and insert the leads into the HVAC connector.

So, with all the pieces now accounted for, I can start assembly!
On the sun sensor side, I got some 22/4 shielded wire and soldered away. Pins 1 and 4 were already there from the factory.

Pins 2 and 3 need to run the HVAC connector. I am only using two of the leads in the 22/4 wire, green and red. I wired the green wire to Pin 2 and the red wire to Pin 3, these are "Sun Sensor Signal 1 and Sun Sensor Signal 2', respectively. You can't see them in the following photo, but they are soldered, shrunk tubed and then taped for a bit of abrasion resistance. What you can see is the gray shielding zip tied to the factory harness running down toward the HVAC connector.

On the Cabin Temp Sensor side, I used all 4 wires in the 22/4. I soldered the following colors to the pins I assigned them:
Pin 1 - Green
Pin 2 - White
Pin 3 - Red
Pin 4 - Black
The connector, sensor and a bit of the harness are visible in the next photo.

That is it for now, the next step will be to bring all of this together at the HVAC connector! It is supposed to be bitterly cold and I leave for vacation in a few days so I'm not sure I will get to it this week. But, if I can find a few hour window, I will do my best!
- Costs:
* ATC HVAC Control unit - $60
* Sensors - $60
* Green Donor Connector - $20
* Cabin Temp Sensor Connector - $21
* 22/4 wire - $5
Then, the last missing piece of the puzzle finally came together! Since the HVAC connector isn't available from MOPAR, I wasn't sure how I was going to get the terminal leads I needed to add to the connector. That is, until I was late night perusing eBay one evening and came across this beauty!!! The exact 16 way connector with about 4" of the harness intact. BUY IT NOW!!!!!!!!!!!!!!!!!
The plan is to simply remove the leads from this connector, solder them to the new harnesses I'm making and insert the leads into the HVAC connector.
So, with all the pieces now accounted for, I can start assembly!
On the sun sensor side, I got some 22/4 shielded wire and soldered away. Pins 1 and 4 were already there from the factory.

Pins 2 and 3 need to run the HVAC connector. I am only using two of the leads in the 22/4 wire, green and red. I wired the green wire to Pin 2 and the red wire to Pin 3, these are "Sun Sensor Signal 1 and Sun Sensor Signal 2', respectively. You can't see them in the following photo, but they are soldered, shrunk tubed and then taped for a bit of abrasion resistance.
What you can see is the gray shielding zip tied to the factory harness running down toward the HVAC connector.
On the Cabin Temp Sensor side, I used all 4 wires in the 22/4. I soldered the following colors to the pins I assigned them:
Pin 1 - Green
Pin 2 - White
Pin 3 - Red
Pin 4 - Black
The connector, sensor and a bit of the harness are visible in the next photo.

That is it for now, the next step will be to bring all of this together at the HVAC connector! It is supposed to be bitterly cold and I leave for vacation in a few days so I'm not sure I will get to it this week. But, if I can find a few hour window, I will do my best!
- Costs:
* ATC HVAC Control unit - $60
* Sensors - $60
* Green Donor Connector - $20
* Cabin Temp Sensor Connector - $21
* 22/4 wire - $5