Comp cut and streching my 2009 2 door JK and installing the TNT Guardian front bumper
 04-04-2014, 04:09 AM
#1
JK Enthusiast
Thread Starter
Join Date: Apr 2014
Location: Cornelius NC
Posts: 135
Likes: 0
Received 0 Likes
on
0 Posts
I have ordered all of my parts from Rock Krawler and River Raider for the comp cut. I will be posting up pics along the way of the build project. My plan is to stretch the JK a minimum of 8" with the Artec spring perch set I can get another inch with a total of 9" which will put the jeep at 105" wheel base. The rear body armor is coming off and will be for sale and my front bumper if anyone is interested. Let the fun begin!!!!!!!!!
 04-04-2014, 05:37 PM
#2
JK Enthusiast
Thread Starter
Join Date: Apr 2014
Location: Cornelius NC
Posts: 135
Likes: 0
Received 0 Likes
on
0 Posts
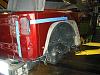
okay I started pulling everything off the jeep today and began to cut the passenger side. I will be posting pictures step by step for the build. the cutting was really easy after I measured and taped out the rear fender, I spoke to river Raider and they gave me ruff measurements to start the cut, and they mentioned my fenders would be shipping by the end of the week. For the stretch I have used Rock Krawlers brackets for the 8 inch kit along with Artecs spring perches to get another inch back. I also will have my control arms next week which are being made out of 7075 aluminum, drilled and threaded for Currie joints. RH thread on the lowers and RH-LH on the upper to adjust pinion angle easy.
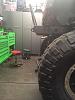
I also had to see how it looked with the tire in the wheel well......lol

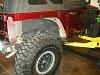
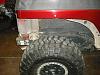
I also had to see how it looked with the tire in the wheel well......lol
04-05-2014, 03:06 AM
#4
JK Enthusiast
Thread Starter
Join Date: Apr 2014
Location: Cornelius NC
Posts: 135
Likes: 0
Received 0 Likes
on
0 Posts
04-06-2014, 01:40 PM
#5
JK Enthusiast
Thread Starter
Join Date: Apr 2014
Location: Cornelius NC
Posts: 135
Likes: 0
Received 0 Likes
on
0 Posts
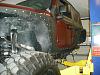
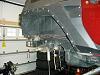
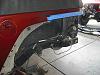
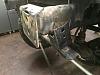
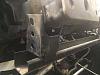
Here are some current pictures of the most recent progress on the comp cut. I will be relocating the current fuel door to the front of the driver tire which looks like it will be pretty simple to install, I did cut off the rear track bar bracket and the bump stop mounts on the passenger side and cleaned the frame up, next will be cleaning up the passenger side.
04-06-2014, 01:51 PM
#6
JK Enthusiast
Thread Starter
Join Date: Apr 2014
Location: Cornelius NC
Posts: 135
Likes: 0
Received 0 Likes
on
0 Posts
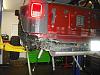
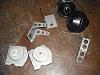
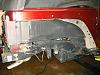
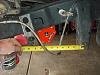
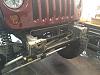
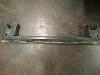
Here are a few pictures of the coil spring relocation from Rock Krawler which makes this a complete bolt in by using a factory cross member which is perfect for the 8" stretch, I will be getting the other inch by using the Artech spring perch mounted on the axle which can be welded in for stock or a 1" stretch.
04-07-2014, 02:55 PM
#7
JK Enthusiast
Thread Starter
Join Date: Apr 2014
Location: Cornelius NC
Posts: 135
Likes: 0
Received 0 Likes
on
0 Posts
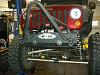
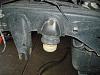
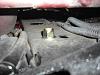
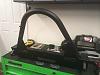
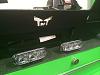
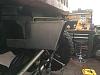
I received the TNT Guardian front bumper today and started the install while I am waiting on my other parts to arrive.
Sent from my iPhone using Tapatalk
Sent from my iPhone using Tapatalk
Last edited by Phatchick; 04-07-2014 at 03:25 PM.
Trending Topics
04-07-2014, 02:58 PM
#8
JK Enthusiast
Thread Starter
Join Date: Apr 2014
Location: Cornelius NC
Posts: 135
Likes: 0
Received 0 Likes
on
0 Posts
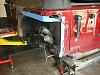
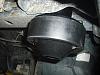
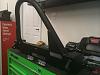
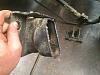
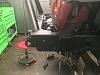
You have to remove your front bumper and sway bar first.
Then you have to remove the crossmember and grind all the areas smooth. Plasma cutter will make short work on this step.
Sent from my iPhone using Tapatalk
Then you have to remove the crossmember and grind all the areas smooth. Plasma cutter will make short work on this step.
Sent from my iPhone using Tapatalk
Last edited by Phatchick; 04-07-2014 at 03:25 PM.
04-07-2014, 03:03 PM
#9
JK Enthusiast
Thread Starter
Join Date: Apr 2014
Location: Cornelius NC
Posts: 135
Likes: 0
Received 0 Likes
on
0 Posts
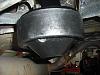
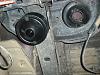
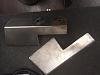
You will then take the templates that come in the kit to mount using your factory sway bar bolts and holes to line everything up. Then mark and cut the frame and clean up all sharp edges with a grinder.
Sent from my iPhone using Tapatalk
Sent from my iPhone using Tapatalk
04-07-2014, 03:07 PM
#10
JK Enthusiast
Thread Starter
Join Date: Apr 2014
Location: Cornelius NC
Posts: 135
Likes: 0
Received 0 Likes
on
0 Posts
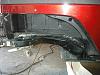
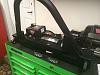
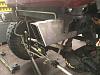
Here is are some test fit pictures with the bumper on the jeep, this is the best approach angle front bumper on the market.
I will post up more info when I continue the installation.
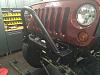
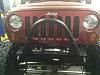
Sent from my iPhone using Tapatalk
I will post up more info when I continue the installation.
Sent from my iPhone using Tapatalk