
Smittybilt XRC Flat Fender/ Body Armor Rear bumper Install w/ Pics
 02-16-2016, 07:16 AM
#1
JK Freak


Thread Starter
The installation of these fenders is pretty straightforward, but since people like play by plays with pictures, I figured I would post one up.
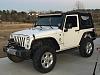
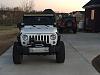
First of all, the fenders are all steel, black powder coated and match my Body Armor rear bumper PERFECTLY. ( I swapped my rear bumper at the same time too) They were packaged well and are well built.
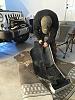
Start off by removing the stock fenders. The directions say there are 5 bolts in the front, but there's actually 6 counting the one on the fender support. Remove the six bolts, unhook the side marker light, and snatch them off. It's loud when you pull them off the jeep, but it's all good.
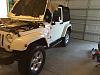
Now that you've got the fronts off, take a minute and clean up the paint where they were. Since I decided to reuse the front inner liner, I also used a pair of vinyl scissors and trimmed them for reinstall. Real easy, just cut strait down along the seam where the fender sticks out. I used a couple oversized washers and reused the bolts to install the liner. on the bottom, we drilled a hole in the pinch seam and zip tied it.
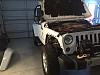
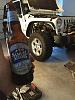
With all that done, the installation of the fender is really easy. First, drink a beer, I recommend Samual Adams. Now, grab you a handful of nuts and bolts and have at it. They line up nice and don't be afraid to tighten them down.
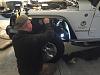
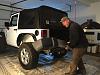
Ok, time for the rears. Super easy. You remove 6 plastic push connectors. Don't try to save them, snatch them out. Then, same as the front, snatch them off. By now, the beer was really good, so we didn't take beer breaks. We drank and worked at the same time. HA!

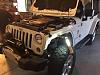
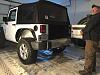
Once you get those off, you install two bolts and 5 self tapping screws and your done. Really easy installation. The big white area in the back I rattle canned. Probably do spray bed liner or reinstall the rear wheel wells if I get bored.
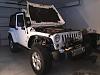
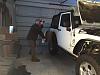
Bumper installation is pretty strait forward. Remove the bumper, remove the tow hook and install the bumper with the provided hardware. Took about 15 minutes. I will say this. With the stock tire carrier and this bumper, you will NOT clear a tire any taller than a 33 without an aftermarket tire carrier or a wheel spacer. I have the Teraflex HD hinge and was planning on upgrading to their tire carrier anyhow when my Spare tire grows up.
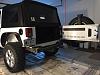
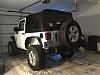
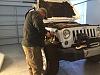
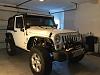
Finished product. Just add 35's. Special thanks to my Buddy Stuart for snapping the pictures and providing a warm place to wrench on the jeep. :
First of all, the fenders are all steel, black powder coated and match my Body Armor rear bumper PERFECTLY. ( I swapped my rear bumper at the same time too) They were packaged well and are well built.
Start off by removing the stock fenders. The directions say there are 5 bolts in the front, but there's actually 6 counting the one on the fender support. Remove the six bolts, unhook the side marker light, and snatch them off. It's loud when you pull them off the jeep, but it's all good.
Now that you've got the fronts off, take a minute and clean up the paint where they were. Since I decided to reuse the front inner liner, I also used a pair of vinyl scissors and trimmed them for reinstall. Real easy, just cut strait down along the seam where the fender sticks out. I used a couple oversized washers and reused the bolts to install the liner. on the bottom, we drilled a hole in the pinch seam and zip tied it.
With all that done, the installation of the fender is really easy. First, drink a beer, I recommend Samual Adams. Now, grab you a handful of nuts and bolts and have at it. They line up nice and don't be afraid to tighten them down.
Ok, time for the rears. Super easy. You remove 6 plastic push connectors. Don't try to save them, snatch them out. Then, same as the front, snatch them off. By now, the beer was really good, so we didn't take beer breaks. We drank and worked at the same time. HA!
Once you get those off, you install two bolts and 5 self tapping screws and your done. Really easy installation. The big white area in the back I rattle canned. Probably do spray bed liner or reinstall the rear wheel wells if I get bored.
Bumper installation is pretty strait forward. Remove the bumper, remove the tow hook and install the bumper with the provided hardware. Took about 15 minutes. I will say this. With the stock tire carrier and this bumper, you will NOT clear a tire any taller than a 33 without an aftermarket tire carrier or a wheel spacer. I have the Teraflex HD hinge and was planning on upgrading to their tire carrier anyhow when my Spare tire grows up.
Finished product. Just add 35's. Special thanks to my Buddy Stuart for snapping the pictures and providing a warm place to wrench on the jeep. :
Last edited by tarpon4me; 02-16-2016 at 07:23 AM.

 02-16-2016, 07:30 AM
#4
JK Freak
Thread Starter
that's about how it went. HAHAHAHAHAH!!!! Thanks again for the help man. Hopefully we will be doing your bumper and winch next weekend.
 02-18-2016, 08:51 AM
#6
JK Freak
Thread Starter