
IPF H4 Headlight Install


Thread Starter
JK Enthusiast
Joined: Nov 2009
Posts: 162
Likes: 0
From: Redmond, WA
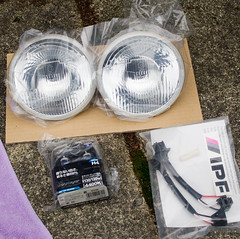
My pre-ordered IPF 920H4 headlight kit came in from Northridge 4x4 today. IPF-920H4 at $170
The kit came with two new light houses, a pair of bulbs, two wiring harness adaptors, a little tube of electrical grease, and a sticker. (click pictures to load Flikr album where you can access larger versions)
Pop out 6 plastic retainers from the top of the front grill. Use a small screwdriver to pop the center out and then you can pull the larger part out.
When the 6 clips are removed, unhook the blinkers (on one side I removed the bulb from the housing, on the other side I removed the wiring harness instead - either way works, depends on how you can get your arm in there which is easier).
The bottom of the grill is held in place with metal wedge clips, all you have to do is pull firmly on the bottom (don't over flex the grill) and they'll pop out.

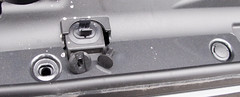
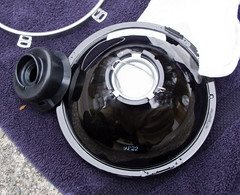
The light housings are held in place by a silver retaining ring, which is held in place with 4 screws.

Remove the ring, and then the housing can be pulled out a little.
Twist the bulb and the housing will come the rest of the way out.
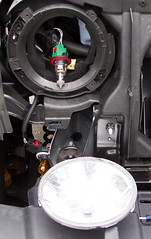
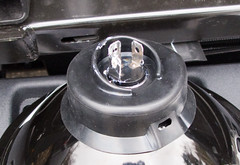
Slide the red safety latch, then press the green latch underneath and the old bulb mount will come off.
Glop some of the grease on there. Put some grease on the other end of the new harness too. (so grease all 4 of the 'female' connectors)
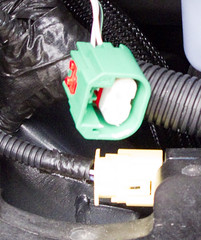
Slide the wiring adaptor in place.
I had to use electrical tape to hold it in place because the clips were not molded in the right spot.

On the new housing, remove the rubber gasket.
Then pull the spring lever to fold it up.
With the lever up you can remove the metal 'plug' covering the bulb hole.
Stick the bulb in, lining up the little prongs so it goes all the way down, then reseat the spring clip.

Push the rubber gasket back on. Takes a little pushing to get it to seat properly all the way around.
Now put everything back on in the reverse order, and be happy that you now aren't in danger of getting killed at night!
Original:

Improved:
The kit came with two new light houses, a pair of bulbs, two wiring harness adaptors, a little tube of electrical grease, and a sticker. (click pictures to load Flikr album where you can access larger versions)
Pop out 6 plastic retainers from the top of the front grill. Use a small screwdriver to pop the center out and then you can pull the larger part out.
When the 6 clips are removed, unhook the blinkers (on one side I removed the bulb from the housing, on the other side I removed the wiring harness instead - either way works, depends on how you can get your arm in there which is easier).
The bottom of the grill is held in place with metal wedge clips, all you have to do is pull firmly on the bottom (don't over flex the grill) and they'll pop out.
The light housings are held in place by a silver retaining ring, which is held in place with 4 screws.
Remove the ring, and then the housing can be pulled out a little.
Twist the bulb and the housing will come the rest of the way out.
Slide the red safety latch, then press the green latch underneath and the old bulb mount will come off.
Glop some of the grease on there. Put some grease on the other end of the new harness too. (so grease all 4 of the 'female' connectors)
Slide the wiring adaptor in place.
I had to use electrical tape to hold it in place because the clips were not molded in the right spot.
On the new housing, remove the rubber gasket.
Then pull the spring lever to fold it up.
With the lever up you can remove the metal 'plug' covering the bulb hole.
Stick the bulb in, lining up the little prongs so it goes all the way down, then reseat the spring clip.
Push the rubber gasket back on. Takes a little pushing to get it to seat properly all the way around.
Now put everything back on in the reverse order, and be happy that you now aren't in danger of getting killed at night!
Original:
Improved:
Last edited by X-caiver; Jan 23, 2010 at 06:54 PM. Reason: two of the steps were flipped around
Thread Starter
JK Enthusiast
Joined: Nov 2009
Posts: 162
Likes: 0
From: Redmond, WA
I'll take a pic of the light tonight. Getting a pic of the stock lights would have meant waiting until tomorrow to install and that wasn't going to happen, ha ha. (besides, everyone knows the stock lights are dim enough to barely qualify as lights  )
)
)
Thread Starter
JK Enthusiast
Joined: Nov 2009
Posts: 162
Likes: 0
From: Redmond, WA
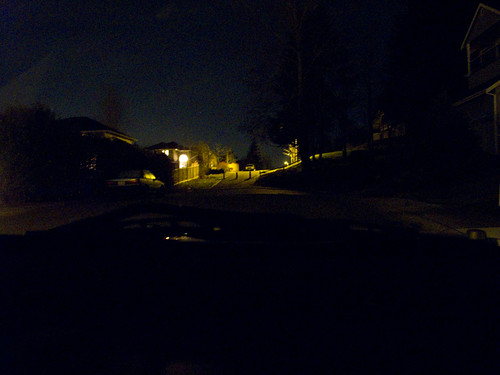
Alright, here are my attempts at taking pictures of the light. I used a Canon G11 set to automatic mode, no exposure compensation, flash off. The camera was set on top of the console above the radio, and the Jeep was parked on a slight hill aiming at another hill. After loading the pics on my computer I did not do any adjustments.
If you go to Flickr you can see the pics twice as large, plus the exif data in case you really want to think about how much light there is.
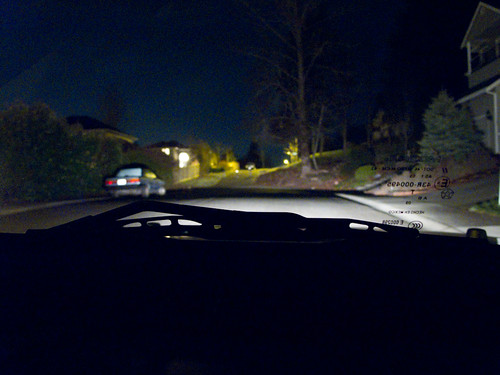
First our neighborhood with the Jeep lights off.
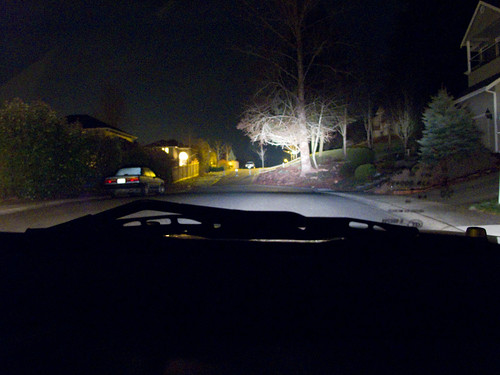
Next I turned the fog lights on.
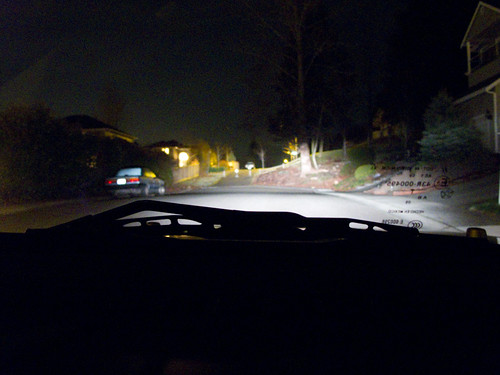
Then I turned the new IPFs on to 'normal'.
Then IPFss at 'normal' + fogs.
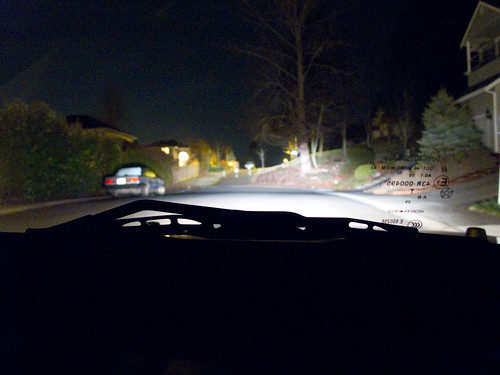
Then the IPFs on 'high'.
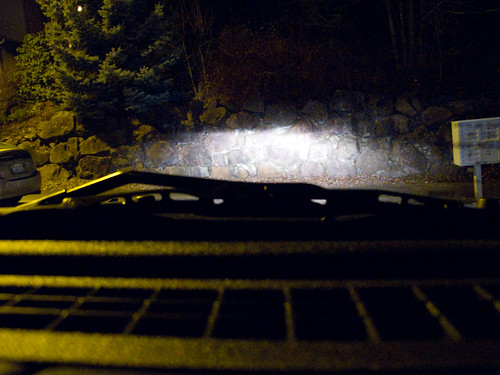
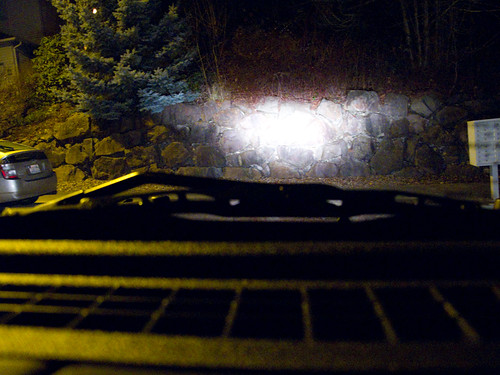
Then I moved the Jeep to be pointing at a rock wall across the street. I backed up until there was like 20 feet or so between the lights and the wall.
Shot the wall with 'normal'.
Shot of the wall with 'high'.
If you go to Flickr you can see the pics twice as large, plus the exif data in case you really want to think about how much light there is.
First our neighborhood with the Jeep lights off.
Next I turned the fog lights on.
Then I turned the new IPFs on to 'normal'.
Then IPFss at 'normal' + fogs.
Then the IPFs on 'high'.
Then I moved the Jeep to be pointing at a rock wall across the street. I backed up until there was like 20 feet or so between the lights and the wall.
Shot the wall with 'normal'.
Shot of the wall with 'high'.
 I've had mine on order since beginning of Jan., can't wait to do this install.

