Bestop Supertop NX
 08-15-2011, 08:21 AM
#11
JK Enthusiast
Thread Starter
Join Date: Nov 2010
Location: Berkshire, Uk
Posts: 245
Likes: 0
Received 0 Likes
on
0 Posts
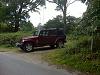
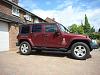
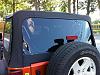
So been running around with this top on for a week or so now.
Overall impressions are good, fits nice, no leaks.
Can run with the sunroof part open at 50mph with little or no noise, even less than the whistle I get from my hardtop.
Did use some old baby socks on the clips when it's open to stop it rattling.
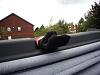
Get a little bit of a ballooning effect when on the motorway at 70mph, if you where on the M25 this Saturday you might have seen it.
Generally getting to put the sunroof down every chance I get,
Do need to find a solution for storing the windows (side and rear) in the back, when the top is down, that keeps them safe.
Also the tail gate bar is a PITA, so need to look at what other options there are for this.
Bestop customer service have replaced the bits that were damaged/missing with no problems/arguments, so big thanks there.
So am I glad I bought it, yes, going to try and keep it on as much as possible as the look is so much better.
Overall impressions are good, fits nice, no leaks.
Can run with the sunroof part open at 50mph with little or no noise, even less than the whistle I get from my hardtop.
Did use some old baby socks on the clips when it's open to stop it rattling.
Get a little bit of a ballooning effect when on the motorway at 70mph, if you where on the M25 this Saturday you might have seen it.
Generally getting to put the sunroof down every chance I get,
Do need to find a solution for storing the windows (side and rear) in the back, when the top is down, that keeps them safe.
Also the tail gate bar is a PITA, so need to look at what other options there are for this.
Bestop customer service have replaced the bits that were damaged/missing with no problems/arguments, so big thanks there.
So am I glad I bought it, yes, going to try and keep it on as much as possible as the look is so much better.
Last edited by Ntgas; 08-15-2011 at 08:23 AM.
 08-15-2011, 09:16 AM
#12
JK Freak
Join Date: Aug 2009
Location: Ann Arbor, MI
Posts: 648
Likes: 0
Received 0 Likes
on
0 Posts
Do need to find a solution for storing the windows (side and rear) in the back, when the top is down, that keeps them safe.
Attachment 196125
The fabric here comes on a bolt doubled up so I had a continuous piece of fabric that was twice as wide as I needed it. I cut it in half length wise. Then I stacked up the two pieces on top of each other and sewed them together across the width at the midpoint. I then folded it at the seam and tacked the corners to make them stronger and make it easier to keep track of where that seam is.
When it is not in use I have it rolled up and secured with four small bungee cords about sixes inches long. When I want to use it I roll it out in the back of the Jeep with the sewed end hanging out the back. I remove the rear window and place it between the bottom "leaf" and the one above it. Then I put the side windows in, each between their own set of leaves. So from top to bottom I have: Jeep floor, felt leaf, rear window, felt leaf, side window, felt leaf, side window, felt leaf. Then starting at the sewed edge I roll up the assembly, quite a bit looser than when it is empty. I then use the same bungee cords to secure it but I hook two together end to end.
You will find that the inner leaves will stick out more than the outer leaf when rolled up. In the rolled up position I trimmed the extra off the inner leaves. It is important not to sew up the sides because you need them to be able to move relative to each other when you roll it up. If you don't know why, take a magazine and mark the edge that is adjacent to the binding with a straight line (far from the binding) then roll it up and see what the line looks like.
Is this clear? I can take some pictures later if you need them.
08-15-2011, 09:25 AM
#13
JK Enthusiast
Thread Starter
Join Date: Nov 2010
Location: Berkshire, Uk
Posts: 245
Likes: 0
Received 0 Likes
on
0 Posts
Originally Posted by bstpierre
What I did for the windows is...
Is this clear? I can take some pictures later if you need them.
Is this for the new NX top?
The side windows on mine seem to have 2 stiff edges at right angles, so what do they look like after they have been rolled up for a few hours?
08-15-2011, 11:27 AM
#14
JK Freak
Join Date: Aug 2008
Location: Aberdeen/Edinburgh/Devon, UK
Posts: 770
Likes: 0
Received 1 Like
on
1 Post
Glad its working for you. My brother is still trying to figure out how to store the windows aswell, they are getting pretty crumpled in the 2dr boot along with a bazooka sub.
I was on the M25 on Sunday, not in the Jeep however. Spent a few days at the Nurburgring in Germany for the old-timer grand prix. So many nice/expensive cars
I was on the M25 on Sunday, not in the Jeep however. Spent a few days at the Nurburgring in Germany for the old-timer grand prix. So many nice/expensive cars
08-15-2011, 11:45 AM
#15
JK Enthusiast
Thread Starter
Join Date: Nov 2010
Location: Berkshire, Uk
Posts: 245
Likes: 0
Received 0 Likes
on
0 Posts
Originally Posted by scotlandjk
pretty crumpled in the 2dr boot along with a bazooka sub.
Spent a few days at the Nurburgring in Germany for the old-timer grand prix. So many nice/expensive cars
08-15-2011, 12:43 PM
#16
JK Freak
Join Date: Aug 2009
Location: Ann Arbor, MI
Posts: 648
Likes: 0
Received 0 Likes
on
0 Posts
I'll take the top down and take some pictures before I head home for the day. I'll post them later.
08-15-2011, 04:13 PM
#17
JK Newbie
Join Date: Dec 2010
Location: Driftwood, TX
Posts: 62
Likes: 0
Received 0 Likes
on
0 Posts
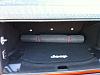
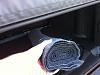
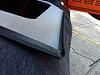
The two retaining clips stay attached to the bed rail on either side of the tailgate, and each has a rearward-facing C-shaped retainer into which either end of the tailgate bar latches. Difficult (for me) to describe succinctly, but fairly straightforward and intuitive upon firsthand inspection. Here are pics of the left end of the tailgate bar, the right retaining clip, and the tailgate bar installed in the right clip:
Here are the part numbers / descriptions from my dealer invoice:
Tailgate bar: 55395757-AC - BAR TAILG 23043020
Right retainer: 55395760-AE - RETAINER 23043020
Left retainer: 55395761-AE - BAR TAILG 23043020
I don't know how pricing works in the UK, but the list price at my dealer was about $111 for all three items. I asked the parts guy (as is my usual practice) "Can you do any better on the pricing?" and got 20% off, so I paid about $89 before tax.
Alternatively, you can find an old / used OEM soft top, and pull the parts from it ...
Last edited by JAustin; 08-15-2011 at 04:17 PM.
08-15-2011, 04:24 PM
#18
JK Freak
Join Date: Aug 2009
Location: Ann Arbor, MI
Posts: 648
Likes: 0
Received 0 Likes
on
0 Posts
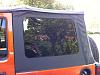
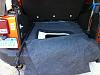
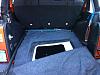
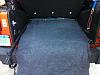
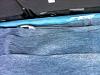
Here are pictures and descriptions of my homemade window roll.
In the US, fabric is typically sold in two yard widths. I think I bought 3 yards of polyester felt. This gave me a piece of fabric 72 inches wide and 108 inches long. I cut it in two so I had two pieces of fabric, each one 36 inches wide and 108 inches long. I placed them on top of each other and sewed the two together at the midpoint and folded it along this thread line. This gave me a stack of fabric 36x54 inches that is four layers thick and they are all attached along one of the short sides.
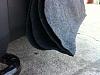
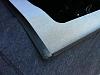
These two pictures show what my top and windows look like. They should look like yours.
This picture shows the roll when it is empty and stowed in the back of the Jeep.
Here is an end shot to show it all rolled up.
This picture shows it unrolled ready to put the windows in. I have the end that is sewn together hanging out the back of the Jeep.
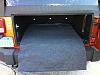
(Continued below)
In the US, fabric is typically sold in two yard widths. I think I bought 3 yards of polyester felt. This gave me a piece of fabric 72 inches wide and 108 inches long. I cut it in two so I had two pieces of fabric, each one 36 inches wide and 108 inches long. I placed them on top of each other and sewed the two together at the midpoint and folded it along this thread line. This gave me a stack of fabric 36x54 inches that is four layers thick and they are all attached along one of the short sides.
These two pictures show what my top and windows look like. They should look like yours.
This picture shows the roll when it is empty and stowed in the back of the Jeep.
Here is an end shot to show it all rolled up.
This picture shows it unrolled ready to put the windows in. I have the end that is sewn together hanging out the back of the Jeep.
(Continued below)
Last edited by bstpierre; 08-15-2011 at 05:03 PM.
08-15-2011, 05:07 PM
#19
JK Freak
Join Date: Aug 2009
Location: Ann Arbor, MI
Posts: 648
Likes: 0
Received 0 Likes
on
0 Posts
(Continued from above)
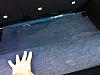
Here is a detail picture of the end that is sewn together. Notice the sides are not sewn.
I fold the top three layers back so it is ready to put the rear window in.
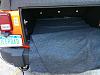
Here is the rear window in position.
Here are a couple of pictures of the side window. The leading edge has a rigid angle that inserts in the door surround. This piece will be parallel and adjacent to the sewn end of the window roll.
The plastic piece of the window that hooks under the lip on the body is flat and will be rolled up.
(Continued below)
Here is a detail picture of the end that is sewn together. Notice the sides are not sewn.
I fold the top three layers back so it is ready to put the rear window in.
Here is the rear window in position.
Here are a couple of pictures of the side window. The leading edge has a rigid angle that inserts in the door surround. This piece will be parallel and adjacent to the sewn end of the window roll.
The plastic piece of the window that hooks under the lip on the body is flat and will be rolled up.
(Continued below)
08-15-2011, 05:12 PM
#20
JK Freak
Join Date: Aug 2009
Location: Ann Arbor, MI
Posts: 648
Likes: 0
Received 0 Likes
on
0 Posts
(Continued from above)
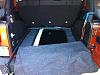
Here is the left window in place between the 2nd and 3rd layer.
Here is the right window in place between the 3rd and 4th (final) layer.
Below the windows are completely covered and ready to be rolled.
Below is a picture showing how I have the inner layers cut shorter so there is just one raw edge exposed when it is rolled up.
Below it is half rolled up.
(Continued below)