So where have you been mounting the CB's?

 05-12-2012, 05:09 PM
#183
The L braces should be on the outside of the 3/8" clamp (not sandwiched in them) on this picture for a much tighter fit.
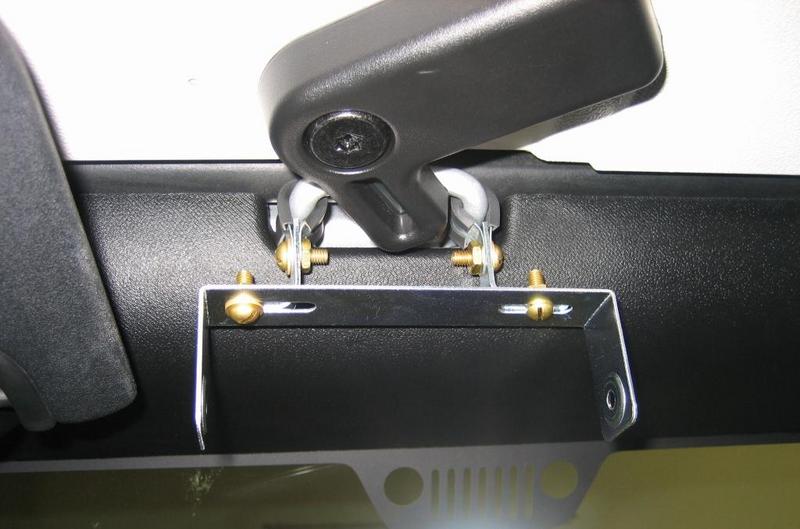
This is before the top plastic part was put back on
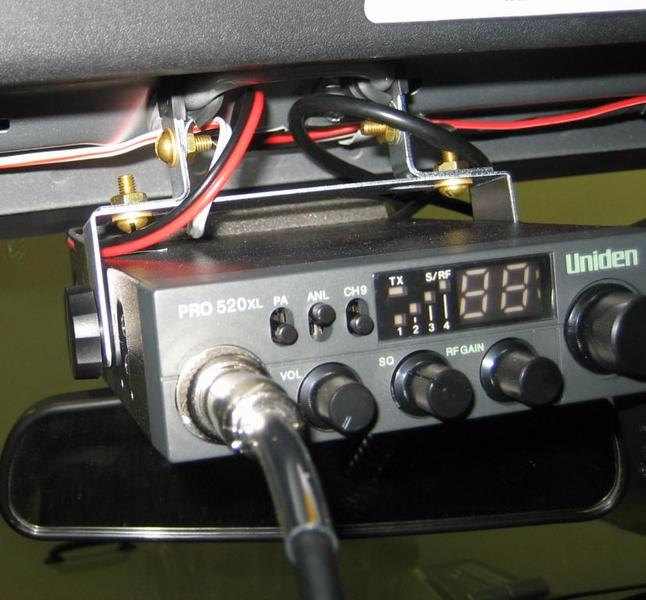
When the mic is clipped in the cord will stay put up there. It doesn't at all get in the way of your rear view. With the cord dangling it isn't really all that bad anyways. Also notice how the speaker is located on the bottom like most CB's. With it up there it's giving you the best sound out of the factory speaker. Another plus is that your passenger can easily get to it if your busy.

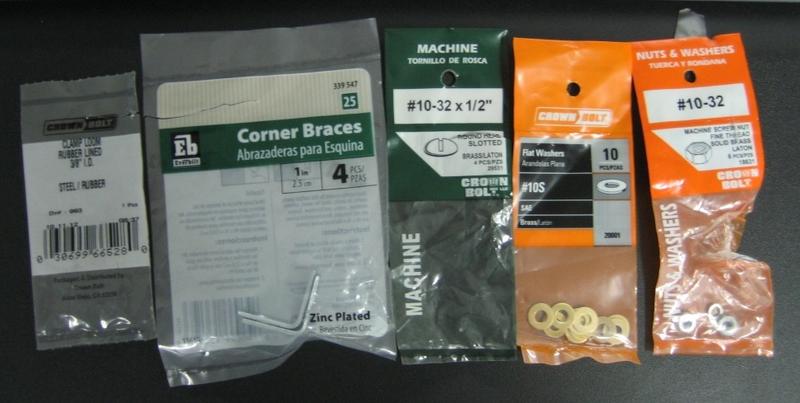
This mount will work with the new 2011/2012 hardtop that uses the footman loop. I copied this idea from someone who copied the idea. I got everything that I needed to do this mount for a Uniden 520 at Home Depot for about $10. This should work with almost any CB if it is not too deep. It works with the 2012 hardtop. It leaves the back of the radio about 2" to the windshield. I might have to get a right angle adapter for the antenna cable.
The insulated clamps are in a box in the nuts and bolts row. 3/8" is the size you want. It is best to put the L brase on the outside of the clamp instead of being sandwiched in there. It will give you a much tighter fit and won't scratch the paint.
The 1" corner brace was in the row with hinges and gate locks. It is the perfect size. You can also put one or both of the L braces facing in to move the mount or get it to work better.
I had some 1/2" size 10 bolts lying around so I used them. As a bonus they are brass so they will not rust. You need 4 of them and washers and nuts. They were the right size to fit very snug through the corner brace.
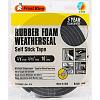
I put a strip of "rubber foam weather seal" right on the top back of the radio where it touches the windshield panel. It is the stuff you can put around your doors at home to stop drafts. I forgot to take a picture of it. I think it will remove any noise or abrasion to the panel.
I did a write up of how I ran the wire and grounded the mount here -->https://www.jk-forum.com/forums/jk-w...2012-a-231369/
This is before the top plastic part was put back on
When the mic is clipped in the cord will stay put up there. It doesn't at all get in the way of your rear view. With the cord dangling it isn't really all that bad anyways. Also notice how the speaker is located on the bottom like most CB's. With it up there it's giving you the best sound out of the factory speaker. Another plus is that your passenger can easily get to it if your busy.
This mount will work with the new 2011/2012 hardtop that uses the footman loop. I copied this idea from someone who copied the idea. I got everything that I needed to do this mount for a Uniden 520 at Home Depot for about $10. This should work with almost any CB if it is not too deep. It works with the 2012 hardtop. It leaves the back of the radio about 2" to the windshield. I might have to get a right angle adapter for the antenna cable.
The insulated clamps are in a box in the nuts and bolts row. 3/8" is the size you want. It is best to put the L brase on the outside of the clamp instead of being sandwiched in there. It will give you a much tighter fit and won't scratch the paint.
The 1" corner brace was in the row with hinges and gate locks. It is the perfect size. You can also put one or both of the L braces facing in to move the mount or get it to work better.
I had some 1/2" size 10 bolts lying around so I used them. As a bonus they are brass so they will not rust. You need 4 of them and washers and nuts. They were the right size to fit very snug through the corner brace.
I put a strip of "rubber foam weather seal" right on the top back of the radio where it touches the windshield panel. It is the stuff you can put around your doors at home to stop drafts. I forgot to take a picture of it. I think it will remove any noise or abrasion to the panel.
I did a write up of how I ran the wire and grounded the mount here -->https://www.jk-forum.com/forums/jk-w...2012-a-231369/
Last edited by Rooster76; 09-07-2012 at 06:08 PM.
05-15-2012, 05:00 PM
#186
JK Newbie
Join Date: Apr 2011
Location: Laredo,Texas
Posts: 86
Likes: 0
Received 0 Likes
on
0 Posts
Nice setup guys, I just picked up what seems to be a cobra 19. Its all black smaller sized radio. Hopefully I can mount it before the weekend. It has a hole in the back for the external speaker, if I get a simple Jack for example the ones that go from your phone to the AUX port in your radio, it should be able to be heard threw the factory radio speakers right?? ...
05-15-2012, 08:49 PM
#187
Nice setup guys, I just picked up what seems to be a cobra 19. Its all black smaller sized radio. Hopefully I can mount it before the weekend. It has a hole in the back for the external speaker, if I get a simple Jack for example the ones that go from your phone to the AUX port in your radio, it should be able to be heard threw the factory radio speakers right?? ...
This question probably deserves its own thread
I have not done it personally but it has been done. You need a 3.5mm (or they are called 1/8") male to male connection. It is better if you can find a mono to stereo one to hear it through both speakers. I'm pretty sure that the stereo plugs get 2 black bands on them and the mono only get one.
I'm not sure how safe it is to your stereo / aux port being that the external speaker gets 7 watts of power sent to it by the radio. I would guess a normal Ipod sends way less than that. If I was to do this I think I would make sure I switched over to the Aux mode with the volume way down, then adjust it up.
joe002 did this with his midland you can see it here -->https://www.jk-forum.com/forums/jk-c...7/#post2174594

Last edited by Rooster76; 05-15-2012 at 08:52 PM.
05-22-2012, 05:06 AM
#189
JK Newbie

Join Date: Aug 2011
Location: Muncy Valley, PA
Posts: 6
Likes: 0
Received 0 Likes
on
0 Posts
I installed my CB in my JK a bit different, I wanted to stay away from drilling any holes in the interior.
I started by purchasing a �� square Aluminum tube 6�-0� long and Aluminum flat stock 1� wide x 1/8� thick, length to suit.
I cut the tube 44� long and attached ears on both sides of the tube with the flat stock.
The door surrounds on all Jk�s are attached with knobs.
Mine being a 2 door there are 2 knobs per side, one in the front and one in the back.
I choose the knobs in the front for my tube support.
I drilled a hole in each ear and used the knobs to hold it down.
Painted it black and mounted my CB to it. Close to the center of the jack loop.
I believe JK�s with a hard top have the same knobs for the door surrounds, once the top panels are removed.
I then went to the web and proceeded with this install.
Project-JK.com - Jeep JK Wrangler Resource � Affordable Jeep JK Wrangler CB Radio SolutionMidland Model-1001Z
I routed my coaxial cable until I came to the sub and wanted to find a way to hide the cable.
Google: JK sub removal
http://www.*******s.com/forum/showthread.php?t=70499
After I got around the sub I continued back to the project �jk .com write up.
You can use Aluminum or steel that�s your option.
Result no holes installation!