Remove Sub Box to Ground and Run Antenna Coax - 2DR 2012
 05-10-2012, 12:21 AM
#1
JK Enthusiast
Thread Starter
To Remove the Sub Woofer
There is 3 bolts and 2 pressure points and one wiring harness
There is 3 bolts and 2 pressure points and one wiring harness
- Lift and remove Plastic around Seat Belt
- Remove small quarter panel plastic piece by tugging and wiggling it off
- Remove the bolt that is now visible - 10mm
- Remove the jack lid and plastic tray so nothing will be in the way for it to slide out
- Remove the 2 torque bolts that have tie downs - size 20
- Lift the sub up and off where you removed the nut by the seat belt
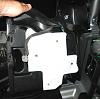
- You have to slide the box out to get it by the gate door and it has a couple of pressure points that might require just a bit of encouragement to release. You can see them in this picture. They look like silver nipples. One is below the seat belt mid way up, and the other is by the gate sort of high up.
- There is a grey plastic wire harness that you need to disconnect by pushing the tab to release it. You can remove the sub about 6" before you need to remove it.
- Now you can put it off to the side
 05-10-2012, 12:22 AM
#2
JK Enthusiast
Thread Starter
Not the greatest photos but that is what the back of the box looks like
I would also check out this thread for more pictures and advice
LINK-> https://www.jk-forum.com/forums/jk-w...012-jk-228098/
I would also check out this thread for more pictures and advice
LINK-> https://www.jk-forum.com/forums/jk-w...012-jk-228098/
Last edited by Rooster76; 09-05-2012 at 05:26 PM.
05-10-2012, 01:06 AM
#3
JK Enthusiast
Thread Starter
This really isn't the ideal place to mount a CB antenna. The antenna mounted here slightly touches the stock Rubicon tire. A better option would be to buy or fabricate something like the Arizona Rocky Road mount that is above the tire. My garage door is just a bit too low for that.
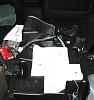
I ran the 18' of coax up roll cage. You can see how I did it on the first picture of the first post.
The gate plastic piece comes off by pulling up from the bottom. There are about 5 or so pressure clamps (bottom) on there and 5 retaining slide in points(on the top). You rotate it sort of 90 degrees and then it comes out. You can see A bit of it in the second picture.
I ran the coax through the rubber grommet on the left of the tire carrier. It just pulls out. It helps to have a flat head screw driver to get it back in.
When you ground a CB antenna it is best to run a wire from the mount and not directly to the antenna. It's my understanding that this helps eliminate ground loops. You need bare metal to ground to. Painted parts will not ground. I was originally going to ground to one of the sub tie down bolts and grinded the paint off. Then I tested the continuity to one of the bolts by the gate latch and found no resistance and chose that spot.
It is good to have a multimeter to test if there is continuity. You can pick a multimeter up for under $20 at most hardware stores/ car stores. I got one at Menards for under $10. I had to put a battery in mine to get it to work. You set it to the Ohm setting. There should be 0 resistance from the negative terminal of the battery to the mount after your done. You can check to see if it is working by sticking the probes together. There are also other test you can do like the picture shows below to make sure there a no shorts in your mount.
It is a good idea if your going to ground under a bolt like this to either use a solder-less circle clamp or to twist the wire a couple of times. If you just put a wire in there when you tighten the wire, it will tend to squeeze out. You get bonus points for soldering the tip and adding a heat shrink. I took off some paint on the bottom of the bolt and lightly grinded off some of the paint off the inner threads of the bolt. Pretty much excessive, but I figured I had the time to do it right.
When your grounding stuff you want the biggest wire and shortest distance possible. I used a AWG-12 which if memory serves me was the smallest gauge that Firestik (antenna manufacture) recommended. The smaller the number the larger the wire. It is also a good idea to get the stranded stuff. I added about 6" to the length of the ground wire in case I wanted to move the mount later or messed up somehow. You can hide any extra in the gate hole.
Last edited by Rooster76; 05-10-2012 at 01:49 AM.
05-10-2012, 01:38 AM
#4
JK Enthusiast
Thread Starter
This is before the plastic part was put back onto the windshield
This mount will work with the new 2011/2012 hardtop that uses the footman loop. I copied this idea from someone who copied the idea(LINK-> So where have you been mounting the CB's? ). I got everything that I needed to do this mount for a Uniden 520 at Home Depot for about $10. This should work with almost any CB if it is not too deep. It works with the 2012 hardtop. It leaves the back of the radio about 2" to the windshield. I might have to get a right angle adapter for the antenna cable.
The insulated clamps are in a box in the nuts and bolts row. 3/8" is the size you want. It is best to put the L brase on the outside of the clamp instead of being sandwiched in there. It will give you a much tighter fit and won't scratch the paint.
The 1" corner brace was in the row with hinges and gate locks. It is the perfect size. You can also put one or both of the L braces facing in to move the mount or get it to work better.
I had some 1/2" size 10 bolts lying around so I used them. As a bonus they are brass so they will not rust. You need 4 of them and washers and nuts. They were the right size to fit very snug through the corner brace.
I put a strip of "rubber foam weather seal" right on the top back of the radio where it touches the windshield panel. It is the stuff you can put around your doors at home to stop drafts. I forgot to take a picture of it. I think it will remove an noise or abrasion to the panel.
Last edited by Rooster76; 09-07-2012 at 06:11 PM.
 Is your CB big in length? I'm just wondering if I'll be able to mount my Cobra 29LX the same way
 05-31-2012, 06:27 PM
#6
JK Enthusiast
Thread Starter
I think it will be really tight. I have about 3" from the back of mine to the windshield. That being said where there is a will there is a way.
The uniden 520 has dimensions of 4-1/2" W x 6-3/4" D x 1-3/8" H
the cobra 29 has dimensions of 7.25" W x 9.25" D x 2.25" H
I put a 90 degree connector from Radio Shack on the back of my radio for the coax so it wouldn't bend against the window. After it was mounted i realized that I probably didn't need it with the small PL-259 connector of the Firestick Firering coax. I wouldn't doubt you would need to run one of these.
Radio Shack
PL-259 Inline Right-Angle Adapter
Model: 278-199 | Catalog #: 278-199

You might have to drill a hole in the supplied mount to put the L brackets on? I have seen the L braces faced inwards or both going the same direction if you need to modify where it sits.
FlameRedJK just used zip ties on his footman mount. You might try that to see how you'll like it and if it will fit. I did this myself before I got all my parts.
Good Luck,
Last edited by Rooster76; 05-31-2012 at 06:31 PM.
Trending Topics
06-03-2012, 02:17 PM
#8
JK Enthusiast
Thread Starter
 Here are a few pics:
04-27-2013, 01:40 AM
Here are a few pics:
04-27-2013, 01:40 AM
#10
JK Enthusiast
Thread Starter