


Adding accessories (I love making stuff) - part 1

Thread Starter
JK Enthusiast
Joined: Mar 2011
Posts: 292
Likes: 1
From: Toronto, Ontario
 Adding accessories (I love making stuff) - part 1
I'm putting some electrical accessories in the Jeep and the wiring is proving to be somewhat complex. I just need to take my time and be patient.
I have 4 custom made switches from OTRATTW and VisionX windshield lights, Tantrum LEDs for rock lights, 2 100w lights for reverse (auto mode and manual) and I'm planning to add LEDs for footwell lighting.
I'm having a hard time find space in the 2011 JK to put the fuses and relays, but I will figure something out.
I'd like to use this thread to chronicle the various activities required to put this all together.
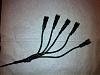
Below is the first step: The ground wires for the lights in the switches. All hand soldered and heat shrunk by me.
Tomorrow, I think I will work in getting the switches to fit in the A pillar switch pod.
I have 4 custom made switches from OTRATTW and VisionX windshield lights, Tantrum LEDs for rock lights, 2 100w lights for reverse (auto mode and manual) and I'm planning to add LEDs for footwell lighting.
I'm having a hard time find space in the 2011 JK to put the fuses and relays, but I will figure something out.
I'd like to use this thread to chronicle the various activities required to put this all together.
Below is the first step: The ground wires for the lights in the switches. All hand soldered and heat shrunk by me.
Tomorrow, I think I will work in getting the switches to fit in the A pillar switch pod.
JK Junkie
Joined: Nov 2008
Posts: 3,297
Likes: 8
From: Cabot, Ar.
Below is the first step: The ground wires for the lights in the switches. All hand soldered and heat shrunk by me.
Tomorrow, I think I will work in getting the switches to fit in the A pillar switch pod.
Attachment 336675
Tomorrow, I think I will work in getting the switches to fit in the A pillar switch pod.
Attachment 336675

Thread Starter
JK Enthusiast
Joined: Mar 2011
Posts: 292
Likes: 1
From: Toronto, Ontario
Originally Posted by JK-Ford
Not bad. But if I may? I would suggest using a "dasy chain" method for this procedure. This method makes a more reliable connection. And it looks better too.
Cheers.
JK Enthusiast
Joined: Apr 2012
Posts: 316
Likes: 0
From: Little rock, Arkansas
I am doing the same thing adding lights and a few other things to my 2010. I found a nice little place to put a 6 fuse fuse block and 5 relays mounted on a broad. If u take out the glove box and look down right where the glove box hinges theres a space where u can put it. If u need a pic I can get one later to day. I built a switch panel be hind the gear shifter. If u need more info let me know.
Thread Starter
JK Enthusiast
Joined: Mar 2011
Posts: 292
Likes: 1
From: Toronto, Ontario
Originally Posted by Rbzak
I am doing the same thing adding lights and a few other things to my 2010. I found a nice little place to put a 6 fuse fuse block and 5 relays mounted on a broad. If u take out the glove box and look down right where the glove box hinges theres a space where u can put it. If u need a pic I can get one later to day. I built a switch panel be hind the gear shifter. If u need more info let me know.
Thread Starter
JK Enthusiast
Joined: Mar 2011
Posts: 292
Likes: 1
From: Toronto, Ontario
Part 2 - I cut out the slots in the A-pillar pod for the switches.
It seems that many people are sanding down the sides of their switches to make them fit. I couldn't bring myself to do it, the switches are just too good looking.
Since I didn't already cut the pod, I decided to make my own cuts slightly offset from the stock markings.
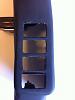
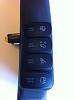
It seems that many people are sanding down the sides of their switches to make them fit. I couldn't bring myself to do it, the switches are just too good looking.
Since I didn't already cut the pod, I decided to make my own cuts slightly offset from the stock markings.
JK Junkie
Joined: Nov 2008
Posts: 3,297
Likes: 8
From: Cabot, Ar.
I am doing the same thing adding lights and a few other things to my 2010. I found a nice little place to put a 6 fuse fuse block and 5 relays mounted on a broad. If u take out the glove box and look down right where the glove box hinges theres a space where u can put it. If u need a pic I can get one later to day. I built a switch panel be hind the gear shifter. If u need more info let me know.
Trending Topics
JK Enthusiast
Joined: Apr 2012
Posts: 316
Likes: 0
From: Little rock, Arkansas
Originally Posted by JK-Ford
I'm not knocking your work. But it doesn't really make any sence "electrically" to install control devices inside the cab to control equipment outside the cab. This only lengthens the power distribution cables and complicates the wireing.
JK Enthusiast
Joined: Apr 2012
Posts: 316
Likes: 0
From: Little rock, Arkansas
Originally Posted by JK-Ford
I'm not knocking your work. But it doesn't really make any sence "electrically" to install control devices inside the cab to control equipment outside the cab. This only lengthens the power distribution cables and complicates the wireing.
JK Enthusiast
Joined: Apr 2012
Posts: 316
Likes: 0
From: Little rock, Arkansas
Originally Posted by CBrNoMore
I'm putting some electrical accessories in the Jeep and the wiring is proving to be somewhat complex. I just need to take my time and be patient.
I have 4 custom made switches from OTRATTW and VisionX windshield lights, Tantrum LEDs for rock lights, 2 100w lights for reverse (auto mode and manual) and I'm planning to add LEDs for footwell lighting.
I'm having a hard time find space in the 2011 JK to put the fuses and relays, but I will figure something out.
I'd like to use this thread to chronicle the various activities required to put this all together.
Below is the first step: The ground wires for the lights in the switches. All hand soldered and heat shrunk by me.
Tomorrow, I think I will work in getting the switches to fit in the A pillar switch pod.
<img src="https://www.jk-forum.com/forums/attachment.php?attachmentid=336675"/>
I have 4 custom made switches from OTRATTW and VisionX windshield lights, Tantrum LEDs for rock lights, 2 100w lights for reverse (auto mode and manual) and I'm planning to add LEDs for footwell lighting.
I'm having a hard time find space in the 2011 JK to put the fuses and relays, but I will figure something out.
I'd like to use this thread to chronicle the various activities required to put this all together.
Below is the first step: The ground wires for the lights in the switches. All hand soldered and heat shrunk by me.
Tomorrow, I think I will work in getting the switches to fit in the A pillar switch pod.
<img src="https://www.jk-forum.com/forums/attachment.php?attachmentid=336675"/>

