
Aftermarket lighting wiring path

Thread Starter
JK Enthusiast
Joined: Jul 2012
Posts: 261
Likes: 2
From: Ohio
I'm about to add some lights to my bumper. I don't have factory fog lights; so I purchased a simple aftermarket lighting cabling kit that includes wire, relay and LED switch that uses adhesive to stick anywhere I want it. It's rated for far higher wattage than the lights I'll be using, so I'm safe there. So, my question is: Does anyone know the best wiring path from bumper to power to the driver-side under-dashboard area? An explanation would be great, but pictures are welcome, too!
JK Freak
Joined: Mar 2012
Posts: 519
Likes: 0
From: ABQ
We just did the same to my fathers Jeep. Just a note - we did also cover the entire length of the wires from bumper to dash with shrink tubing and that exposed with wire loom, maybe paranoid.
The path we used is:
- zip tied to bumper support
- Looking head on at the jeep, ran wires up under air filter box to battery power.
- From battery, we ran the wires across the back of firewall along factory harness (covered this section with wire loom)
- Pull off side panel of drivers side dash and you will see a small hole filled with foam, this is where we ran the wires through with a piece of wire ( Wires through this portion were covered with two shrink tubes.
- now just run the wires to were you want the switch and hook it up.
JK Enthusiast
Joined: Dec 2013
Posts: 419
Likes: 1
From: Ottawa, Canada
We just did the same to my fathers Jeep. Just a note - we did also cover the entire length of the wires from bumper to dash with shrink tubing and that exposed with wire loom, maybe paranoid.
The path we used is:
- zip tied to bumper support
- Looking head on at the jeep, ran wires up under air filter box to battery power.
- From battery, we ran the wires across the back of firewall along factory harness (covered this section with wire loom)
- Pull off side panel of drivers side dash and you will see a small hole filled with foam, this is where we ran the wires through with a piece of wire ( Wires through this portion were covered with two shrink tubes.
- now just run the wires to were you want the switch and hook it up.
The path we used is:
- zip tied to bumper support
- Looking head on at the jeep, ran wires up under air filter box to battery power.
- From battery, we ran the wires across the back of firewall along factory harness (covered this section with wire loom)
- Pull off side panel of drivers side dash and you will see a small hole filled with foam, this is where we ran the wires through with a piece of wire ( Wires through this portion were covered with two shrink tubes.
- now just run the wires to were you want the switch and hook it up.
Same here, but the firewall hole is accessible from under the dash, so the dash part removal is not necessary, if you don't mind diving under there. then you run the wiring towards the center console. Until I install a switch pod, I stuck the led switch on the side of the console.

JK Freak
Joined: Jan 2009
Posts: 845
Likes: 3
From: Scituate, MA
Take your time and plan it out. The foam access from engine compartment to the interior can be seen from the engine side of the firewall. Use a coat hanger to punch a hole through it and drag the wires into the left upper dash area. Once you have the wire length you need you can re-seal the foam hole with anything. Putty, foam insulation, silicone sealant...or nothing.
JK Jedi Master


Joined: Mar 2007
Posts: 14,800
Likes: 374
From: Midwest City, OK
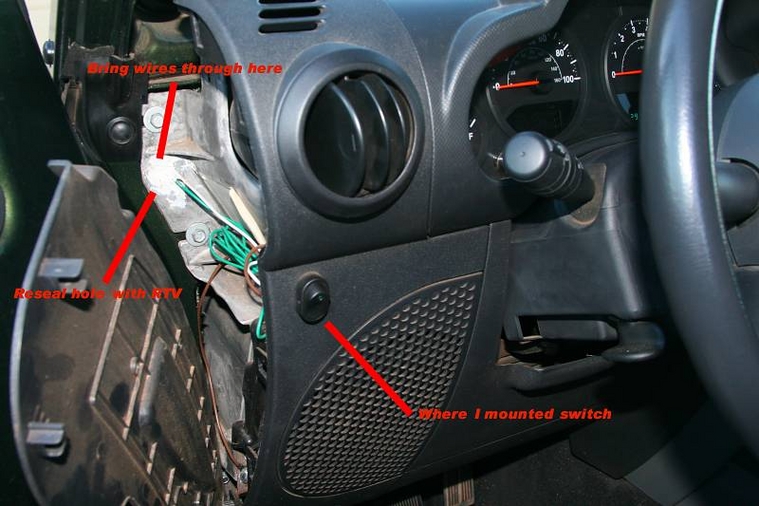
There are a couple different ways into the cabin from the engine compartment, depending on whether you have an auto or manual tranny. However, this one is common to both. This one cannot be seen from the engine compartment, nor from under the dash. It is, however, the easiest to use once the side panel is removed. This applies to all years of JK, and to both sides of the compartment (driver or passenger) ...

JK Enthusiast
Joined: May 2014
Posts: 142
Likes: 0
Where can you pick up power from the dash lights so the rocker switch will illuminate when lights are turned on? And also do most people wire directly to the battery or from the high beams. I am installing a led bar on my front bumper. Thanks
JK Freak
Joined: Mar 2008
Posts: 563
Likes: 1
From: Hopedale, MA
Ok so I used to own a car shop... we installed all kinds of things. We also specialized in custom wiring. Here are a few tricks for you:
Put the 2 wires in a drill like this, tie wrap the other end to something to hold them and spin the together like this:


Once you have the wire twisted together you can run it though braided sleeve or corrugated tubing:

You can run from the bumper up and along the engine bay support like this:


You can run it around the engine bay just tie wrapped to the existing corrugated wire loom:


Then like listed above run it through the foamed hole:


You get a ignition source either from the dash off the column
Then just wire up the switch as directed.
Last edited by darkknight1999; Sep 14, 2014 at 05:12 PM.
Trending Topics
JK Jedi Master
Joined: Mar 2007
Posts: 14,800
Likes: 374
From: Midwest City, OK
Spectro Wire and Cable: Expandable-Sleeving
I also use some of this stuff where near high heat, or when I'm replacing loom over existing wiring and don't want to have to tear into the wiring to do so (this is split down the middle, so you can just push it over the wiring ...
Spectro Wire and Cable: Roundit 2000
They do sell their products by the foot, which you'll especially appreciate if you need some of that Roundit!
Along with shrinkwrap at the loom ends to keep it from fraying, you can create a neat electrical install ...
JK Jedi Master
Joined: Mar 2007
Posts: 14,800
Likes: 374
From: Midwest City, OK
This is a great tip. I would caution that you're going to add quite a bit to the length of the wire run. On some installs that may be problematic unless the wire size is increased--on anything that draws lots of current. For example, a set of KC Daylighters would be brighter if the wire for them was minimum run/maximum size. Also, a refrigerator doesn't draw much current (about 1-1/2 amps typically), but they are very voltage sensitive, shutting down usually in the low 11s to save the battery for starting the vehicle. A long run to the back of the Jeep causes quite a bit of voltage drop, which is why the fridge manufacturers recommend 12 GA wire or so. Minimize voltage drop, maximize the time the fridge will run off the battery alone.