
Lug Hole Lights

Thread Starter
JK Newbie
Joined: Dec 2012
Posts: 50
Likes: 0
From: Eugene, Oregon
Finally decided to get off my back-side and build a set of lug lights. A few weeks ago I grabbed a set of mini round LED truck/trialer lights from from superbrightleds. This wasn't the cheapest place to get them but even so the total project price was under 20.00. They were red 3/4" rounds with a sealed pigtail coming out the back. I have ordered stuff from them in the past and since this was the first set that I had built I wasn't to concerned. I have a 1013 JKU with factory wheels and these lights appear to fit perfect. I have an after market rear bumper w/carrier that has holes matching the lug holes so the wire has a path through the wheel/carrier.  Things needed: 2 - Lights 4 - Female crimp style quick connectors fully insulated 4 - Male crimp style quick connectors fully insulated 2 - Non-insulated butt connectors (I used blue insulated and cut the insulated part off) 10' - Red #16 wire (I used MTW) 10' - Black #16 wire (I used MTW) 1' - 1/4" heat shrink with glue Braided sleeve or split loom Basic electrical tools: cutters, stripers, crimpers, heatgun My first set was to test the lights and for that I used an old computer PSU that I have converted over for bench testing all of my 12v creations. On my set of lights there is a black wire and a while wire. They are exactly opposite with the white wire being the negative.
 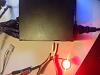 I added a small piece of heat shrink to each wire before crimping my connectors on so that I could seal the wire end of the connector. I would prefer to use a more suitable weather proof connector but since I may have to remove them to use the spare this was the second best option. I also decided to reverse my connectors so that down the road when I have forgotten what color was +/- the connections would tell me. So negative (white wire) on the lights got a female connector and positives (black wire) got a female connector.
 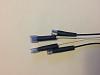 That takes care of the light end so I started on the other side. I made 2 short positive and negative pig tails with the proper quick connect ends to match the light pigtails. I made mine about 8" long and taking the two negative pigtails I crimped them under one butt connector on the same side and then connected the remaining #16 wire to the other side of the butt connector. Essentially creating a "Y" connection for the two lights. I didn't take a picture before but have one after I shrunk the HS. I used extra wire length since I didn't want to go outside to actually measure. Once I get the final install completed I will get a good measurement for overall wire. Being an electrician and having a stock of wire the extra wasn't a big deal as I will use the left over on something.
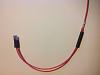
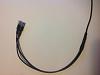 Repeat the same steps for the positive wiring. One step that I did extra and can be seen from the following picture is change the length of the wires on the back of the light. I shortened both of the negative wires to help with decreasing the size of the bundle at the connections because I used extra length in the jeep side wiring it didn't make any difference. Following that I added 3/8" braided sleeve to the jeep side harness. I ran out of sleeve but intend to add some to each side of the "Y" in order to cover the quick connects.
 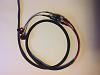 Since the weather here is rainy and I don't have anywhere indoor to do the final install I bench tested it again.
 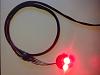 Hopefully this will help anyone who is interested in a set of these lights and is a DYI type of person. I am looking for a better connector than the quick connects that will still fit through the lug hole) Once I install them I will try to get the post opened up so I can add a picture of the lights on the jeep, edit the overall wire length, and possibly add the how-to on the jeep end. Thanks
Last edited by k0260; Dec 12, 2015 at 07:23 PM.
JK Jedi

Joined: Dec 2010
Posts: 5,642
Likes: 486
From: Knoxville
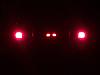
Since you've come this far, don't put them inside the lug holes. It sucks to rotate tires or change in a spare. Put a plate behind the tire and put them there. I bent a piece to sit on top of my carrier and allow the lights to "peek" through the wheel. It's actually increased visibility and less hassle. I'd recommend it to everyone who even thinks about the lug lights.
EBay has a pair of the lights for dirt cheap. You could even do more than just two small lights back there if you wanted to do so, they don't draw much power.
EBay has a pair of the lights for dirt cheap. You could even do more than just two small lights back there if you wanted to do so, they don't draw much power.
Thread Starter
JK Newbie
Joined: Dec 2012
Posts: 50
Likes: 0
From: Eugene, Oregon
I might try that bit with my carrier it seems as though they just slip in and plug together. Will have to see how well they stay in place. I have bent a flat bar bracket as a license plate holder and it might block off other options. I was surprised by how well they fit with my carrier but I don't want to deal with with them falling out. Only time will tell
Thread Starter
JK Newbie
Joined: Dec 2012
Posts: 50
Likes: 0
From: Eugene, Oregon
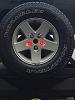
Had a chance to get the lights installed this afternoon. I had to do a slight filing around the base of the light but once that was done they are a perfect tight file in the factory wheel lug hole. I am planning to build and install a new LP bracket off the tire carrier so I just use cable ties to secure the harness. I plan to add LP lights and a reverse light to the bracket so I didn't want to do anything permanent until I had all the wiring there. I am very happy with the end result, I even disconnected them and removed the tire to simulate having to use the spare and was able to pop them out with out any issue using a small screw driver that I carry in the jeep. I tied my wiring in on the passenger side tail light by poking a hole in the expandable foam that was used to seal the tail light cavity. It was a piece of cake and took maybe 20 minutes to complete. I am going to purchase and test a couple of lights from ebay since you can get 10 of them for 8.00. This is one project that is well worth doing yourself I see the lug light kits selling for 34.00-55.00 on ebay. Take that savings and buy a tool that you can use on your next electrical project or just buy beer
Last edited by Rogue26; Dec 14, 2015 at 04:22 PM.