Rigid Dually D2 Install: Notes and Pics

 07-09-2013, 10:55 AM
#82
JK Super Freak
Join Date: May 2011
Location: North County San Diego, California
Posts: 1,000
Likes: 0
Received 0 Likes
on
0 Posts
07-09-2013, 11:13 AM
#83
JK Enthusiast
Join Date: Dec 2012
Location: Dallas
Posts: 386
Likes: 0
Received 0 Likes
on
0 Posts
01-26-2014, 03:31 PM
#84
JK Newbie

Join Date: Dec 2013
Location: Toledo, Ohio
Posts: 1
Likes: 0
Received 0 Likes
on
0 Posts
Fantastic original post, Rubi Driver, thank you! This worked very smoothly for my 2013 JKUR. I might suggest that installers consider installing the lighted switch on the plastic cover directly beneath the steering column instead of the pillar. In this location, the bright red light from the switch is out of the field of view in a dark cabin...unlike when it is mounted on the pillar. Simply drill a 3/4" hole, file the hole open a little more so that the switch will fit, and run the wires past the left speaker just beneath the steering column. If you're not keen to drill a hole in the cabin, the plastic cover is quite small and wouldn't likely be very expensive to replace.
01-26-2014, 06:05 PM
#85
JK Junkie
I purchased the Rigid Windshield mount kit offered here through ORW and installed them yesterday. Here's a quick walk-though with pics and notes.
Overview
I purchased these lights for greater distance and peripheral lighting while off road. To get the most light, I upgraded to the D2s, which have six rather than four LEDs. They as still quite small and mount to the ORW windshield light brackets easily. The install took about 90 minutes, with much of it just making sure everything was neat. The results are exactly what I was hoping.
Tools
Torx wrench set
Allen wrench set
Ratchet set
Screw drivers
Crescent wrench
coat hanger, or wire fish tape
electrical tape
pocket knife
Zip ties, assorted sizes
Vise pliers
Initial Steps
The kit comes with a well thought out wiring harness that includes leads for an internal switch. The kits comes with a two stage LED switch for mounting inside the cabin. Take a moment to understand the way the wires lay out and do a test layout with them under the hood. If you're going with the windshield mount, the wires lay out perfectly.
Install Inside
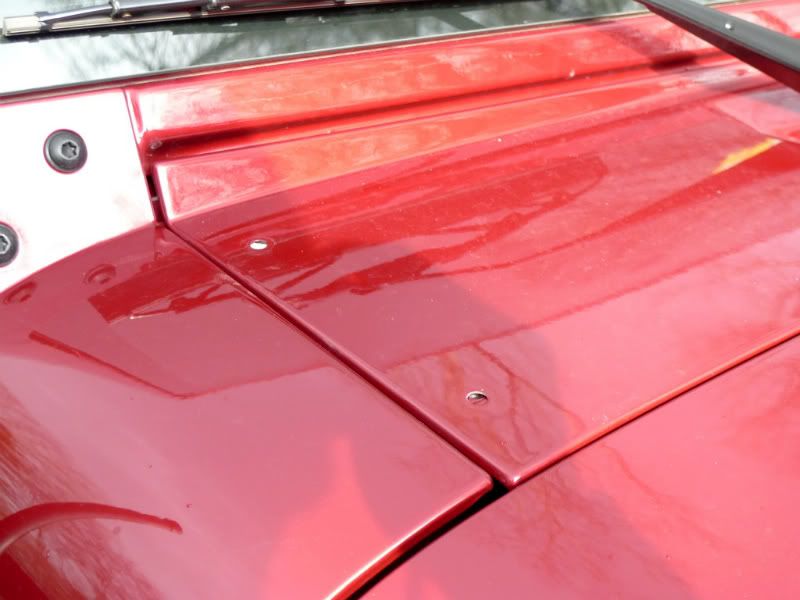
The first, and most cumbersome step in the install is finding the route into the cabin from the engine bay. I chose to go through an existing hole that comes plugged by the factory with spray insulation. Take off the A pillar cover and the dash-side cover and the hole will be obvious. It is shown here with a screwdriver poked through it.
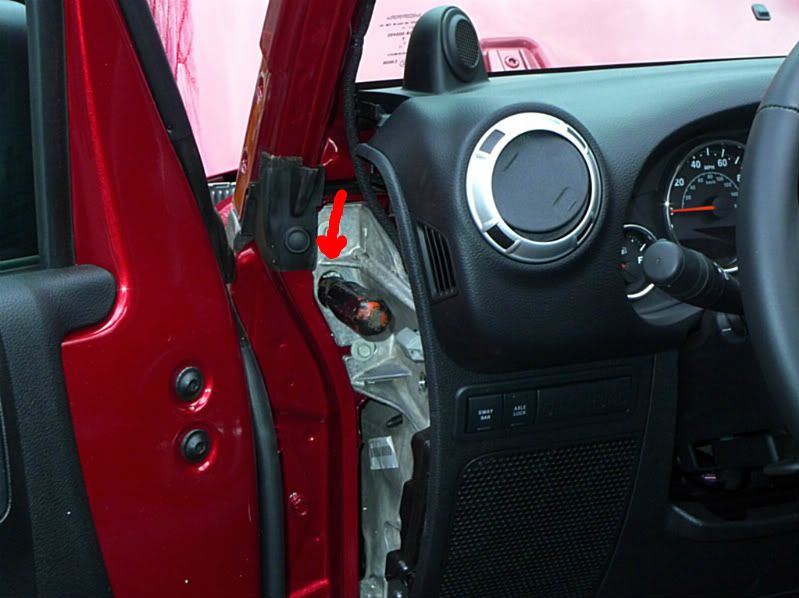
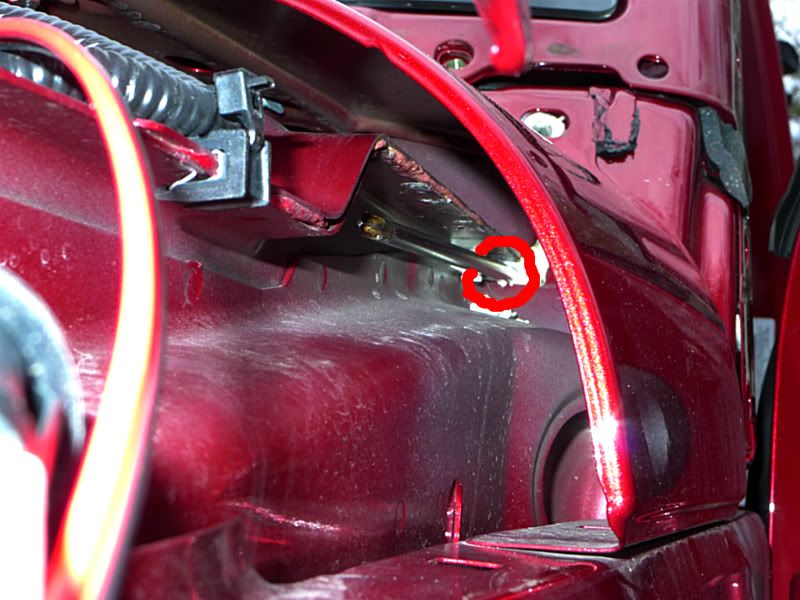
The opening appears to lead to various places in the engine bay. The easiest to find and use was a straight shot that puts the hole to the outside of the engine bay. This is not a problem as the wire can be routed this way without being touched by the hood when closed. You can see the other side of the screwdriver here:
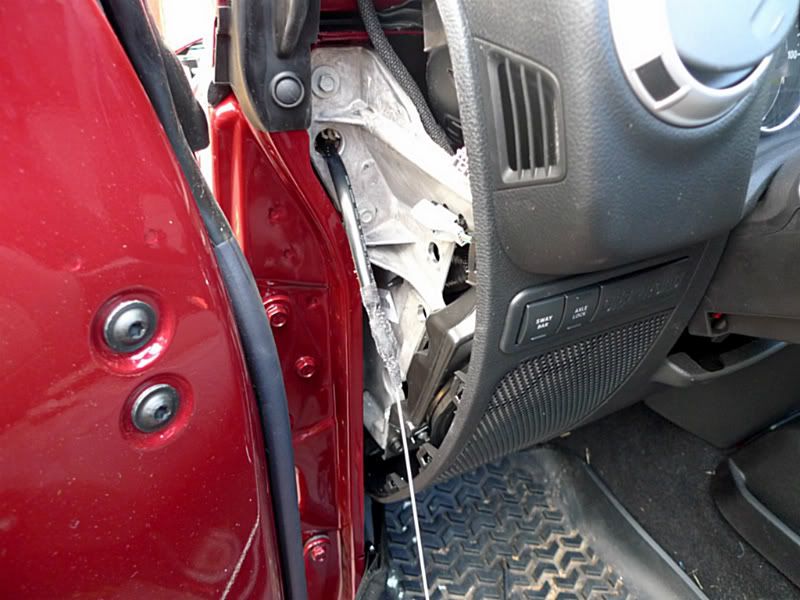
Once you establish the hole, take a wire fish (or coat hanger!) and put it through the hole. Tape the switch leads to the end and pull it through. This will take a little work and manipulation as the hole is not round, but oblong.
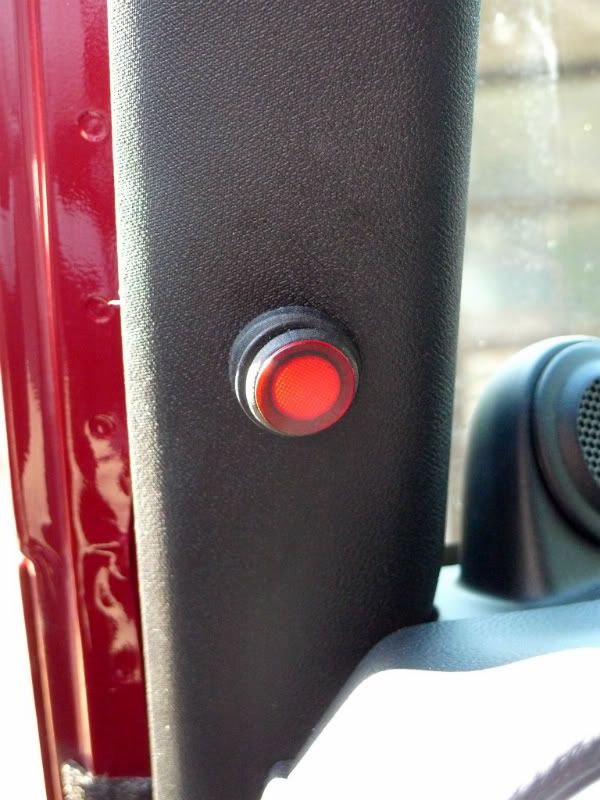
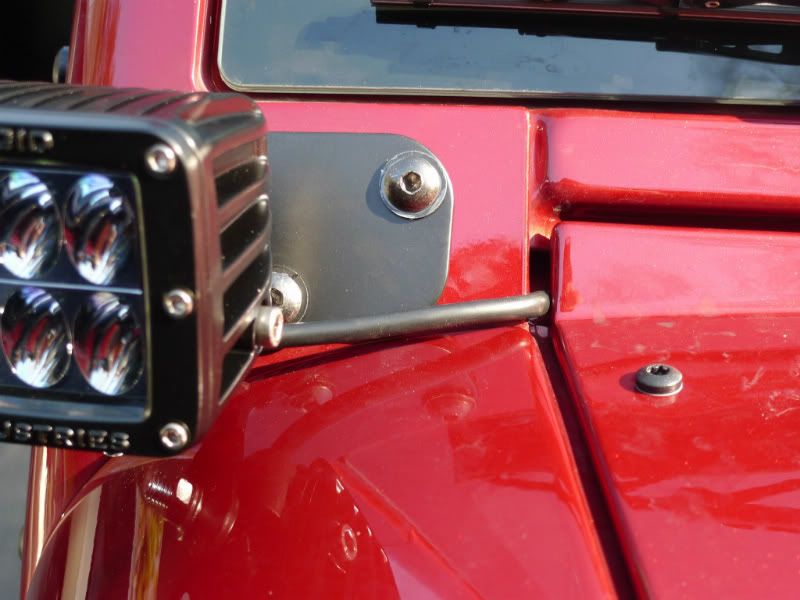
Once this is through, take off the tape and prepare the factory A pillar cover for the switch. (That's where I mounted it because it was an obvious spot. If you want it elsewhere, I'm sure you'll figure out the run.) Pick a spot for the switch on the cover, mark it with a Sharpie, then drill a hole. To ensure a tight fit, I drilled a 5/8" hole using a bore bit, then custom widened it for a perfect snug fit using a pocket knife and sand paper. The final hole was just under 3/4". Run the wire up inside the pillar cover and through the hole, then attach the switch. Press fit. Then reinstall the pillar cover. It will look like this when complete:
Additional notes on the A pillar cover process:
To get the cover off, you must remove the cover above it. This will require you to remove the visor mount from the header. Have a complete Torx wrench set available. (You will need it in multiple places during install.)
The A pillar cover is held on by one "screw". It looks like a screw, but it's not. Rather, it's a plastic threaded pin. In the end, I had to just pull it out and press it back in. It is looser than factory now, but does not rattle at all while driving.
The instructions from Rigid as to how to connect the leads to the switch are WRONG. It tells you to put the red lead in the middle. It should be the blue. If you follow the instructions, the light switch works, but the LED indicator on the switch will always be on rather than being on when the lights are on and off when they are off.
Install Under the hood
Once the switch is complete, the rest is just a process of routing the wires. You have to get leads to both lights and connections to the battery. It is easiest to follow the existing wiring lines and zip tie the wires to them for a neat install. Also, you'll want to remove the bolts that fasten the wiper motor cowl so that you can get the wires to the windshield mounting points.
When I was done, the wiring under the hood looked like this:
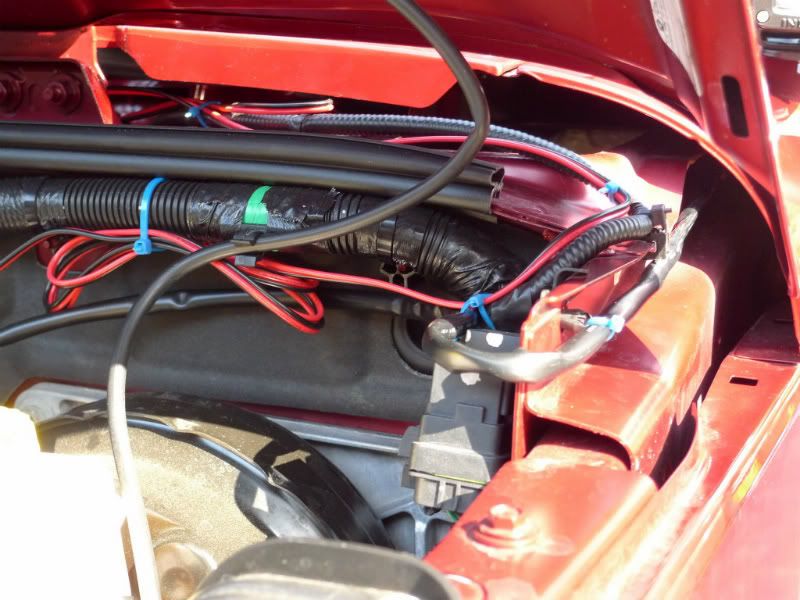
The solenoid for the wiring harness has a convenient tab on it that allows you to screw or bolt it somewhere. There's a convenient threaded bolt end sticking out of the firewall that I put it on and secured with a nut I had. This is nice to do, but not necessary.
At the battery, I zip tied the lines such that the fuse in the line is easy to reach and won't move around.
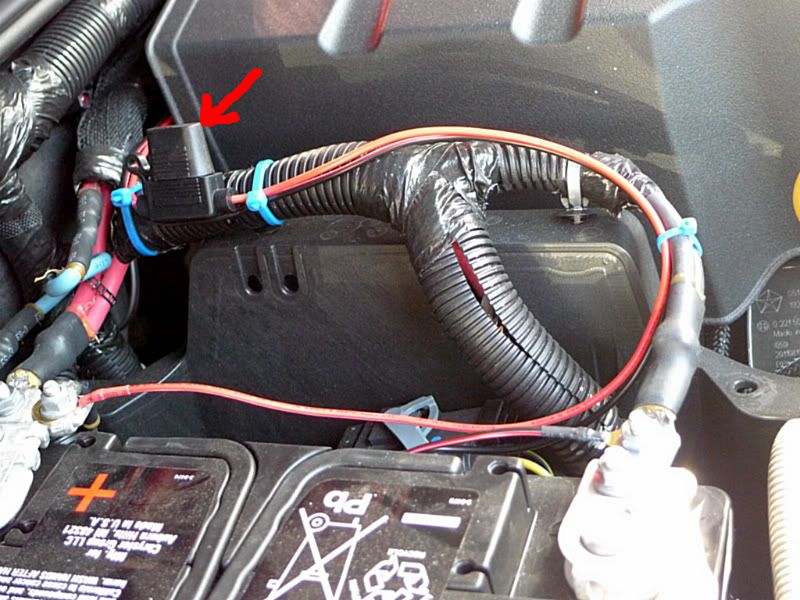
Notes on install at battery:
The instructions that come with the lights are spartan (and actually wrong in one spot). It does not tell you that the red wire is positive and the black negative. If you're handy with this stuff, you'd know that. I had to look it up just to be sure.
The contacts on the battery poles are held by a nut through the top, yet compression fit around the pole. As such, if you loosen the nut on top, the clamp opens horizontally. I found it best to have vise pliers available when re-tightening to make sure the connection to the pole was not loose.
Install of lights
The mounting brackets are pretty straight forward. They only go on one way, and they mount with replacement bolts that are a little longer than factory (these are in the kit from ORW). The lights mount to the brackets easily, however you will need some larger washers to span the light mounting hole as the nut and washer from Rigid are too small.
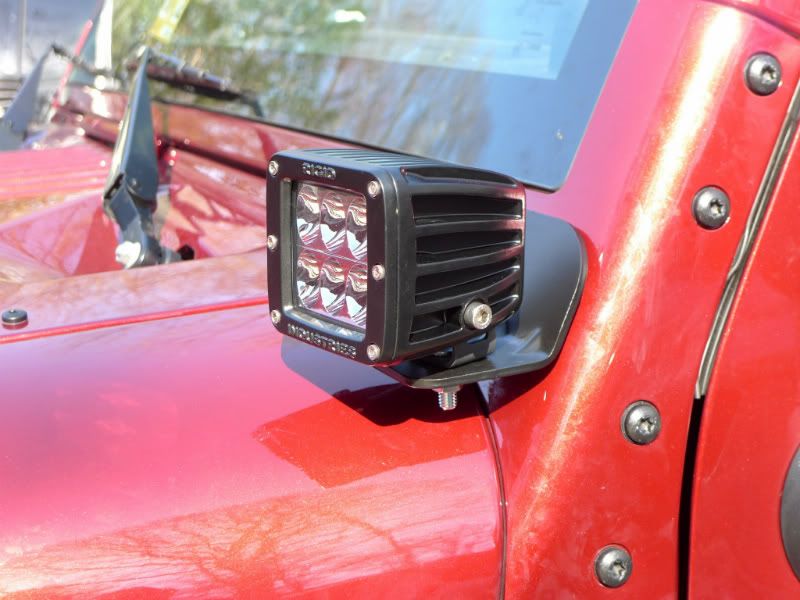
The final touch is to connect the lights to the wiring using the weatherproof connectors. Luckily, the wires from the lights are just long enough to make it under the cowl. This allows a very clean final install, not to mention would make taking the lights off your Jeep intact a little bit harder for a thief.
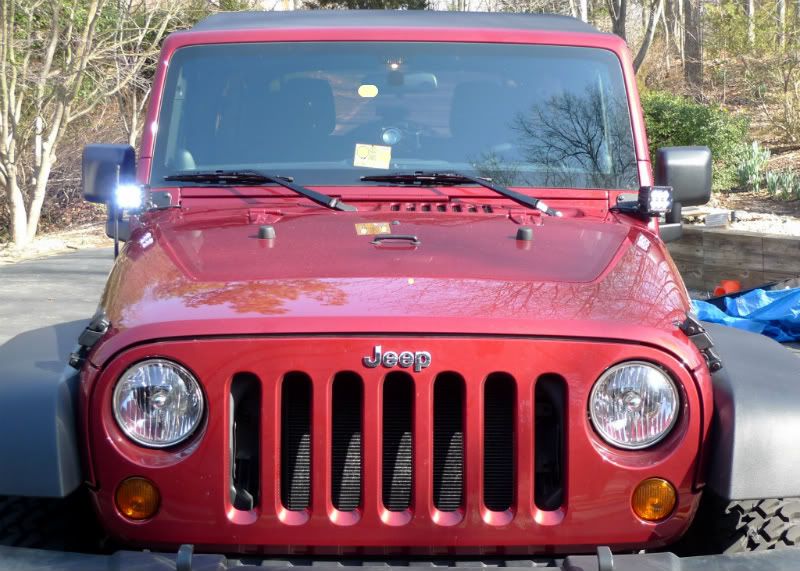
The finished install is quite pleasing, at least to my eye. I like the fact that you can't even see them from inside, so there's zero loss of vision from the driver's seat. And the lights are BRIGHT!
Thanks to John and Justin at ORW with assistance with this package. Also, kudos to Rigid for making a helk of a light. I hope you found these notes helpful. If you have any questions, I'll try my best to answer them.
Overview
I purchased these lights for greater distance and peripheral lighting while off road. To get the most light, I upgraded to the D2s, which have six rather than four LEDs. They as still quite small and mount to the ORW windshield light brackets easily. The install took about 90 minutes, with much of it just making sure everything was neat. The results are exactly what I was hoping.
Tools
Torx wrench set
Allen wrench set
Ratchet set
Screw drivers
Crescent wrench
coat hanger, or wire fish tape
electrical tape
pocket knife
Zip ties, assorted sizes
Vise pliers
Initial Steps
The kit comes with a well thought out wiring harness that includes leads for an internal switch. The kits comes with a two stage LED switch for mounting inside the cabin. Take a moment to understand the way the wires lay out and do a test layout with them under the hood. If you're going with the windshield mount, the wires lay out perfectly.
Install Inside
The first, and most cumbersome step in the install is finding the route into the cabin from the engine bay. I chose to go through an existing hole that comes plugged by the factory with spray insulation. Take off the A pillar cover and the dash-side cover and the hole will be obvious. It is shown here with a screwdriver poked through it.
The opening appears to lead to various places in the engine bay. The easiest to find and use was a straight shot that puts the hole to the outside of the engine bay. This is not a problem as the wire can be routed this way without being touched by the hood when closed. You can see the other side of the screwdriver here:
Once you establish the hole, take a wire fish (or coat hanger!) and put it through the hole. Tape the switch leads to the end and pull it through. This will take a little work and manipulation as the hole is not round, but oblong.
Once this is through, take off the tape and prepare the factory A pillar cover for the switch. (That's where I mounted it because it was an obvious spot. If you want it elsewhere, I'm sure you'll figure out the run.) Pick a spot for the switch on the cover, mark it with a Sharpie, then drill a hole. To ensure a tight fit, I drilled a 5/8" hole using a bore bit, then custom widened it for a perfect snug fit using a pocket knife and sand paper. The final hole was just under 3/4". Run the wire up inside the pillar cover and through the hole, then attach the switch. Press fit. Then reinstall the pillar cover. It will look like this when complete:
Additional notes on the A pillar cover process:
To get the cover off, you must remove the cover above it. This will require you to remove the visor mount from the header. Have a complete Torx wrench set available. (You will need it in multiple places during install.)
The A pillar cover is held on by one "screw". It looks like a screw, but it's not. Rather, it's a plastic threaded pin. In the end, I had to just pull it out and press it back in. It is looser than factory now, but does not rattle at all while driving.
The instructions from Rigid as to how to connect the leads to the switch are WRONG. It tells you to put the red lead in the middle. It should be the blue. If you follow the instructions, the light switch works, but the LED indicator on the switch will always be on rather than being on when the lights are on and off when they are off.
Install Under the hood
Once the switch is complete, the rest is just a process of routing the wires. You have to get leads to both lights and connections to the battery. It is easiest to follow the existing wiring lines and zip tie the wires to them for a neat install. Also, you'll want to remove the bolts that fasten the wiper motor cowl so that you can get the wires to the windshield mounting points.
When I was done, the wiring under the hood looked like this:
The solenoid for the wiring harness has a convenient tab on it that allows you to screw or bolt it somewhere. There's a convenient threaded bolt end sticking out of the firewall that I put it on and secured with a nut I had. This is nice to do, but not necessary.
At the battery, I zip tied the lines such that the fuse in the line is easy to reach and won't move around.
Notes on install at battery:
The instructions that come with the lights are spartan (and actually wrong in one spot). It does not tell you that the red wire is positive and the black negative. If you're handy with this stuff, you'd know that. I had to look it up just to be sure.
The contacts on the battery poles are held by a nut through the top, yet compression fit around the pole. As such, if you loosen the nut on top, the clamp opens horizontally. I found it best to have vise pliers available when re-tightening to make sure the connection to the pole was not loose.
Install of lights
The mounting brackets are pretty straight forward. They only go on one way, and they mount with replacement bolts that are a little longer than factory (these are in the kit from ORW). The lights mount to the brackets easily, however you will need some larger washers to span the light mounting hole as the nut and washer from Rigid are too small.
The final touch is to connect the lights to the wiring using the weatherproof connectors. Luckily, the wires from the lights are just long enough to make it under the cowl. This allows a very clean final install, not to mention would make taking the lights off your Jeep intact a little bit harder for a thief.
The finished install is quite pleasing, at least to my eye. I like the fact that you can't even see them from inside, so there's zero loss of vision from the driver's seat. And the lights are BRIGHT!
Thanks to John and Justin at ORW with assistance with this package. Also, kudos to Rigid for making a helk of a light. I hope you found these notes helpful. If you have any questions, I'll try my best to answer them.
i know some people can't get over the square shape of the duallys, but the light quality, low power draw and extremely long lifetime are great trade off's to having 5" or 6" nearly headlight size light mounted to your A pillars.
matthew
03-23-2014, 04:48 PM
#86
JK Enthusiast
Thread Starter
Join Date: Oct 2011
Location: Fairfax, VA
Posts: 168
Likes: 0
Received 0 Likes
on
0 Posts
Fantastic original post, Rubi Driver, thank you! This worked very smoothly for my 2013 JKUR. I might suggest that installers consider installing the lighted switch on the plastic cover directly beneath the steering column instead of the pillar. In this location, the bright red light from the switch is out of the field of view in a dark cabin...unlike when it is mounted on the pillar. Simply drill a 3/4" hole, file the hole open a little more so that the switch will fit, and run the wires past the left speaker just beneath the steering column. If you're not keen to drill a hole in the cabin, the plastic cover is quite small and wouldn't likely be very expensive to replace.
I like your idea, with one caveat: if you hide the switch, it's possible that it could be on without drawing attention to itself.
03-31-2014, 04:50 AM
#89
JK Newbie

Join Date: Jun 2011
Location: seeley lake, MT
Posts: 91
Likes: 0
Received 0 Likes
on
0 Posts
Rambone: what brand of taillights are those? Thanks.[/QUOTE]
They're IPCW's. They look good and work great but they can fog-up inside the lense from condensation if you're not careful at the carwash. I'd buy something else if I was looking for lights, something watertight.
They're IPCW's. They look good and work great but they can fog-up inside the lense from condensation if you're not careful at the carwash. I'd buy something else if I was looking for lights, something watertight.