
Stereo upgrade


Thread Starter
JK Newbie
Joined: Dec 2014
Posts: 44
Likes: 0
From: westford, ma
Hi All,
I wanted to document my stereo build up. So far I'm putting in a Kenwood DNX691HD with a idatalink maestro. I got all the parts:
Kenwood HU
idata link maestro RR
CH1 wire harness
antenna wire adapter
mounting kit
Here's the wiring all put together. This is just the CH1 and the Kenwood wiring. There's two control wires to go along with this from the Maestro.
I'll add some more pics as I get this done.
Thread Starter
JK Newbie
Joined: Dec 2014
Posts: 44
Likes: 0
From: westford, ma
I got this all done.
I heard a lot about the bracket just being removed for the top screw on the dash. I decided to try and cut it to re-use that dash mount screw. I cut the top wings off and the lower half just below the mounting screw holes.
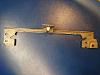
It fit back in with no problem.
I heard a lot about the bracket just being removed for the top screw on the dash. I decided to try and cut it to re-use that dash mount screw. I cut the top wings off and the lower half just below the mounting screw holes.
It fit back in with no problem.
Thread Starter
JK Newbie
Joined: Dec 2014
Posts: 44
Likes: 0
From: westford, ma
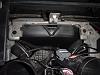
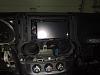
I put all the wiring in. The maestro unit fits to the left of the air duct. There's an extra wire spliced into the amp turn on lead for the future. I also put in a USB cable for Maestro reprogramming. The USB input on the radio and the MHL cable are all run to the glove box.
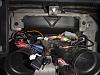
The radio fit with the bracket back in.
The radio fit with the bracket back in.
Thread Starter
JK Newbie
Joined: Dec 2014
Posts: 44
Likes: 0
From: westford, ma
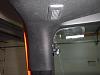
I was not sure if I wanted to use the Uconnect system or the Kenwood bluetooth system so, I ran the Kenwood mic up to the pillar. I'll be getting some double sided tape to secure the mic later. What does everyone else like to use? Uconnect or aftermarket?
Thread Starter
JK Newbie
Joined: Dec 2014
Posts: 44
Likes: 0
From: westford, ma
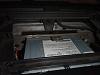
Everything put in and the finished product:
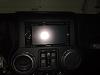
Almost verything works! gauges work. Nav instructions display on the EVIC, but I don't know how to get them to re-appear if the EVIC is changed to another display, i.e. fuel economy. USB works, both Uconnect and Kenwood interface. I don't have the MHL working yet for my S5 because I need an adapter. I'm leaning towards using Kenwood bluetooth so I can use Pandora.
Almost verything works! gauges work. Nav instructions display on the EVIC, but I don't know how to get them to re-appear if the EVIC is changed to another display, i.e. fuel economy. USB works, both Uconnect and Kenwood interface. I don't have the MHL working yet for my S5 because I need an adapter. I'm leaning towards using Kenwood bluetooth so I can use Pandora.
JK Enthusiast
Joined: May 2011
Posts: 438
Likes: 0
From: Pittsburgh,PA
I got this all done.
I heard a lot about the bracket just being removed for the top screw on the dash. I decided to try and cut it to re-use that dash mount screw. I cut the top wings off and the lower half just below the mounting screw holes.
<img src="https://www.jk-forum.com/forums/attachment.php?attachmentid=597149"/><img src="https://www.jk-forum.com/forums/attachment.php?attachmentid=597149"/>
It fit back in with no problem.
<img src="https://www.jk-forum.com/forums/attachment.php?attachmentid=597150"/>
Trending Topics
Thread Starter
JK Newbie
Joined: Dec 2014
Posts: 44
Likes: 0
From: westford, ma
yes, the double din won't fit in the bracket. It needs to be removed to cut. The bracket holds the stock radio in place and has a screw on top to help hold the dash in place.
The brackets I got off of ebay as a kit with an antenna adapter and basic wire harness(which I didn't use). The brackets were Xscorpion brand. The only issue I had is that the screws provided with the Kenwood unit were not long enough to reach the threads in the side. I got some longer screws at my local hardware store. 4mm x 1.5 x 10 (I think).
I went this route over a 430N because of 1 price 2 I wanted android integration (pandora, MHL).
I have a backup camera to install too, but I'm going to install that at the same time I do new speakers and amplifier. Hopefully I only have to run wires once this way.