
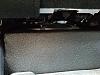
Under-Seat Sub Box Installed

JK Enthusiast

Joined: Jan 2015
Posts: 435
Likes: 10
From: Ft. Barfoot, VA
You'll have to PM him for details.
I have the same box made my MattK11 under both my front seats and let me tell you... it's worth it. You'll pay more for custom work elsewhere and if they've never done it before then you'll go through aggravating moments of trial & error. Matt has already done his homework and this product is the culmination of his research and design. It simply works. I just wished I had done it sooner before I wasted about $800 of stereo equipment that gave me back absolutely nothing in return (except aggravation).
That's my .02.
JK Newbie
Joined: Mar 2017
Posts: 7
Likes: 0
From: DC...for now.
Well judging by his quick response time, I'd say you could ask MattK11 for the current price. They look pretty amazing. I can't imagine handmade fiberglass work of this quality is cheap...Don't quote me on this, but I'm pretty sure on another post that of course I can't seem to find right now, it was $500+ per side. By his description of the build and materials, if you have the $$, they appear to be well worth it. So, MattK11, what do you charge for a pair of these bad boys?

JK Enthusiast
Joined: Dec 2013
Posts: 164
Likes: 0
From: Gahanna, OH
I built my own version of the underseat sub enclosure for passenger seat as of now. Materials for it cost about $60 max for fiberglass materials and mdf. But it is VERY time consuming. A lot of time in tearing apart the Jeep seats/carpet about 6-8 times depending on how often u need to use ur Jeep!! A lot of trial fittings. I have the older style seats that Mattk11 boxes don't fit and he hasn't found a Jeep to get specs for yet. So if ur handy and got time on ur hands, give it a try. I'm very happy with mine and I get the satisfaction of that I custom built it. I got a sundown 10" SD3 sub in it.
JK Newbie
Joined: Mar 2017
Posts: 7
Likes: 0
From: DC...for now.
I built my own version of the underseat sub enclosure for passenger seat as of now. Materials for it cost about $60 max for fiberglass materials and mdf. But it is VERY time consuming. A lot of time in tearing apart the Jeep seats/carpet about 6-8 times depending on how often u need to use ur Jeep!! A lot of trial fittings. I have the older style seats that Mattk11 boxes don't fit and he hasn't found a Jeep to get specs for yet. So if ur handy and got time on ur hands, give it a try. I'm very happy with mine and I get the satisfaction of that I custom built it. I got a sundown 10" SD3 sub in it.
So, I'm very excited and am waiting. Still mulling over amp placement for the SOUND STORM FR1600.2 FORCE 1600-Watt I have. It's too bulky for the back storage compartment. At the moment it's on the floor under the back seat, but the RCAs are a bit strained when the seat is down. If I could find a way to mount the amp to the underside of the seat w/o drilling into it, I think that would work. I also noticed there's clearance above the soundbar with the soft-top, but again attaching without too much destruction is key for me. It would be great for heat dissipation and not an obvious spot for would-be criminals. However, one drop of rain could ruin a day pretty quick. I'm open to other suggestions.
I'll post photos when all is said and done!


JK Enthusiast
Joined: Jan 2015
Posts: 435
Likes: 10
From: Ft. Barfoot, VA
Still mulling over amp placement for the SOUND STORM FR1600.2 FORCE 1600-Watt I have. It's too bulky for the back storage compartment. At the moment it's on the floor under the back seat, but the RCAs are a bit strained when the seat is down. If I could find a way to mount the amp to the underside of the seat w/o drilling into it, I think that would work. I also noticed there's clearance above the soundbar with the soft-top, but again attaching without too much destruction is key for me. It would be great for heat dissipation and not an obvious spot for would-be criminals. However, one drop of rain could ruin a day pretty quick. I'm open to other suggestions.
Are you in a 4-door JK?
I created mounting brackets for my amp to install underneath my rear seats. It's tucked directly underneath and not onto the floor (for obvious reasons). There is actually room to install 2 amps depending on size.
I considered for a moment of that space above the soundbar but knew right away that wouldn't work. Weather would beat it up and ruin it immediately. Stealth-wise, I think it's a good set-up. The amp you're referring to sounds rather large. The one I have running my sub is a Kicker 12CX12001. It does a GREAT job providing the power that the subs need.
Good luck. Hope your install turns out great. The boxes from MattK11 should be a standard!
JK Newbie
Joined: Mar 2017
Posts: 7
Likes: 0
From: DC...for now.
They're here! OK...so actually I've had them for a while now, but wanted to get them completely install complete with pictures etc. for the full install, recommendation, and review.
Here's a link to the Google Album if you want to dive right into the eye candy. There's also a video of the prep work with a questionable and disclaimed placement for the amp. https://goo.gl/photos/GE5YwykpHjSE4Pa79
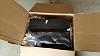
Unboxing.
Initial test fit of passenger side.
Slow is smooth, and smooth is fast. Something I didn't remember after this step...
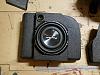
Empty. Just the enclosure.

I had to rasp down the inside edge for the subs to fit in the openings. This was all part of the plan since I was given very detailed instructions. I took everything out, rasped, filed, and sanded the inside edge down until I saw white (fiberglass). I should have put on long sleeves, eye pro, and a mask...but thought of that half way through the second one. Like I said, I was excited and moving fast. I did put on the mask and glasses when using the air compressor to clean them up after the sanding.
Function Test before shot with poly.
After putting everything together I wanted to make sure things worked the way I expected. No, I didn't play music with the sub in free air, just wanted to get a shot with poly-fill in it.
The pair while sealant sets up.
Here is the final unmounted view. I used weatherproof clear caulking on the under ledge of the sub mount ring and connection posts. I will say I underestimated the length of the machine screws I would need. This cause some sweat and cursing when I jacked up some t-nuts and had trouble unscrewing some spots. Lowe's longest 8-32 machine screw was only 1 inch and 10-32s were too girthy for my sub mount rings. I had to order some 1.5 inch machine screws online. If I were to do it over again, I'd go with a 1.25 inch. If you try to back these longer ones out, they tend to drag the poly-fill along which doesn't go well once it all hits the t-nut.
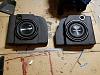
Driver's side closeup.
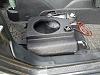
Passenger Mounting.
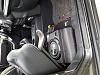
Passenger side was easy. Fit like a glove. I didn't have to cut any carpet.
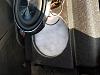
Passenger Mounting 2.
I have heated seats. Here I am worried about clearance. Turns out I just needed to velcro some wires up from hanging down.
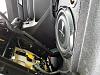
Driver's Side from outside finished.
Driver's side mounting wasn't so easy. it was trial and error on which screws to tighten first. I started to hear a slight snap-crackle-pop and immediately loosened up. It was very, very, very tight.The best I could do still had the seat bracket cutting through the line-x at the rear inboard corner. If you hear this, be careful with your investment...So nerve wrenching.
Driver's side, under seat clearance.
Only major issue has to do with my effort to get a good value on the subs I chose. I looked at the sundown that everyone else was using. I was already spending more than the wife authorized. I kept what I originally bought, a pair of pioneer 10" ib-flats. Anyway, the issue is that when playing at volume, if the seat is too low, it can tap some of the wires. I need to tape these or Velcro these up. I really hope they aren't taping the plastic plugs. The connections in the rear maybe impossible to relocate.
Final thoughts? This is great for the space that's available. I did have a Challenger and a WRX with trunk space before and a full-sized 10" MTX sub (that I had to sell with the car). These don't perform as well on the real low notes, but that may be my chosen setup. The bonus however is that you FEEL it. The wife even made a comment without my prompting. I'm hoping it pays off next time we go for a ride .
.
Huge thanks to Matt. The fit and finish was worth the money. These look stock and are stealthy and secure which was all the major points I was going for. Plus it brings the bass forward in the cabin which should pay off when the top is down.
Here's a link to the Google Album if you want to dive right into the eye candy. There's also a video of the prep work with a questionable and disclaimed placement for the amp. https://goo.gl/photos/GE5YwykpHjSE4Pa79
Unboxing.
Initial test fit of passenger side.
Slow is smooth, and smooth is fast. Something I didn't remember after this step...
Empty. Just the enclosure.
I had to rasp down the inside edge for the subs to fit in the openings. This was all part of the plan since I was given very detailed instructions. I took everything out, rasped, filed, and sanded the inside edge down until I saw white (fiberglass). I should have put on long sleeves, eye pro, and a mask...but thought of that half way through the second one. Like I said, I was excited and moving fast. I did put on the mask and glasses when using the air compressor to clean them up after the sanding.
Function Test before shot with poly.
After putting everything together I wanted to make sure things worked the way I expected. No, I didn't play music with the sub in free air, just wanted to get a shot with poly-fill in it.
The pair while sealant sets up.
Here is the final unmounted view. I used weatherproof clear caulking on the under ledge of the sub mount ring and connection posts. I will say I underestimated the length of the machine screws I would need. This cause some sweat and cursing when I jacked up some t-nuts and had trouble unscrewing some spots. Lowe's longest 8-32 machine screw was only 1 inch and 10-32s were too girthy for my sub mount rings. I had to order some 1.5 inch machine screws online. If I were to do it over again, I'd go with a 1.25 inch. If you try to back these longer ones out, they tend to drag the poly-fill along which doesn't go well once it all hits the t-nut.
Driver's side closeup.
Passenger Mounting.
Passenger side was easy. Fit like a glove. I didn't have to cut any carpet.
Passenger Mounting 2.
I have heated seats. Here I am worried about clearance. Turns out I just needed to velcro some wires up from hanging down.
Driver's Side from outside finished.
Driver's side mounting wasn't so easy. it was trial and error on which screws to tighten first. I started to hear a slight snap-crackle-pop and immediately loosened up. It was very, very, very tight.The best I could do still had the seat bracket cutting through the line-x at the rear inboard corner. If you hear this, be careful with your investment...So nerve wrenching.
Driver's side, under seat clearance.
Only major issue has to do with my effort to get a good value on the subs I chose. I looked at the sundown that everyone else was using. I was already spending more than the wife authorized. I kept what I originally bought, a pair of pioneer 10" ib-flats. Anyway, the issue is that when playing at volume, if the seat is too low, it can tap some of the wires. I need to tape these or Velcro these up. I really hope they aren't taping the plastic plugs. The connections in the rear maybe impossible to relocate.
Final thoughts? This is great for the space that's available. I did have a Challenger and a WRX with trunk space before and a full-sized 10" MTX sub (that I had to sell with the car). These don't perform as well on the real low notes, but that may be my chosen setup. The bonus however is that you FEEL it. The wife even made a comment without my prompting. I'm hoping it pays off next time we go for a ride
. Huge thanks to Matt. The fit and finish was worth the money. These look stock and are stealthy and secure which was all the major points I was going for. Plus it brings the bass forward in the cabin which should pay off when the top is down.
Last edited by xCrossTip; May 6, 2017 at 03:41 PM. Reason: Trying to fix pictures posting