


Winch control relocation...


Thread Starter
JK Newbie
Joined: May 2013
Posts: 96
Likes: 0
From: M'ssippi
 Winch control relocation...
I'm wanting to relocate the control box for my warn m8000 from the stock bracket into the engine compartment.
I'm also wondering how difficult it would be to "minimize" the packaging of the control box itself. I haven't taken the plastic cover off of mine yet to see what's inside.
Surely some of you have relocated your winch controls. Where did you place the control?
I'm also wondering how difficult it would be to "minimize" the packaging of the control box itself. I haven't taken the plastic cover off of mine yet to see what's inside.
Surely some of you have relocated your winch controls. Where did you place the control?


JK Enthusiast
Joined: Apr 2010
Posts: 265
Likes: 1
From: Northern Virginia
Winch control relocate
I did this when I put my winch on (sort of). I put the solenoids in a box that I got from Digikey. I didn't want the winch control cable out on the front of the Jeep. Although I left the control box out there on the front, I relocated the switches to the inside. I also put a solenoid in the box to run the lights on the bumper.
Box from Digikey: AN-1322 Bud Industries | 377-1741-ND | DigiKey

Here is the wiring on the inside of the Jeep. I used one of those Daystar switch panels that install at the bottom of the center console. Note that the In/Out switch and the horn switch are momentary and the other two are on/off. I will try to look up the part numbers for those in a bit.
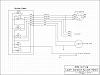
Box from Digikey: AN-1322 Bud Industries | 377-1741-ND | DigiKey
Here is the wiring on the inside of the Jeep. I used one of those Daystar switch panels that install at the bottom of the center console. Note that the In/Out switch and the horn switch are momentary and the other two are on/off. I will try to look up the part numbers for those in a bit.
Last edited by maxspongebob; Jun 1, 2013 at 01:55 PM.
JK Enthusiast
Joined: Apr 2010
Posts: 265
Likes: 1
From: Northern Virginia
The posts extend above the case by less than 1/4 inch, but the lid is 3/4 inch deep on the inside. So 1/2 inch to spare. I put a piece of plastic (cut out side of a milk jug) on the inside of the lid just in case.
Trending Topics
JK Enthusiast
Joined: Apr 2010
Posts: 265
Likes: 1
From: Northern Virginia
I finally found the part numbers for the switches.
Again, on Digikey, this is the momentary switch used for winch in/out and for the horn.
Digikey part number: 432-1094-ND
Manufacturer part number: V8D2UHNB-AAC00-000 by Carling Technologies
V8D2UHNB-AAC00-000 Carling Technologies | 432-1094-ND | DigiKey
This is the on/off switch used to enable the winch and for the lights
Digikey part number: 432-1088-ND
Carling Technologies part nu8mber: V1D2GHNB-AAC00-000
V1D2GHNB-AAC00-000 Carling Technologies | 432-1088-ND | DigiKey
Again, on Digikey, this is the momentary switch used for winch in/out and for the horn.
Digikey part number: 432-1094-ND
Manufacturer part number: V8D2UHNB-AAC00-000 by Carling Technologies
V8D2UHNB-AAC00-000 Carling Technologies | 432-1094-ND | DigiKey
This is the on/off switch used to enable the winch and for the lights
Digikey part number: 432-1088-ND
Carling Technologies part nu8mber: V1D2GHNB-AAC00-000
V1D2GHNB-AAC00-000 Carling Technologies | 432-1088-ND | DigiKey
JK Enthusiast
Joined: Apr 2010
Posts: 265
Likes: 1
From: Northern Virginia
I did this when I put my winch on (sort of). I put the solenoids in a box that I got from Digikey. I didn't want the winch control cable out on the front of the Jeep. Although I left the control box out there on the front, I relocated the switches to the inside. I also put a solenoid in the box to run the lights on the bumper.
Box from Digikey: AN-1322 Bud Industries | 377-1741-ND | DigiKey
Attachment 463656
Here is the wiring on the inside of the Jeep. I used one of those Daystar switch panels that install at the bottom of the center console. Note that the In/Out switch and the horn switch are momentary and the other two are on/off. I will try to look up the part numbers for those in a bit.
Attachment 463664
Box from Digikey: AN-1322 Bud Industries | 377-1741-ND | DigiKey
Attachment 463656
Here is the wiring on the inside of the Jeep. I used one of those Daystar switch panels that install at the bottom of the center console. Note that the In/Out switch and the horn switch are momentary and the other two are on/off. I will try to look up the part numbers for those in a bit.
Attachment 463664
If I had it to do over again, I would change only one thing. In the second diagram where there are 3 wires going to the winch, GRN BLK & WHT, I would add a fourth wire for ground. You should extend the ground from the switch panel all the way up to the solenoid box to minimize ground noise on the radio. When I did it I used a good thick extension cable with a black rubber jacket. There were only 3 wires in the cable, four would have been better.
For most folks this would not be a problem, but I have a HAM radio in the Jeep and I can hear a difference in the reception when the fog lights are on.