


Craigslist/Ebay 2013 wrangler sport budget build

JK Junkie

Joined: Nov 2011
Posts: 3,863
Likes: 1
From: Bossier City, LA

AH !! you called me out on it! no one was supposed to call me out that quick.....when I finished up the install I half way felt that 7 was too much but it felt fine on the test drive.......to sum it up, your simple efforts of a comment convinced that I really should adjust them, so I adjusted them and got to a solid +5 degree (from what I can tell on my dial). (And yes, its stupid easy to change it, I was just lazy the first go-around.)
I'm happy with that.

Thread Starter
JK Newbie
Joined: Mar 2015
Posts: 56
Likes: 0
From: Houston, tx
Let there be Light!!
Major step for my electricity skills.
to put it simply:
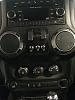
I made a custom switch panel in place of the small cubby between center AC vents...white cardboard is for mock up, black steel plate will be the finished product. I wanted a 5 switch design for two reasons. to limit my collection of gadgets and keep it "clean"
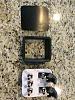
After roughing up the surfaces I put some gorilla glue epoxy on the modified cubby box and the metal plate, after it was curved to contour the curve on teh cubby, and I must say that works superb.
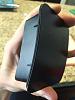
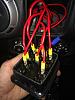
I found this cool fuse block to allow one power input and 6 outputs. If a fuse were to blow there is a little red LED on the block that will light up to indicate which fuse is blown. Only one set of lights (2) are set up right now so only one fuse however supply wires are run for the remaining switches, havent done the return lines yet as I do not know where they will be going.....just waiting for accessories (eventually the top two will be for lockers, hence the switch protectors, would hate for the goofball girlfriend go switch happy while not in the ideal situation)
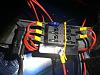
Here is the back of the switch panel, clean I think, the ground wire is the only one that is able to be daisy chained together. But overall I like it.
Done. and each switch has a red LED on the end that lights up when in the ON position. (eventually the top two will be for lockers, hence the switch protectors) pretty good look if I say so myself.
I KNOW THE BOTTOM CENTER SWITCH IS NOT EXACTLY CENTER. I MAY OR MAY NOT HAVE SNEEZED WHILE TRYING TO DRILL THE HOLE...
to put it simply:
I made a custom switch panel in place of the small cubby between center AC vents...white cardboard is for mock up, black steel plate will be the finished product. I wanted a 5 switch design for two reasons. to limit my collection of gadgets and keep it "clean"
After roughing up the surfaces I put some gorilla glue epoxy on the modified cubby box and the metal plate, after it was curved to contour the curve on teh cubby, and I must say that works superb.
I found this cool fuse block to allow one power input and 6 outputs. If a fuse were to blow there is a little red LED on the block that will light up to indicate which fuse is blown. Only one set of lights (2) are set up right now so only one fuse however supply wires are run for the remaining switches, havent done the return lines yet as I do not know where they will be going.....just waiting for accessories (eventually the top two will be for lockers, hence the switch protectors, would hate for the goofball girlfriend go switch happy while not in the ideal situation)
Here is the back of the switch panel, clean I think, the ground wire is the only one that is able to be daisy chained together. But overall I like it.
Done. and each switch has a red LED on the end that lights up when in the ON position. (eventually the top two will be for lockers, hence the switch protectors) pretty good look if I say so myself.
I KNOW THE BOTTOM CENTER SWITCH IS NOT EXACTLY CENTER. I MAY OR MAY NOT HAVE SNEEZED WHILE TRYING TO DRILL THE HOLE...
Last edited by Lamer321; Jun 17, 2015 at 04:52 PM.
Thread Starter
JK Newbie
Joined: Mar 2015
Posts: 56
Likes: 0
From: Houston, tx
let there be light...again.
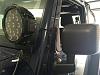
These are the lights, so far just two installed, waiting on the bull bar delivery and KC light mounts to install the other two. I will be grinding the "KC" letter off almost immediately.
51 watt LED. suckers are like the sun. 17 led's per light. 30degree throw
(EDIT: NOW THAT I HAVE SEEN THE LIGHTS IN ACTION, THESE WERE IN NEED OF SOME SERIOUS MODIFICATION TO THE LED OPTICS WITHIN THE LIGHT HOUSING.....30 DEGREES IS FAR TO WIDE...SEE BELOW.)
----------------------------------------------------------------------------------------------------------
Ok, so, the optics...I had some time to learn up on these things, and it should be noted that there are far too many different kinds of optics/LED combinations that exist in this world.
With that said, my new friend Bill (I think) at LEDSupply.com helped with my dilemma. Ended up going with the 100048 Carclo Lens, it is a 7 degree FWHM (Full Width at Half Maximum) IE: 7 degrees from far left to far right edge of the light beam, half way from its maximum "throw" (how far the strongest point of light actually goes in the direction you are pointing the light.) I only bought 17 to start with as I did not know if this was going to work.
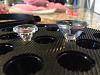
To clear up any confusion. These are Optics. Original optic on the left (weak and puny), new and much larger optic on the right (new hotness)
Now because these are larger, they do not fit in the carriage that the originals came in, (the carriage is the black plate like thing in the above picture).
Fortunately, thanks to Bill, the new optics fit directly onto/over the LED itself. effectively holding it in place. AWESOME! But there was still the height issue as seen below. The new optics left the cover plate about 1/8" from its sealing/watertight/secure location. So, fortunately I had some "D" shape 1/4" weather stripping left over from when my soft top was leaking at the top front of the doors, soooo I figure why not.
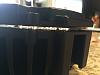
SUCCESS!! The weather stripping actually worked better than I thought. because it was 1/4", and the gap was about 1/8" it allowed me to "squeeze" the cover plate into position. BONUS: THE GLASS IN TEH COVER PLATE ACTUALLY PRESSES ONTO THE OPTICS NOT ONLY KEEPING THEM IN PLACE, BUT ACTUALLY ALIGNING THEM ALL TO FACE THE SAME DIRECTION....WIN-WIN.
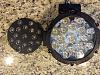
I took the "new hotness" light out to the field to do a bit of comparison. wired it up with some test wires set up with alligator clamps and....HOLY SHIT! it was indeed 7 degrees and these optics turned this wide angle light into a pencil beam of blinding darkness elimination! shined it around for fun and got yelled at by the apartment across the street. I call that success. I went home and immediately bought 51 more Carclo optics. amazingly BIll was still at his store and boxed them up right then and there. Just waiting on those to do the remaining three lights.
I. AM. EXCITED.
Comparison pics will come after the changeout is complete.
51 watt LED. suckers are like the sun. 17 led's per light. 30degree throw
(EDIT: NOW THAT I HAVE SEEN THE LIGHTS IN ACTION, THESE WERE IN NEED OF SOME SERIOUS MODIFICATION TO THE LED OPTICS WITHIN THE LIGHT HOUSING.....30 DEGREES IS FAR TO WIDE...SEE BELOW.)
----------------------------------------------------------------------------------------------------------
Ok, so, the optics...I had some time to learn up on these things, and it should be noted that there are far too many different kinds of optics/LED combinations that exist in this world.
With that said, my new friend Bill (I think) at LEDSupply.com helped with my dilemma. Ended up going with the 100048 Carclo Lens, it is a 7 degree FWHM (Full Width at Half Maximum) IE: 7 degrees from far left to far right edge of the light beam, half way from its maximum "throw" (how far the strongest point of light actually goes in the direction you are pointing the light.) I only bought 17 to start with as I did not know if this was going to work.
To clear up any confusion. These are Optics. Original optic on the left (weak and puny), new and much larger optic on the right (new hotness)
Now because these are larger, they do not fit in the carriage that the originals came in, (the carriage is the black plate like thing in the above picture).
Fortunately, thanks to Bill, the new optics fit directly onto/over the LED itself. effectively holding it in place. AWESOME! But there was still the height issue as seen below. The new optics left the cover plate about 1/8" from its sealing/watertight/secure location. So, fortunately I had some "D" shape 1/4" weather stripping left over from when my soft top was leaking at the top front of the doors, soooo I figure why not.
SUCCESS!! The weather stripping actually worked better than I thought. because it was 1/4", and the gap was about 1/8" it allowed me to "squeeze" the cover plate into position. BONUS: THE GLASS IN TEH COVER PLATE ACTUALLY PRESSES ONTO THE OPTICS NOT ONLY KEEPING THEM IN PLACE, BUT ACTUALLY ALIGNING THEM ALL TO FACE THE SAME DIRECTION....WIN-WIN.
I took the "new hotness" light out to the field to do a bit of comparison. wired it up with some test wires set up with alligator clamps and....HOLY SHIT! it was indeed 7 degrees and these optics turned this wide angle light into a pencil beam of blinding darkness elimination! shined it around for fun and got yelled at by the apartment across the street. I call that success. I went home and immediately bought 51 more Carclo optics. amazingly BIll was still at his store and boxed them up right then and there. Just waiting on those to do the remaining three lights.
I. AM. EXCITED.
Comparison pics will come after the changeout is complete.
Last edited by Lamer321; Jul 27, 2016 at 11:07 AM.
Thread Starter
JK Newbie
Joined: Mar 2015
Posts: 56
Likes: 0
From: Houston, tx
Engine Cooling
Facts: I live in Houston, TX
It is warm in Houston during every. single. day.
It is stupid hot in the summer months
Vehicles get hot, just like their engines.
So this happened/will happen.
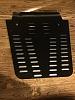
I bought it, just need a weekend to install. If anyone has advice or any tricks, ill take em. I have a Dremel, and a drill...
It is warm in Houston during every. single. day.
It is stupid hot in the summer months
Vehicles get hot, just like their engines.
So this happened/will happen.
I bought it, just need a weekend to install. If anyone has advice or any tricks, ill take em. I have a Dremel, and a drill...

JK Freak
Joined: May 2012
Posts: 645
Likes: 2
From: Tucson, AZ
Facts: I live in Houston, TX
It is warm in Houston during every. single. day.
It is stupid hot in the summer months
Vehicles get hot, just like their engines.
So this happened/will happen.
I bought it, just need a weekend to install. If anyone has advice or any tricks, ill take em. I have a Dremel, and a drill...
Attachment 615161
It is warm in Houston during every. single. day.
It is stupid hot in the summer months
Vehicles get hot, just like their engines.
So this happened/will happen.
I bought it, just need a weekend to install. If anyone has advice or any tricks, ill take em. I have a Dremel, and a drill...
Attachment 615161
Thread Starter
JK Newbie
Joined: Mar 2015
Posts: 56
Likes: 0
From: Houston, tx
lights in action
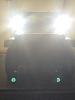
alright, here are two pictures of lights: NOTE: 2 lights are with the aftermarket optics, and 2 lights are stock.
here is just two lights unmodified...wide coverage but weak at distance.
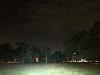
here are all 4 lights. All modified.....much better light at distance. My high beams are not on either.
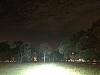
here is just two lights unmodified...wide coverage but weak at distance.
here are all 4 lights. All modified.....much better light at distance. My high beams are not on either.
Last edited by Lamer321; Jul 23, 2015 at 03:47 PM.
Thread Starter
JK Newbie
Joined: Mar 2015
Posts: 56
Likes: 0
From: Houston, tx
Amazon Prime Day - July 15th
In case you haven't heard, Amazon is hosting what they call "Prime Day" on July 15th (next wednesday). its a 24 hour "....better than Black Friday...." sale, according to Amazon.
My "Prime List" (mostly just everything thats on my Amazon Wish List)
HELLA HLA-H83140171 H4 12V 100/80W Halogen Bulb Off Road Use x2 = $13.48
KC HiLiTES (6307) H13 to H4 Headlight Conversion Cables = $18.54
Cibie 082440 Light Unit x2 = $87.16
Synergy Manufacturing 8001 Jeep JK High Steer Drag Link = $ 225.00
Synergy Manufacturing 8002 Jeep JK Heavy Duty Chromoly Tie Rod = $375.00
AntennaX Off-Road (13-inch) Antenna for (07 thru 15) Jeep Wrangler JK = $16.99
Barricade J100744 JK Rubi Rails - Textured Black = $199.00
Bestop 42640-01 HighRock 4x4 Under Seat Lock Box for Wrangler JK, Driver side = $56.50
Total cost: $936.75
hoping it comes down to under $600. big hopes, but still a big spend for me also...
My "Prime List" (mostly just everything thats on my Amazon Wish List)
HELLA HLA-H83140171 H4 12V 100/80W Halogen Bulb Off Road Use x2 = $13.48
KC HiLiTES (6307) H13 to H4 Headlight Conversion Cables = $18.54
Cibie 082440 Light Unit x2 = $87.16
Synergy Manufacturing 8001 Jeep JK High Steer Drag Link = $ 225.00
Synergy Manufacturing 8002 Jeep JK Heavy Duty Chromoly Tie Rod = $375.00
AntennaX Off-Road (13-inch) Antenna for (07 thru 15) Jeep Wrangler JK = $16.99
Barricade J100744 JK Rubi Rails - Textured Black = $199.00
Bestop 42640-01 HighRock 4x4 Under Seat Lock Box for Wrangler JK, Driver side = $56.50
Total cost: $936.75
hoping it comes down to under $600. big hopes, but still a big spend for me also...
Thread Starter
JK Newbie
Joined: Mar 2015
Posts: 56
Likes: 0
From: Houston, tx
New Top
Bought a Rampage Trail top. current top was leaky and loud. New top is much better, quetter and looks much better IMO.
There was one problem: As I had removed the foam wrapping around the roll bars it didnt quite fit as tightly as I had hoped. So, it at the top of the rear window, enough to disturb my view using the rear view mirror. SO....
3" PVC which I cut in half and then in half again, and secured with two hose clamps each...one on each side of the cage.
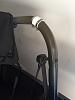
Next was the cross member: 3/4" steel pipe with PVC fittings on the ends, shaped to contour the 3" PVC, but also sit on the outer/top of the cage, roughing up the surfaces and some epoxy secured it in place more than adequately.

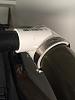
And all the way across...
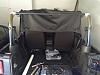
Overall I am very pleased. Eliminated the sag and gives the top a better shape. Have since painted everything black, including cage. is very hidden in the corner of the top, and because the top doesn't come completely off, it will never be seen.
There was one problem: As I had removed the foam wrapping around the roll bars it didnt quite fit as tightly as I had hoped. So, it at the top of the rear window, enough to disturb my view using the rear view mirror. SO....
3" PVC which I cut in half and then in half again, and secured with two hose clamps each...one on each side of the cage.
Next was the cross member: 3/4" steel pipe with PVC fittings on the ends, shaped to contour the 3" PVC, but also sit on the outer/top of the cage, roughing up the surfaces and some epoxy secured it in place more than adequately.
And all the way across...
Overall I am very pleased. Eliminated the sag and gives the top a better shape. Have since painted everything black, including cage. is very hidden in the corner of the top, and because the top doesn't come completely off, it will never be seen.