


WxNerd2015's Never Ending Build -

Thread Starter
JK Enthusiast
Joined: Sep 2015
Posts: 419
Likes: 22
From: Madison Heights, MI
 JK Tips and Tricks
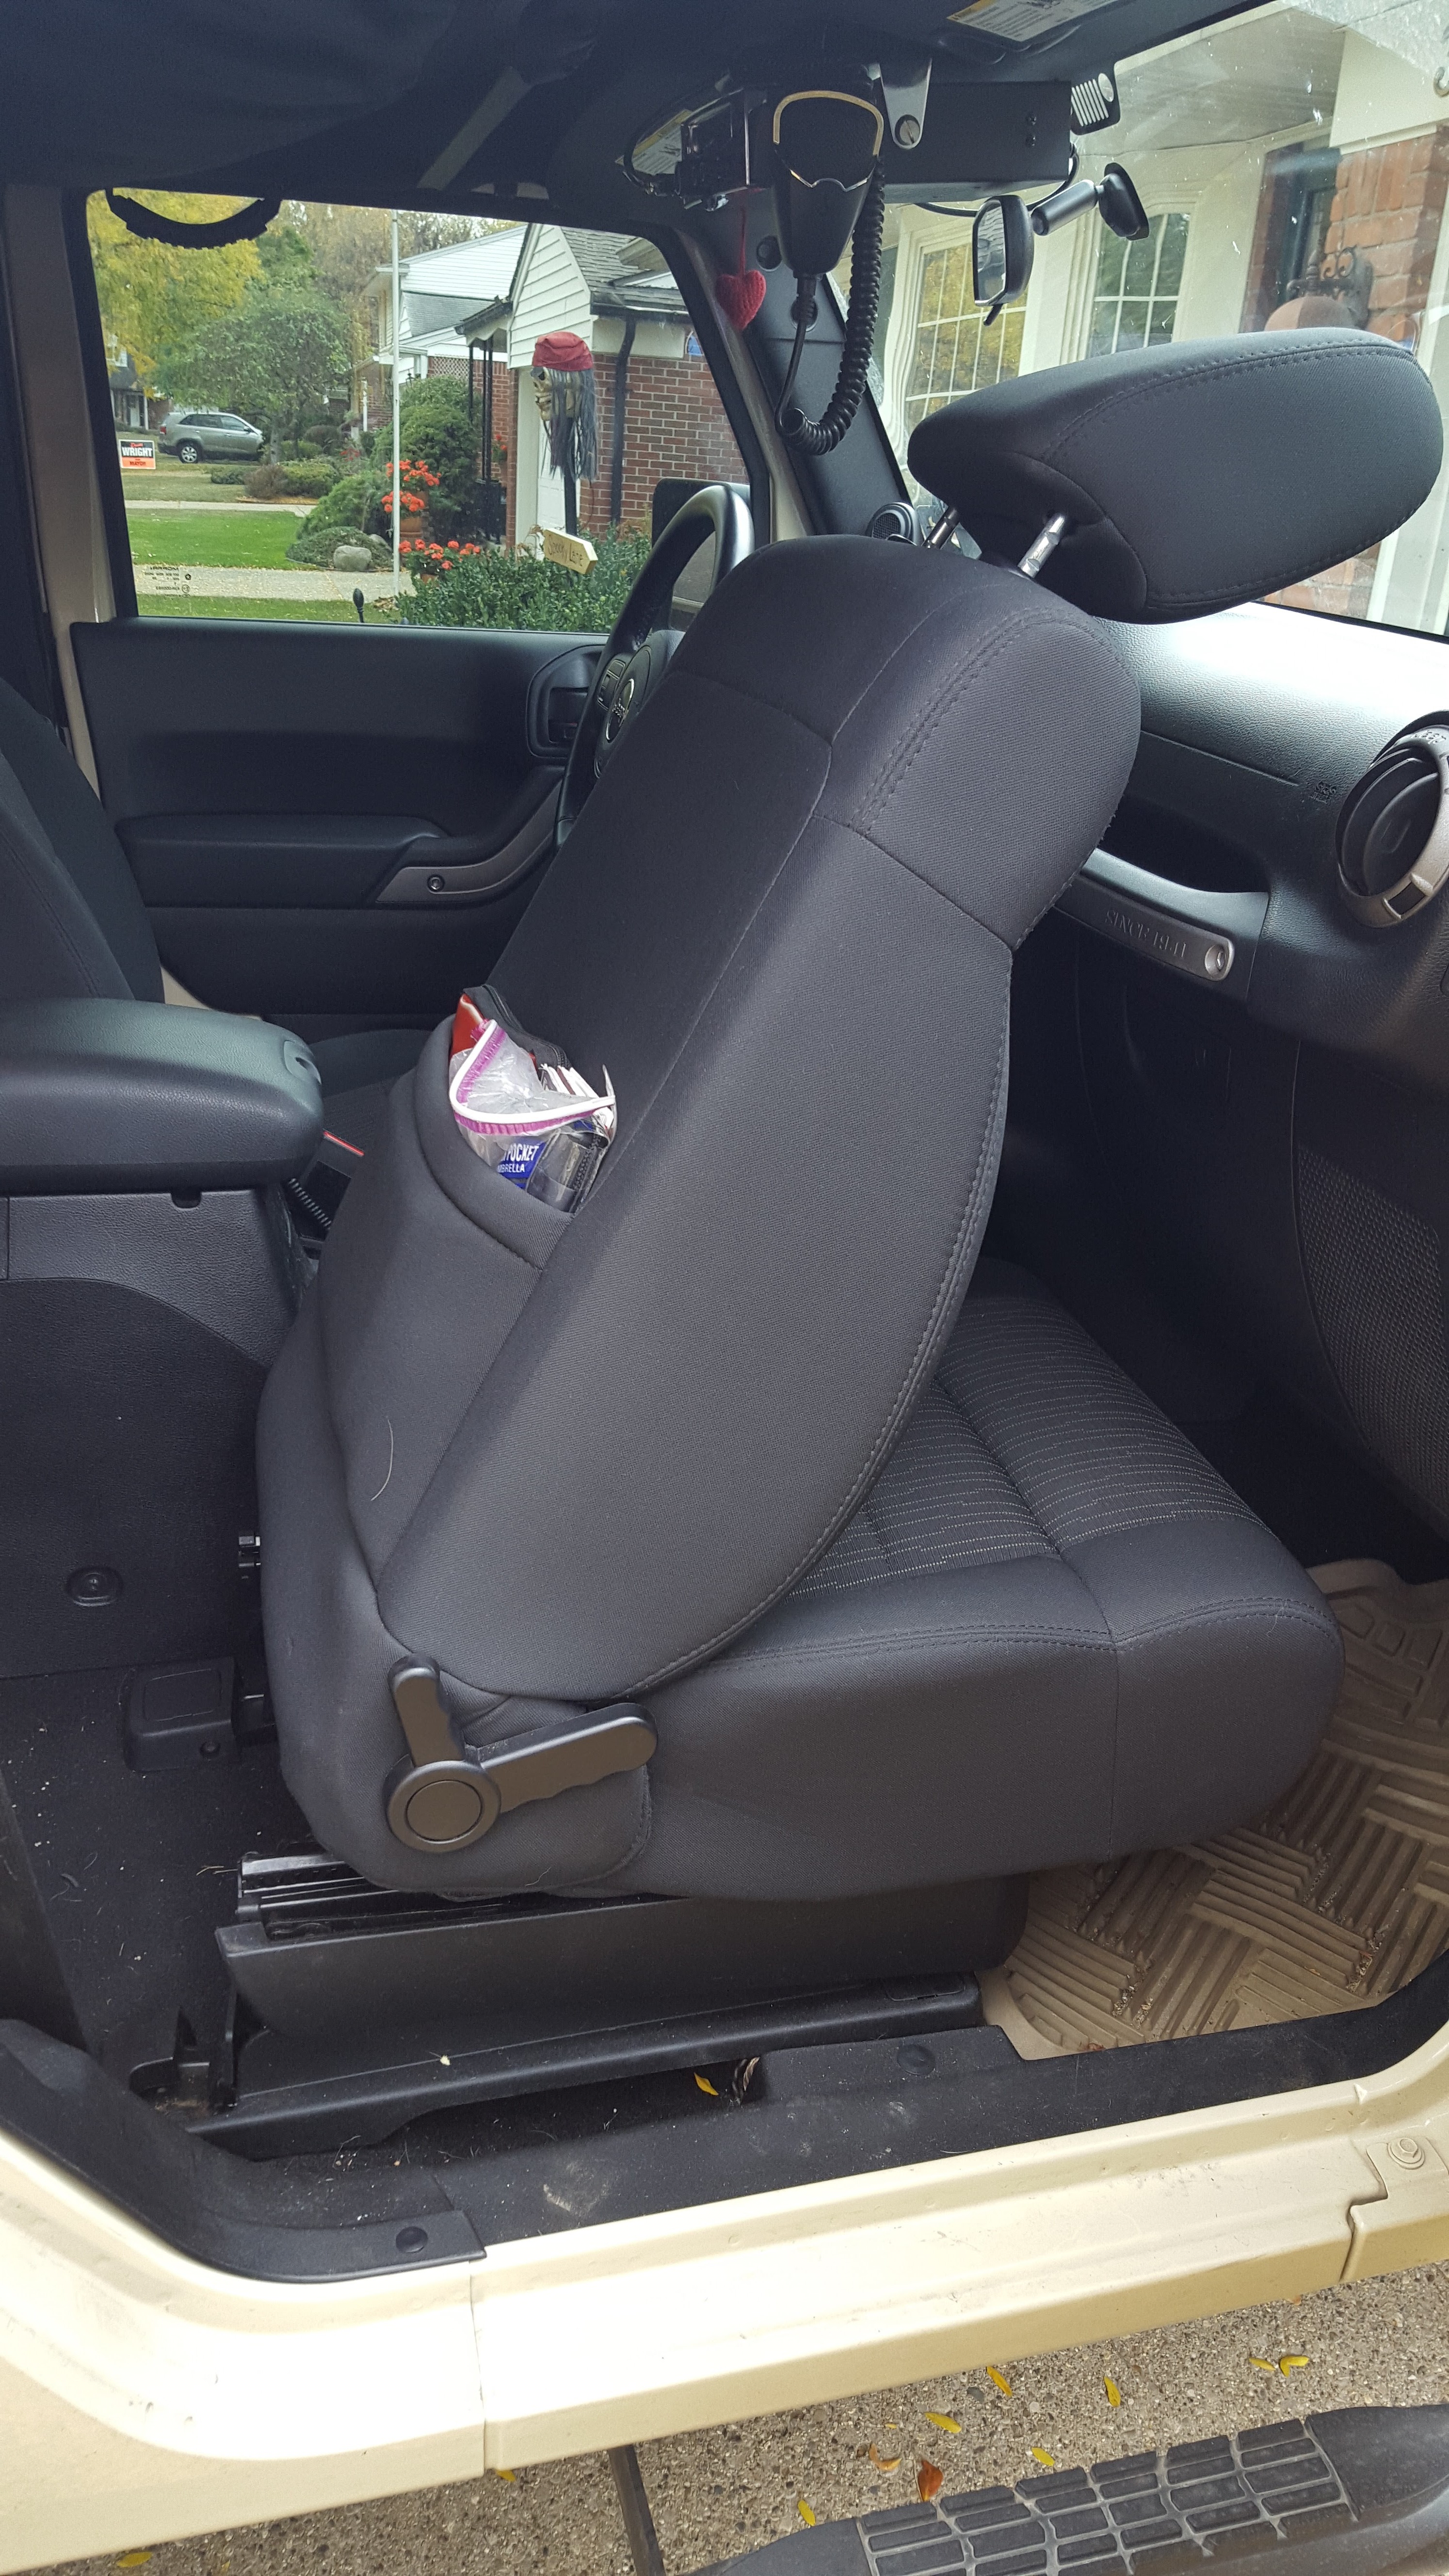
Just another quick JK Tip for ya! On the 2-door JKs, it can be hard to get in and out of the back sometimes! But Jeep built in a little trick to help your entry and exit! When you release the seat to open entry to the back seat area, if you push the seat forward, the track the seat is attached to will lift up and tilt the seat forward a few niches more and allow a bit bigger entry space into the rear of the Jeep!
Here is how you do it:
1. Starting with the seat in the normal, "upright and locked" position
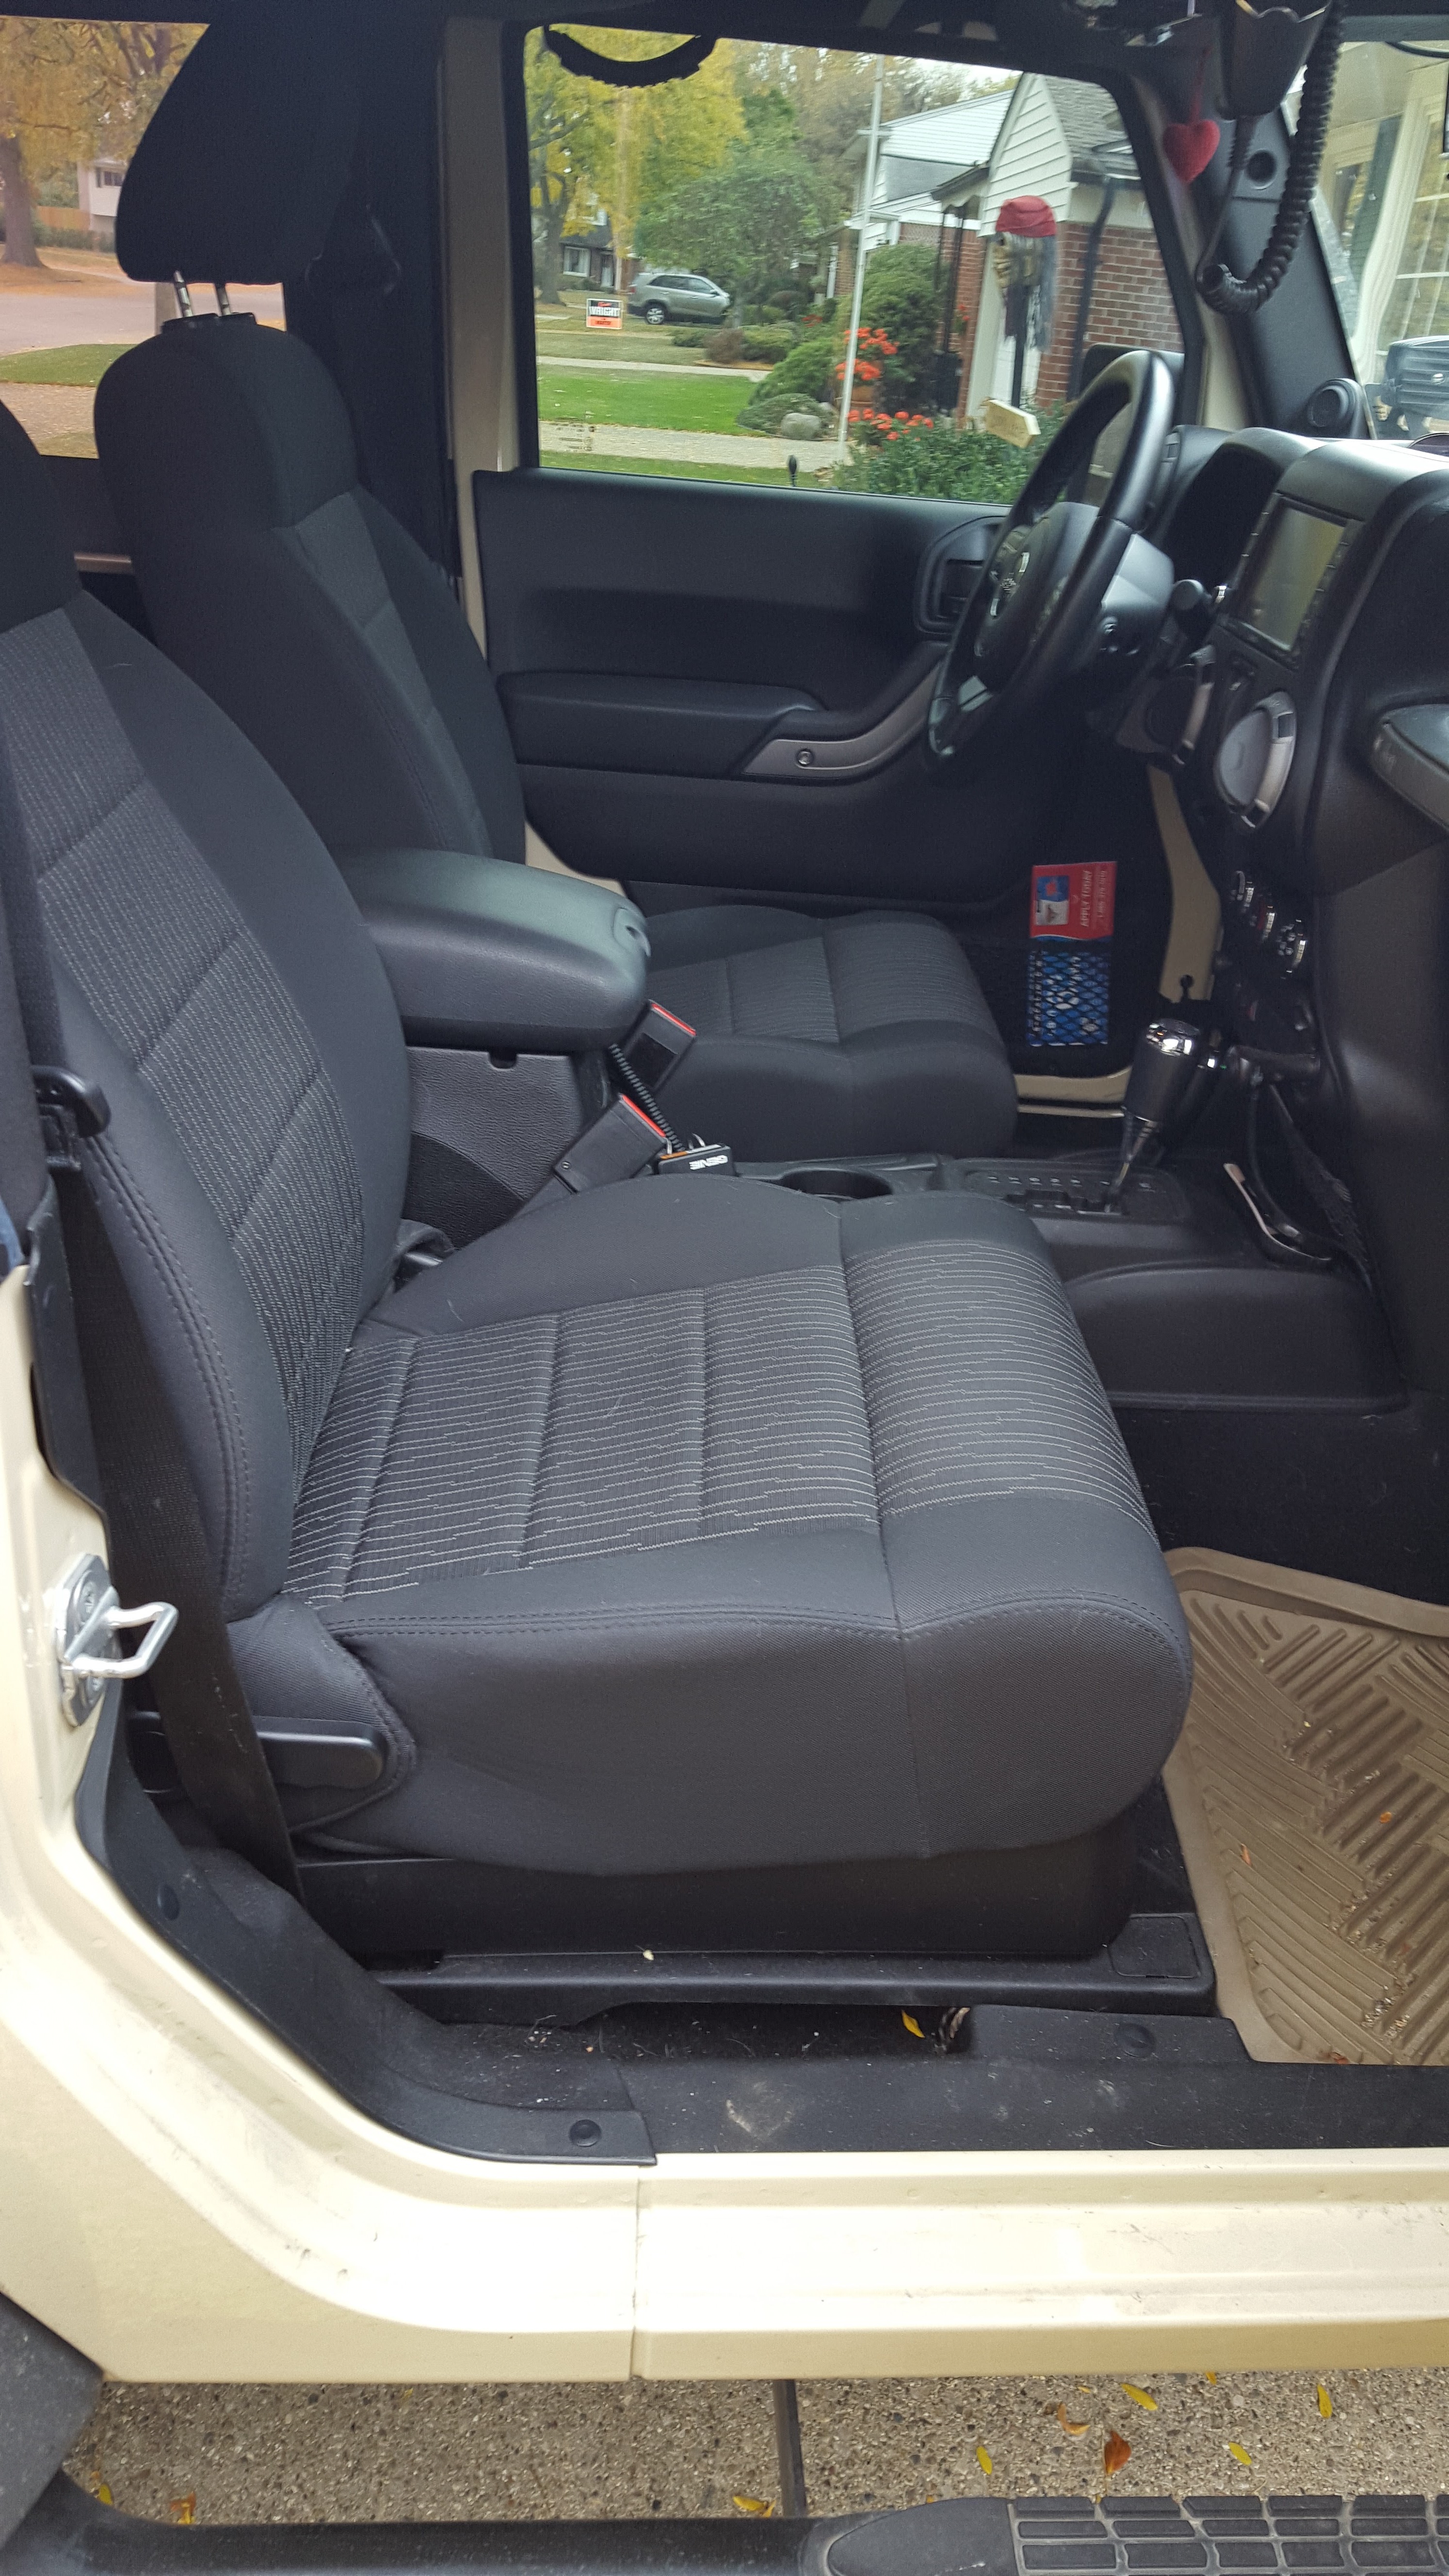
2. Grab the handle on the side of the seat, and lift the handle up (or push the top of the handle to the rear of the Jeep

The back of the seat will now be tipped forward

3. Reach under the front of the seat, grab the seat position adjustment bar, and slide the seat all the way forward
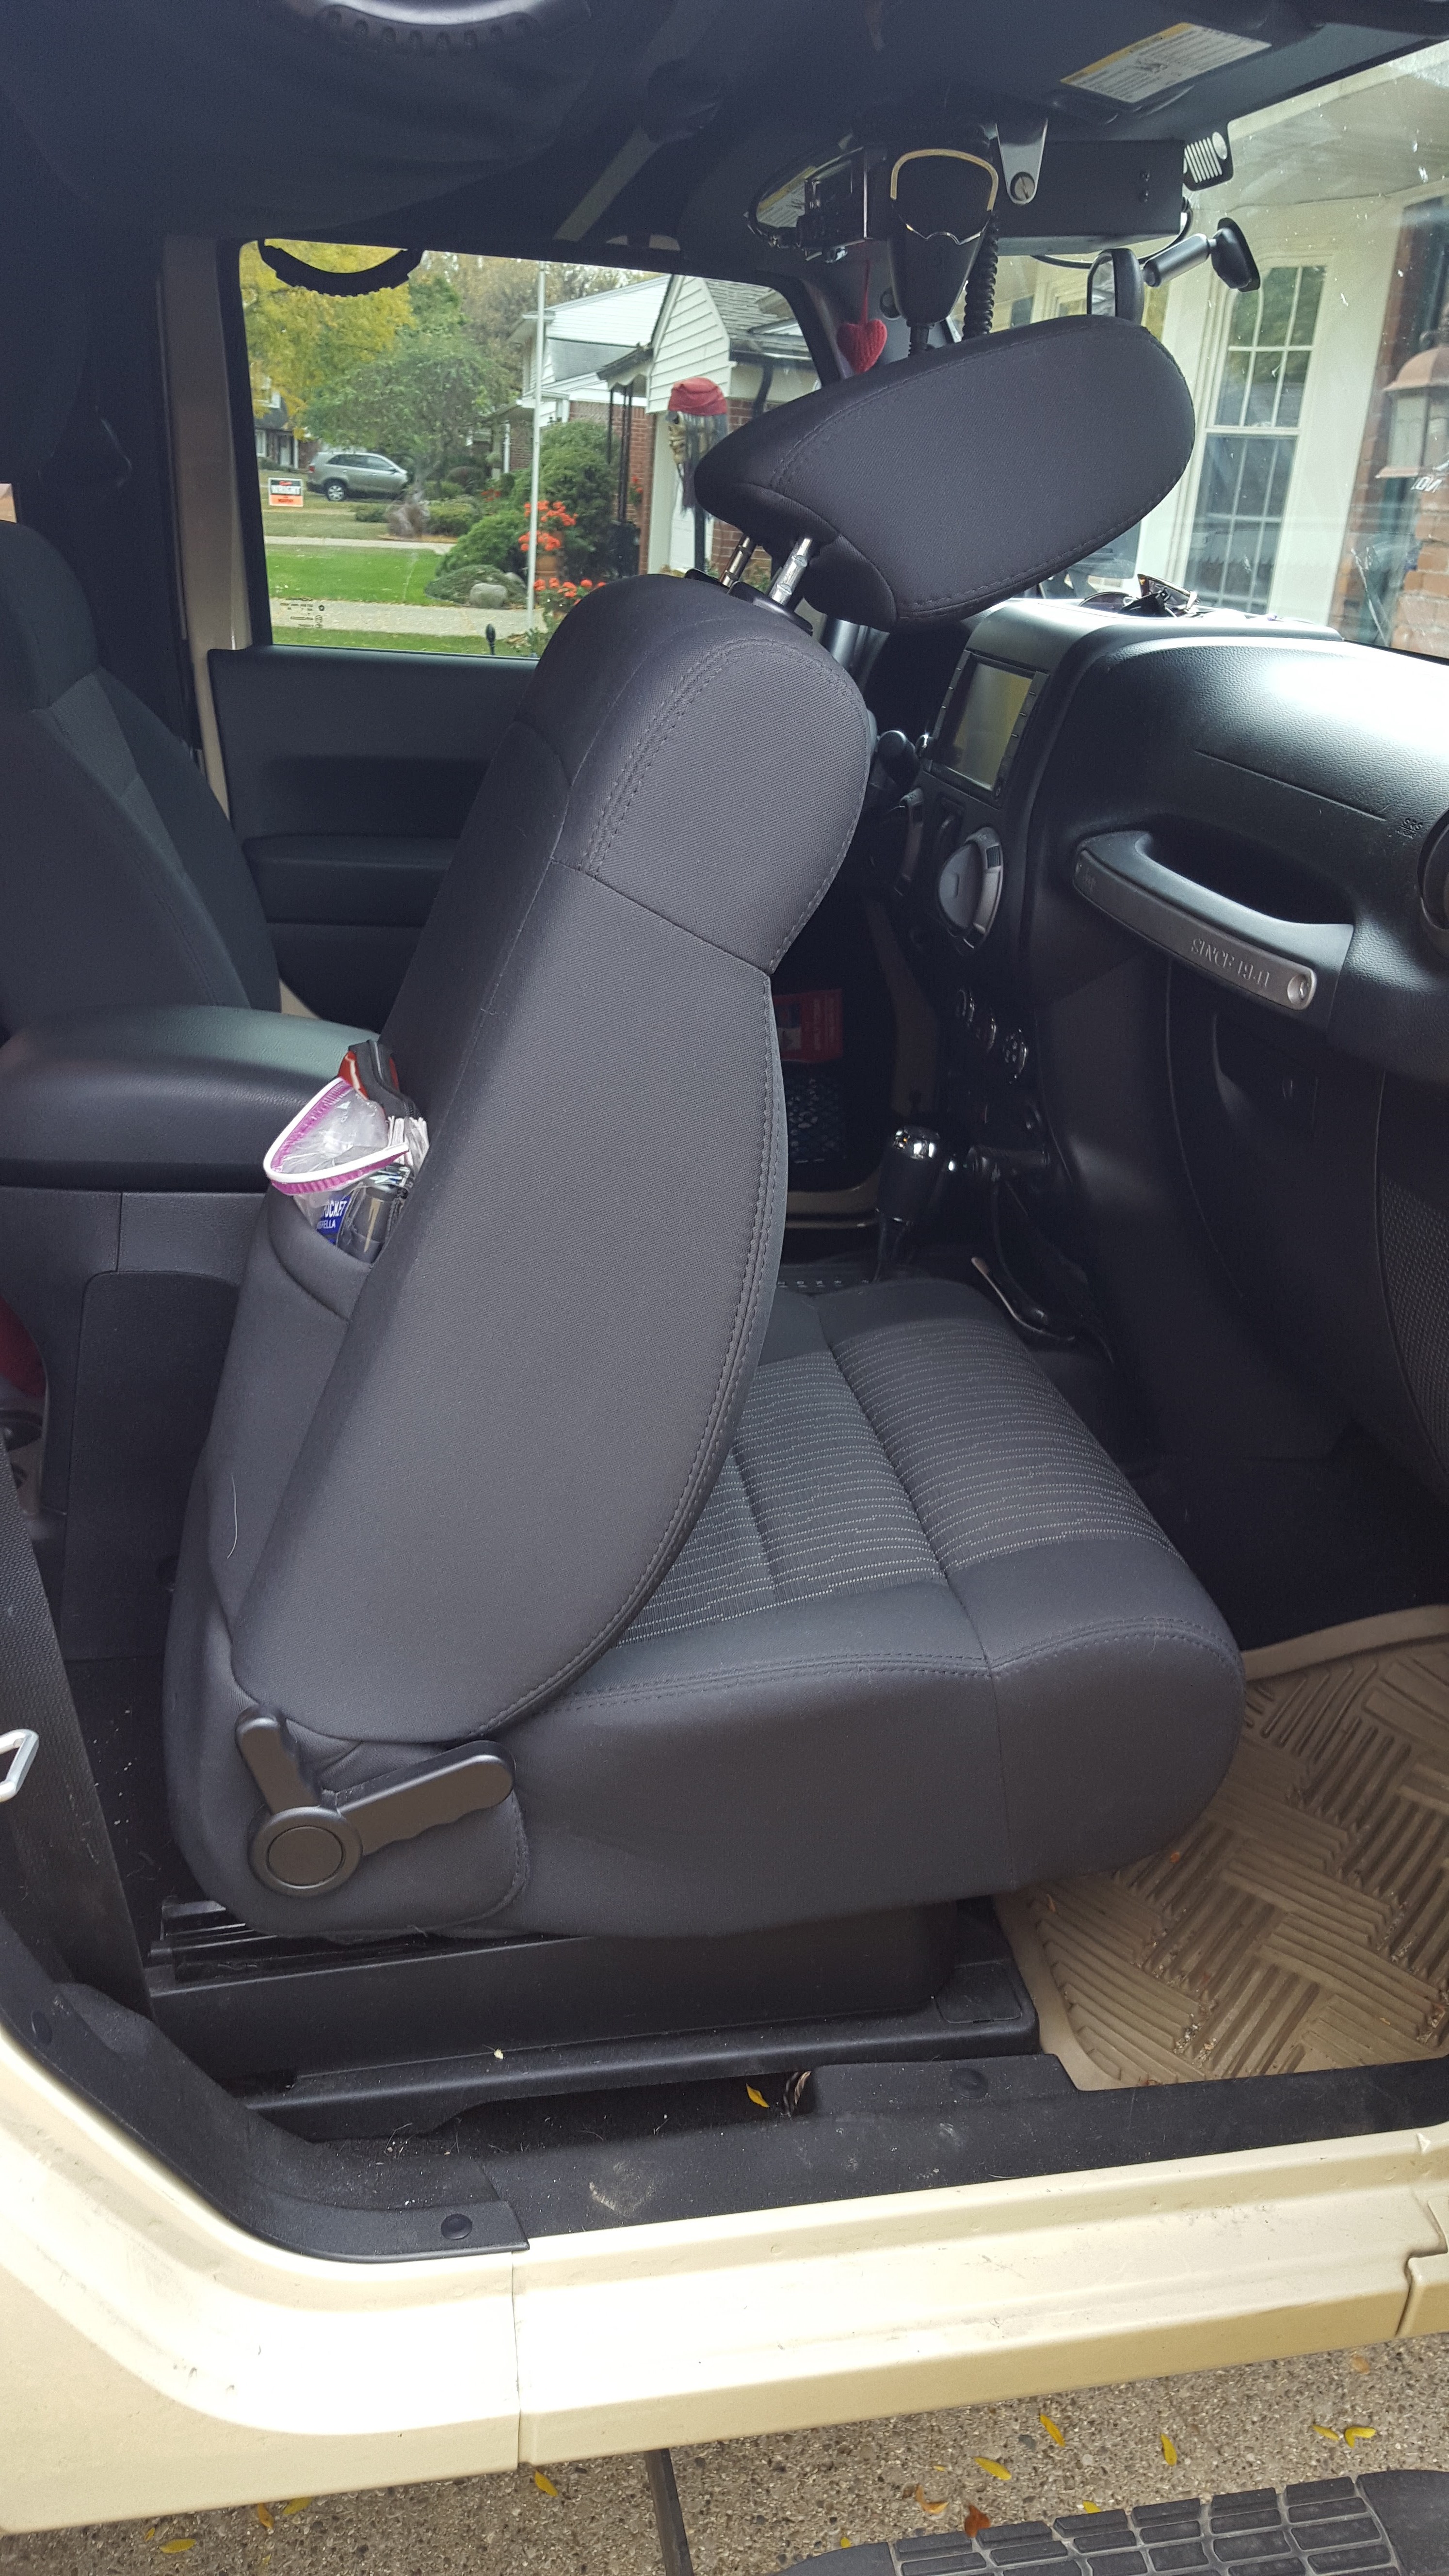
So you can see the seat is now all the way forward, with the track in it's normal, down position
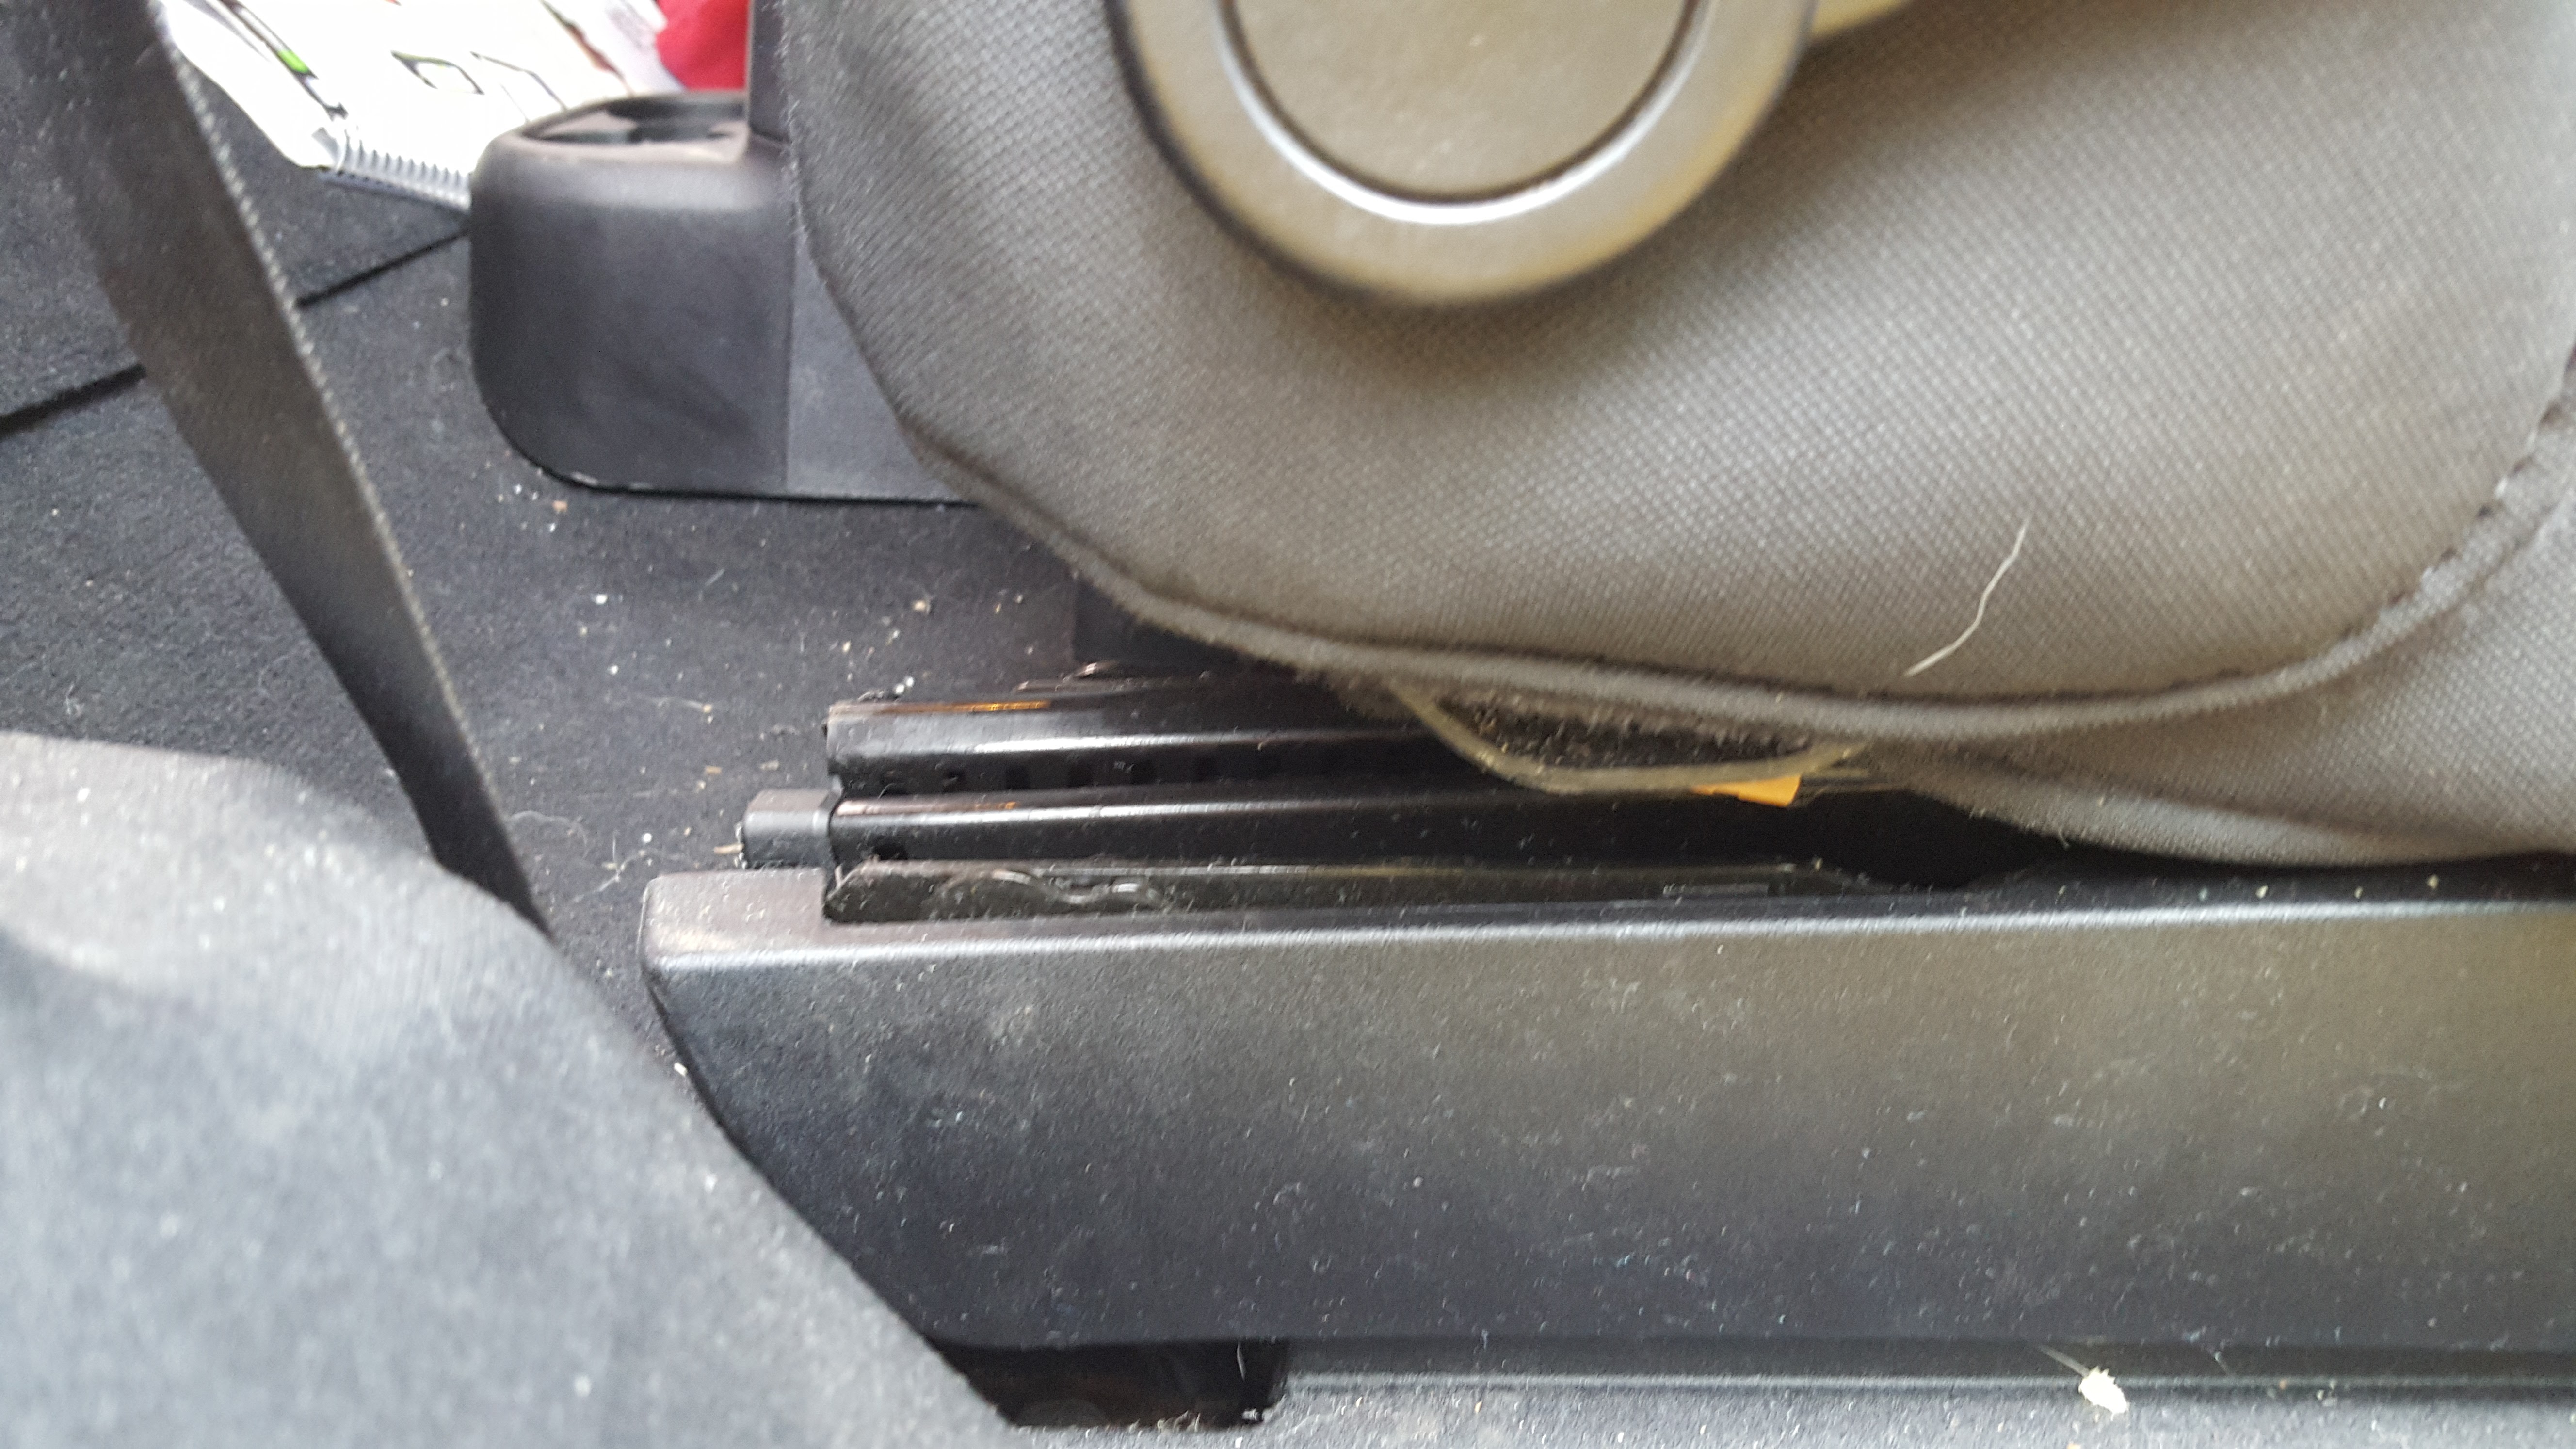

4. Now from the back of the seat, go ahead and push the seat towards the front of your Jeep! You should feel the seat lift up a little and then shift forward a few more inches! As you can see in the pictures, the back of the track for the seat lifts up, providing extra space to access the back seat area of your Jeep!


I hope, for those of you who have the 2 Door JKs, that this little trick helps ya out! Thanks for reading!
Here is how you do it:
1. Starting with the seat in the normal, "upright and locked" position
2. Grab the handle on the side of the seat, and lift the handle up (or push the top of the handle to the rear of the Jeep
The back of the seat will now be tipped forward
3. Reach under the front of the seat, grab the seat position adjustment bar, and slide the seat all the way forward
So you can see the seat is now all the way forward, with the track in it's normal, down position
4. Now from the back of the seat, go ahead and push the seat towards the front of your Jeep! You should feel the seat lift up a little and then shift forward a few more inches! As you can see in the pictures, the back of the track for the seat lifts up, providing extra space to access the back seat area of your Jeep!
I hope, for those of you who have the 2 Door JKs, that this little trick helps ya out! Thanks for reading!
Thread Starter
JK Enthusiast
Joined: Sep 2015
Posts: 419
Likes: 22
From: Madison Heights, MI
JK Tips and Tricks
For your enjoyment, here is the video of the folding and tipping of the front seats!
https://www.youtube.com/watch?v=PwBulTizsmA
https://www.youtube.com/watch?v=PwBulTizsmA
Thread Starter
JK Enthusiast
Joined: Sep 2015
Posts: 419
Likes: 22
From: Madison Heights, MI
Well...the Michigan Roads Strike Again...
Well, looks like I am in for another new windshield now! That will make my 3rd windshield in a year and a half! And somehow, even with being a storm chaser, the only thing to ruin my windshield is the dang Michigan roads! I had 3 chips in the windshield already but I was able to get am filled before they expanded, but within the last few days here, apparently something chipped my windshield at the very bottom edge, right in front of the steering wheel, and has now cracked up (no pun intended) into the windshield now and will have to be replaced...


At least insurance covers most of bit, but I still have a deductible to pay on it...looks like it's time to look into a rock/bug deflector for the hood to try and minimize these occurrences a bit more! I had one on my Dakota for 7 years and never even had a chip in the windshield, but 5 chips, 3 cracks, and now to the third windshield...it's worth a shot to not have to keep paying for new glass! Looking into getting the WeatherTech Bug/Rock deflector here for about $60, which is cheaper than my deductible for a windshield, so if it works...totally worth it! I'll see what deal I can get and hopefully order in the next few days!
I'll post a review of the deflector, as well as an install post once I go through all that!
2011 Jeep Wrangler | WeatherTech Stone and Bug Deflector, Bug Shield, Stone Guard | WeatherTech.com
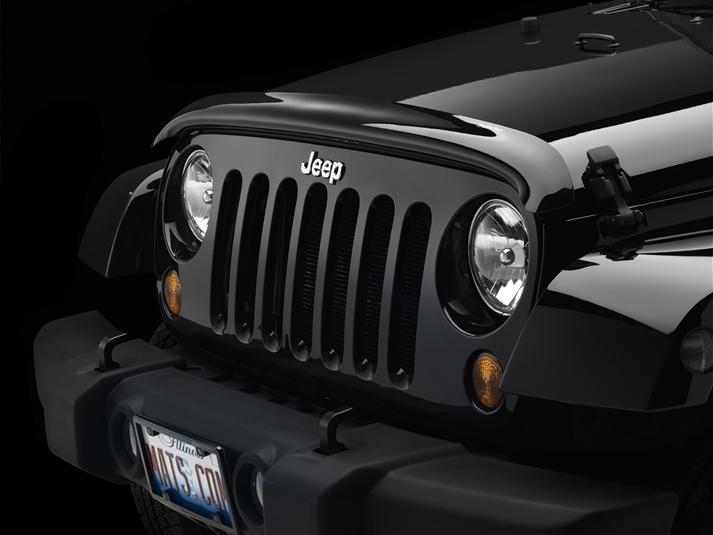
At least insurance covers most of bit, but I still have a deductible to pay on it...looks like it's time to look into a rock/bug deflector for the hood to try and minimize these occurrences a bit more! I had one on my Dakota for 7 years and never even had a chip in the windshield, but 5 chips, 3 cracks, and now to the third windshield...it's worth a shot to not have to keep paying for new glass! Looking into getting the WeatherTech Bug/Rock deflector here for about $60, which is cheaper than my deductible for a windshield, so if it works...totally worth it! I'll see what deal I can get and hopefully order in the next few days!
I'll post a review of the deflector, as well as an install post once I go through all that!
2011 Jeep Wrangler | WeatherTech Stone and Bug Deflector, Bug Shield, Stone Guard | WeatherTech.com
JK Enthusiast
Joined: May 2015
Posts: 194
Likes: 0
From: Canton,MI
Just another quick tip/trick for those of you with hard tops!
Let's admit it, it is nice to have a hard top too for your Jeep (especially if you live in the northern states where winter does actually happen ), and it's much better having the hard top factory installed from Jeep, and then add a soft top later! Cuz the other way around is a huge pain and hassle and you still may be missing some options that you could have had from the factory! But oneof the pains is, you have to disconnect the power and washer fluid lines from the hard top that are running to the wiper and heater on the rear window if you actually want to run it topless (which it's a Jeep, of coarse you want to run topless!
  ) but then you got these random wires just dangling around, and one with liquid iin it that could end up all over stuff! Now the best option would be to somehow "cap" the washer fluid line to make sure none leaks out (or in case you accidentally hit the switch). This is just a suggestion, however I have not hit it yet with m hard top off, so as long as you are to too forgetful, then you should be good!
No to the loose wire issue, now if it's just a quick run with the top off and you are not really concerned with where the wires go, then the quickest and easiest way to deal with the wires is to just tuck then back towards the front under the side of the tub (where you set the top on screw it in to to fasten it to the Jeep). That's the quickest and easiest, however I have found after a little bit they find their way out of there and are once again loose! Plus, by tucking them horizontally, some of the remaining washer fluid in the end of the line leaked out (I never hit the button, just some remained in the line) as usually the lines are kept vertical but once turned, the remaining fluid leaked out! The second option is a bit more secure and if you will have the hard top off for a while, go ahead and separate the plastic trim around the rear roll bar and then tuck the wires into the panel, as they fit completely inside and are totally secured and out of the way! No more worries on that! Except that you still get the run out of washer fluid from the line unless you cap it as it is sitting horizontal! Plus, that is more wear and tear on plastic trim pieces which are only so strong, and the more you move and flex them, the closer you get to breaking them, so be careful with that too! And lastly, this is the idea that I used! I went ahead and tucked the lines inside the roll bar cover which is easy to access, they are secure, and they are sitting vertical, so no worries on the washer fluid running out! And once the hard top goes back on for winter, they are just a quick pull from the roll bar cover and good to go! Thanks for reading! Here are a few pictures of my set up!
Let's admit it, it is nice to have a hard top too for your Jeep (especially if you live in the northern states where winter does actually happen
), and it's much better having the hard top factory installed from Jeep, and then add a soft top later! Cuz the other way around is a huge pain and hassle and you still may be missing some options that you could have had from the factory! But oneof the pains is, you have to disconnect the power and washer fluid lines from the hard top that are running to the wiper and heater on the rear window if you actually want to run it topless (which it's a Jeep, of coarse you want to run topless! ) but then you got these random wires just dangling around, and one with liquid iin it that could end up all over stuff! Now the best option would be to somehow "cap" the washer fluid line to make sure none leaks out (or in case you accidentally hit the switch). This is just a suggestion, however I have not hit it yet with m hard top off, so as long as you are to too forgetful, then you should be good!No to the loose wire issue, now if it's just a quick run with the top off and you are not really concerned with where the wires go, then the quickest and easiest way to deal with the wires is to just tuck then back towards the front under the side of the tub (where you set the top on screw it in to to fasten it to the Jeep). That's the quickest and easiest, however I have found after a little bit they find their way out of there and are once again loose! Plus, by tucking them horizontally, some of the remaining washer fluid in the end of the line leaked out (I never hit the button, just some remained in the line) as usually the lines are kept vertical but once turned, the remaining fluid leaked out! The second option is a bit more secure and if you will have the hard top off for a while, go ahead and separate the plastic trim around the rear roll bar and then tuck the wires into the panel, as they fit completely inside and are totally secured and out of the way! No more worries on that! Except that you still get the run out of washer fluid from the line unless you cap it as it is sitting horizontal! Plus, that is more wear and tear on plastic trim pieces which are only so strong, and the more you move and flex them, the closer you get to breaking them, so be careful with that too! And lastly, this is the idea that I used! I went ahead and tucked the lines inside the roll bar cover which is easy to access, they are secure, and they are sitting vertical, so no worries on the washer fluid running out! And once the hard top goes back on for winter, they are just a quick pull from the roll bar cover and good to go! Thanks for reading! Here are a few pictures of my set up!
Thread Starter
JK Enthusiast
Joined: Sep 2015
Posts: 419
Likes: 22
From: Madison Heights, MI
Ok, cool! Sounds good! I was playing it on the safe side with that, but I figured there had to be some sort of "fail safe" built into that! Thanks!
Thread Starter
JK Enthusiast
Joined: Sep 2015
Posts: 419
Likes: 22
From: Madison Heights, MI
Thank you Safelight!
Well, thanks to Safelight this morning, I now have a shiny, clean, brand new windshield on the Jeep! No more chips and cracks! They met me at work and got the whole windshield replaced, even around my CB up in the windshield on the inside and my off road lights which are up in front of the windshield on the bottom edge no problem! Even got em straighter than they were probably and vacuumed the entire front seat areas! And all was done in just over an hour! Very impressive! A+ top notch work and service! If ya ever need any automotive glass, Safelight always takes great care of you!
Back to mods now though, and hopefully my WeatherTech Rock Deflector arrives in the next few days! Ordered it from ExtremeTerrain.com and got free shipping on it too!
Well, that's all for now!
Back to mods now though, and hopefully my WeatherTech Rock Deflector arrives in the next few days! Ordered it from ExtremeTerrain.com and got free shipping on it too!
Well, that's all for now!
Thread Starter
JK Enthusiast
Joined: Sep 2015
Posts: 419
Likes: 22
From: Madison Heights, MI
Windshield LED Light Install
So, as mentioned a little while ago, here is the write up for the off road windshield light install!
I was looking into getting a 50” bar for across the top of the windshield, but at the time, it was just out of my price range, and I always liked the look of the windshield lights, and did some research and found, for what I was wanting to spend, these cubes on windshield mounted brackets which would produce more than enough light! So I did some eBay searching as well as some off road sites. I found some of the top brands out there, such as Rigid Industries or KC were absolutely top notch, but for the price, I just could not pull the trigger as my preferred price range was a bit lower! So I came across these Cree LED cube lights on eBay, which seemed plenty powerful, had the same sort of look as the KCs and Rigid Industries that I was looking at, and had a muuuuuch better price!
I also decided that I didn’t really wanna settle for just one beam pattern or the other, and I thought the stacked windshield lights with the dual brackets just looked really cool! So I ended up with a set of spot beam pattern (10* beam pattern but really long range), a set of fog beam pattern (45*-60* beam pattern, depending on what you read as I have never actually measured and the agreement in listings wasn’t fully clear, but they spread nicely and have a great wide output, but don’t go as far as the spots), and a pair of dual mount windshield brackets which just reuse the same bolts and screw that the windshield already contains. I picked all this up for around $150, and overall, I am very happy!
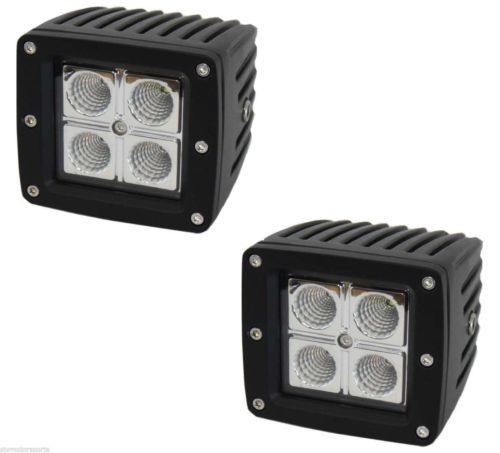
2 x 16W Dually Cube CREE LED Flood Fog Driving Light for Off Road ATV Jeep Truck | eBay

DUAL LED BAR PILLAR MOUNT BRACKET FOR SQUARE FLOOD LIGHT 07-15 JEEP WRANGLER JK

2x3" cube CREE Led Work Light Square Offroad SUV Boat ATV Jeep Lamp 4x4 Foglight
So, to start the install, I had these two sets of cube LEDs, which hand nothing with them, except the light with about 5” of wiring off the back, and hardware to mount to the included brackets. I set aside the included brackets as they were not needed for the brackets that I had purchased to mount the lights to. I decide that for me, the best set up would be to get a bit more height for the spot LEDs and mount them on the upper part of the dual mounting bracket and the flood LEDs would mount in the lower location. And we now get to one of the hardest parts of the install right off the bat:
1. You slight the bracket into the proper groves from the backside of the light.
2. Then adjust the light on the bracket until the holes on both sides of the lights, line up with the holes in the bracket.
***As a side note, I recommend doing the lower lights first as access from the top of the light is easier than from the bottom***
3. Once you have the holes lined up, you can use the included hardware for the fasten the lights to the brackets.
a. This is done by dropping a nut into the proper groove on the back of the light.
b. Making sure that the nut remains balanced in the groove, go ahead and insert the screw
***Side note, I used a closed box end wrench to reach in the grooves on the opposite side that the bolt was coming from to make sure I could push the bolt into the nut and begin to thread it, and once the bolt was tight enough to the nut, it did not move and tightened down nicely. However, this only worked on the flood patterned lights as the hardware that was sent with the spot beam pattern did not fit the holes on the lights, which meant a trip to AutoZone to get the proper sized nuts and screws that had heads that would sink into the holes and reach the nut inside. I guess that’s what I get for ordering the “from the manufacturer” parts which are located in China, never the less though, I was able to get it worked out and tightened down.***
c. Once you are able to get the bolt threaded into the nut, line the lights up roughly where you think they should be, and tighten down. FYI, this whole set up is done away from the vehicle as there was no need to be at the vehicle to get this all set up!
4. With the lights now secured to the bracket, I had to figure out what I was going to do for wiring and a switch. Once again, a trip to AutoZone solved that problem, and they ordered a completely switch harness with fuse and relay for me for about $30 and took the weekend to come into the store.
a. As these are LEDs and have an extremely low power draw compared to any other type of off road light, AutoZone advised me that it was perfectly fine to wire all 4 LEDs onto the same switch and fuse as it did not exceed the rating on the harness.

Pilot Automotive/Pre-wired harness kit with micro switch for 12 volt auxiliary lamps PL-HARN3 - Read Reviews on Pilot Automotive #PL-HARN3
5. I also wanted to make sure that paint behind the brackets did not get scratched, and this were just cost iron brackets which were powder coated, so some buffer between the paint and the bracket was needed.
6. I went to Home Depot, and the guy I talked to was very helpful once I explained what I was looking for and needed and we decided on a piece of weather stripping that goes at the bottom of the entry of a front door on a house, which is rubber and pretty thin was exactly what I needed to cut out the shape of the bracket and then place behind the bracket when I mount it on the Jeep to keep the windshield frame protected!
7. Cutting was relatively easy for the padding as I took the weather stripping, held the base of the bracket up and scored the rubber with my pocket knife where the outer edge was and the holes for the screws and then cut the pieces that I needed with scissors.
8. Once I had the switch/harness in hand and the padding to go behind the brackets cut to shape, it was time to get going on getting the lights on the Jeep!
I was looking into getting a 50” bar for across the top of the windshield, but at the time, it was just out of my price range, and I always liked the look of the windshield lights, and did some research and found, for what I was wanting to spend, these cubes on windshield mounted brackets which would produce more than enough light! So I did some eBay searching as well as some off road sites. I found some of the top brands out there, such as Rigid Industries or KC were absolutely top notch, but for the price, I just could not pull the trigger as my preferred price range was a bit lower! So I came across these Cree LED cube lights on eBay, which seemed plenty powerful, had the same sort of look as the KCs and Rigid Industries that I was looking at, and had a muuuuuch better price!
I also decided that I didn’t really wanna settle for just one beam pattern or the other, and I thought the stacked windshield lights with the dual brackets just looked really cool! So I ended up with a set of spot beam pattern (10* beam pattern but really long range), a set of fog beam pattern (45*-60* beam pattern, depending on what you read as I have never actually measured and the agreement in listings wasn’t fully clear, but they spread nicely and have a great wide output, but don’t go as far as the spots), and a pair of dual mount windshield brackets which just reuse the same bolts and screw that the windshield already contains. I picked all this up for around $150, and overall, I am very happy!
2 x 16W Dually Cube CREE LED Flood Fog Driving Light for Off Road ATV Jeep Truck | eBay
DUAL LED BAR PILLAR MOUNT BRACKET FOR SQUARE FLOOD LIGHT 07-15 JEEP WRANGLER JK
2x3" cube CREE Led Work Light Square Offroad SUV Boat ATV Jeep Lamp 4x4 Foglight
So, to start the install, I had these two sets of cube LEDs, which hand nothing with them, except the light with about 5” of wiring off the back, and hardware to mount to the included brackets. I set aside the included brackets as they were not needed for the brackets that I had purchased to mount the lights to. I decide that for me, the best set up would be to get a bit more height for the spot LEDs and mount them on the upper part of the dual mounting bracket and the flood LEDs would mount in the lower location. And we now get to one of the hardest parts of the install right off the bat:
1. You slight the bracket into the proper groves from the backside of the light.
2. Then adjust the light on the bracket until the holes on both sides of the lights, line up with the holes in the bracket.
***As a side note, I recommend doing the lower lights first as access from the top of the light is easier than from the bottom***
3. Once you have the holes lined up, you can use the included hardware for the fasten the lights to the brackets.
a. This is done by dropping a nut into the proper groove on the back of the light.
b. Making sure that the nut remains balanced in the groove, go ahead and insert the screw
***Side note, I used a closed box end wrench to reach in the grooves on the opposite side that the bolt was coming from to make sure I could push the bolt into the nut and begin to thread it, and once the bolt was tight enough to the nut, it did not move and tightened down nicely. However, this only worked on the flood patterned lights as the hardware that was sent with the spot beam pattern did not fit the holes on the lights, which meant a trip to AutoZone to get the proper sized nuts and screws that had heads that would sink into the holes and reach the nut inside. I guess that’s what I get for ordering the “from the manufacturer” parts which are located in China, never the less though, I was able to get it worked out and tightened down.***
c. Once you are able to get the bolt threaded into the nut, line the lights up roughly where you think they should be, and tighten down. FYI, this whole set up is done away from the vehicle as there was no need to be at the vehicle to get this all set up!
4. With the lights now secured to the bracket, I had to figure out what I was going to do for wiring and a switch. Once again, a trip to AutoZone solved that problem, and they ordered a completely switch harness with fuse and relay for me for about $30 and took the weekend to come into the store.
a. As these are LEDs and have an extremely low power draw compared to any other type of off road light, AutoZone advised me that it was perfectly fine to wire all 4 LEDs onto the same switch and fuse as it did not exceed the rating on the harness.
Pilot Automotive/Pre-wired harness kit with micro switch for 12 volt auxiliary lamps PL-HARN3 - Read Reviews on Pilot Automotive #PL-HARN3
5. I also wanted to make sure that paint behind the brackets did not get scratched, and this were just cost iron brackets which were powder coated, so some buffer between the paint and the bracket was needed.
6. I went to Home Depot, and the guy I talked to was very helpful once I explained what I was looking for and needed and we decided on a piece of weather stripping that goes at the bottom of the entry of a front door on a house, which is rubber and pretty thin was exactly what I needed to cut out the shape of the bracket and then place behind the bracket when I mount it on the Jeep to keep the windshield frame protected!
7. Cutting was relatively easy for the padding as I took the weather stripping, held the base of the bracket up and scored the rubber with my pocket knife where the outer edge was and the holes for the screws and then cut the pieces that I needed with scissors.
8. Once I had the switch/harness in hand and the padding to go behind the brackets cut to shape, it was time to get going on getting the lights on the Jeep!
Thread Starter
JK Enthusiast
Joined: Sep 2015
Posts: 419
Likes: 22
From: Madison Heights, MI
Windshield LED Light Install (continued)
9. First, I started by fastening the light brackets, with the lights attached, to their mounting location on the Jeep.
a. Drivers side was as simple as removing the torque screws at the base of the windshield on the front side (just 2 torque screws)
b. Line the bracket with the padding on the back (in between the bracket and the windshield frame) with the existing holes on the windshield frame
c. Reinsert the 2 torque screws you had just removed
d. Make sure the screws thread into the holes
e. Tighten down the torque screws, and your are good to go. And as you can see in the picture, the stock torque screws are used and the light is fastened just fine!

f. The passenger side provided much more of an issue for me, as you begin the same way be removing the existing 2 torque screws on the front of the windshield frame.
g. I then attempted to place the light bracket the same way as the driver side, but I found that if it was attached the same way, it pinched the passenger side wiper to the windshield and did not allow it to move.
h. Therefore, one more trip to AutoZone for some washers and longer bolts which matched the size of the holes in the windshield frame.
i. Once I had the correct sized bolts, I tried to reattached the bracket
j. It took some fiddling and test fits with washers as spacers, but I was able to tighten the bracket down without it pinching the passenger side wiper. It took two washers on the more inward hole to tilt the passenger side bracket out slightly, but it is 100% clear then. Eventually, I may go ahead and have the bracket reworked a bit so as not to have to have “spacers” in there at all, but for the time being, it has worked exactly how I needed it to! So as you can see below, there are now silver bolts which are longer than the stock holding it in, as well as in the second picture you can see the washers inserted as spacers behind the bracket and the weather stripping which is also behind the bracket!


10. So with the actual lights mounted to the Jeep now, the next task was wiring
a. I started by splicing the ends of wires coming off of the lights, into the new AutoZone switch harness ends which were meant for the lights (2 splices for each light, and while I would have loved to solder the connections together, I did not have those tools available when I did this so I used wire splices from AutoZone, which were the blue clips that you clamp close and they tap the two wires…one day I will go back and make those connections better)
b. Anyhow, that is a total of 4 splices per side of the Jeep and then the connection points were wrapped extremely good and tight with tape!

c. I then undid the 4 torque screws which are located on the panel the wipers are located in
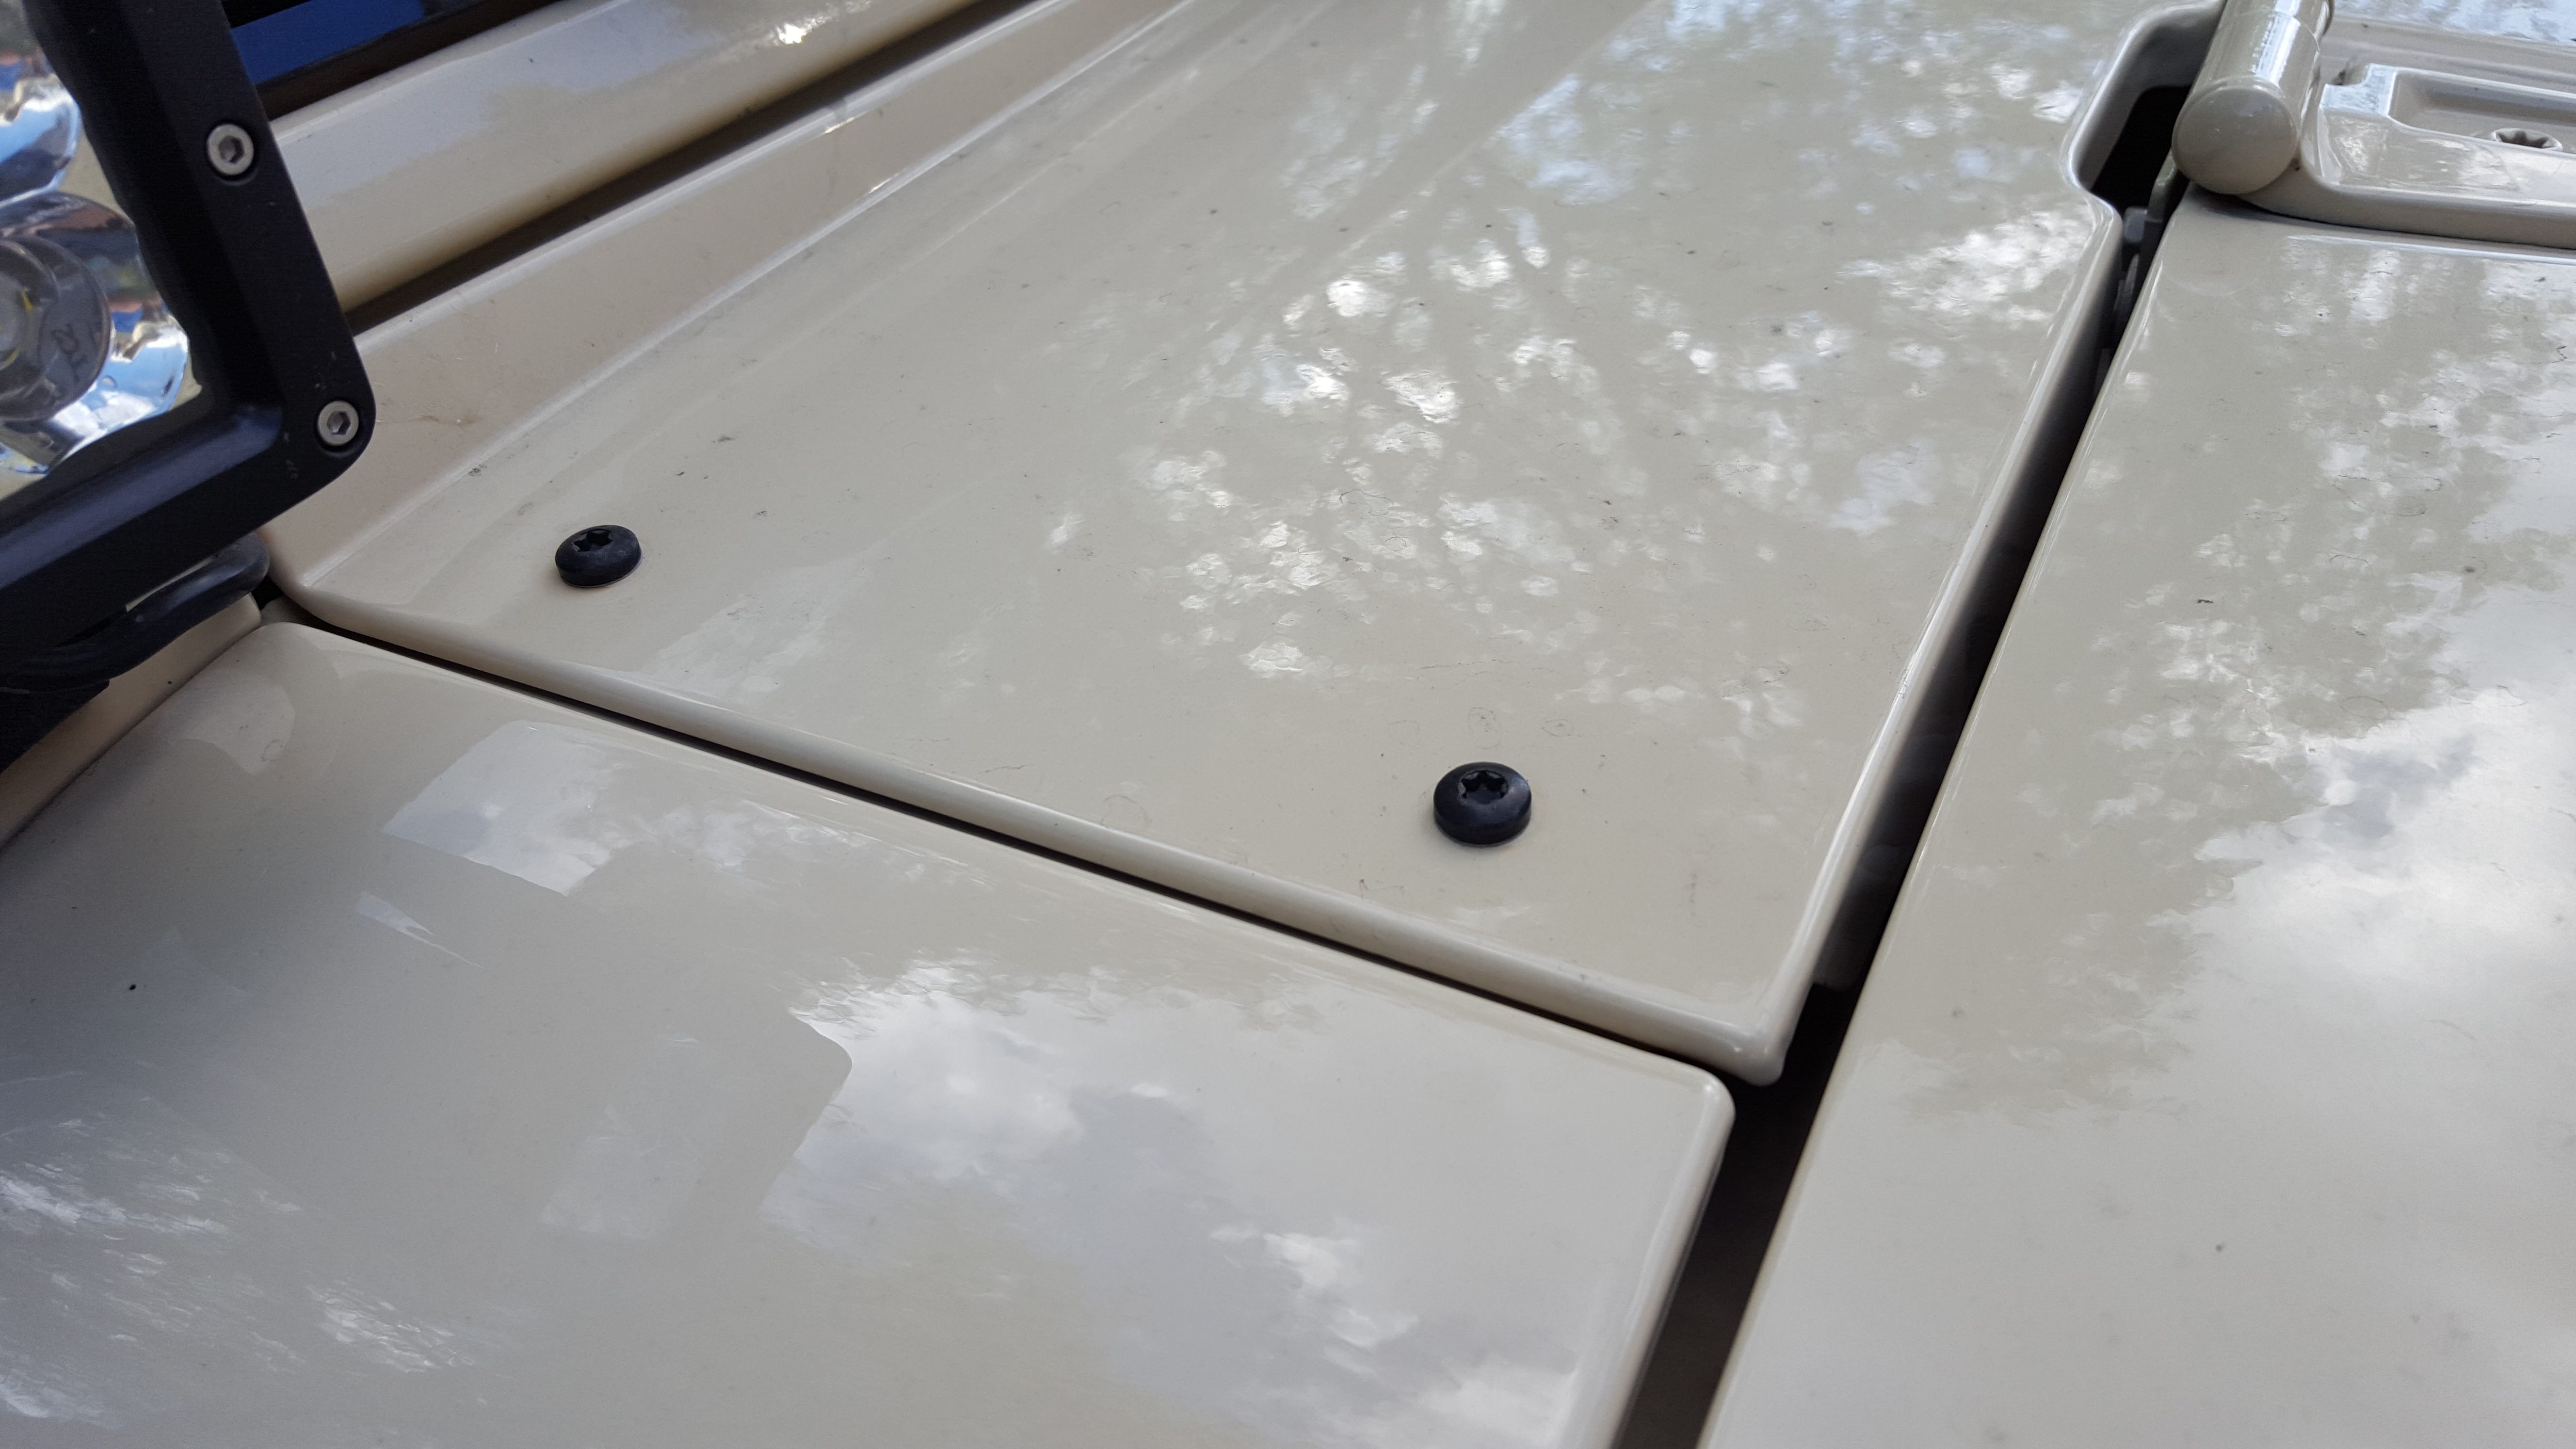
d. From here, I was able to lift the panel up just enough and slide the harness down underneath this panel, which as you can see as a lot of empty and unused space.

e. Once you tighten the panel just in front of the windshield back on, you can then work on making the connections to the power and ground.
f. First was to make the connection to the battery for power. This was connected to the positive pole by removing one of the bolts on the connector on top, sliding the end of the harness on for a power connection, and then reattaching the bolt
g. Then, we had to find a location to hang the fuse. For this, I ran the wire harness forward from the battery up next to the fuse box and undid one of the bolts on the edge of the body of the hood.
h. Then lined the hole up in the top of the fuse holder and put the bolt back through that, and into its original hole. You can also see the ground connection I made for the fuse itself in the first picture
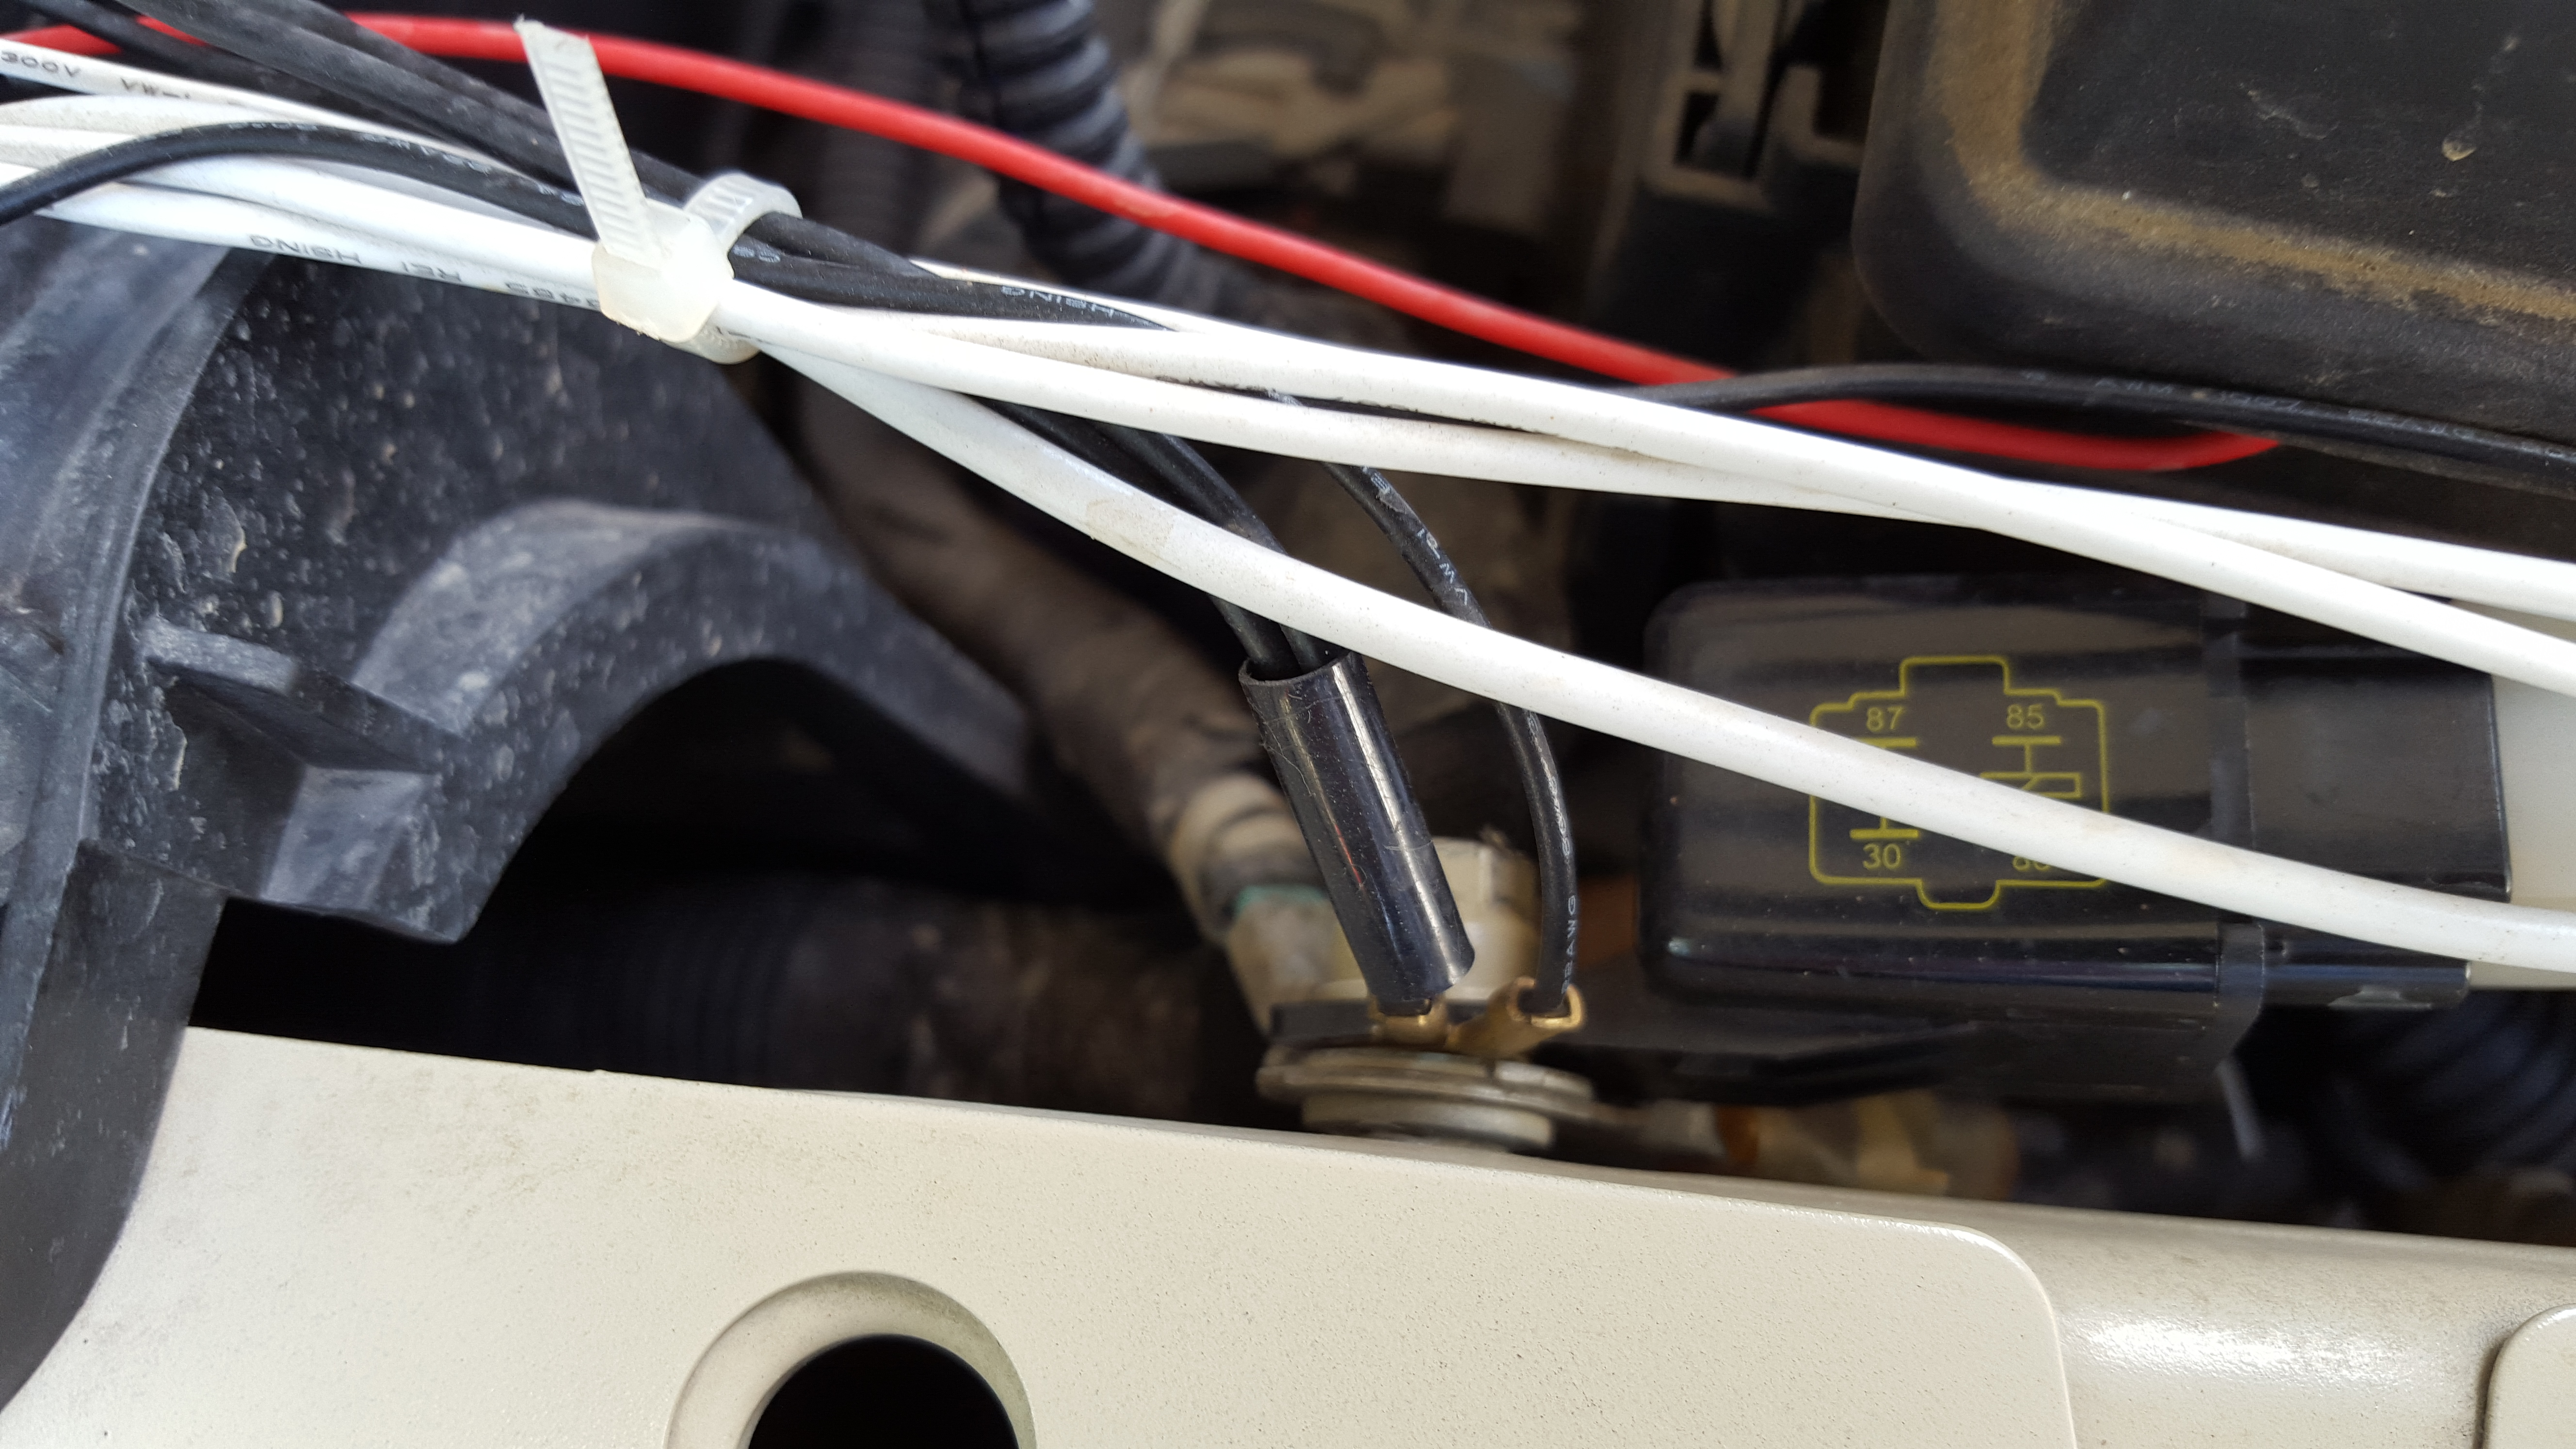

i. After the fuse was held in place, I then ran the other power end of the wire to a switched power source. The directions with the harness said to find the parking lamp wire and splice this wire into it, however a buddy of mine showed me a trick her used on his Camaro for an easier connection, which was to find a fuse to one of the parking/running lights and wrap the end of the wire around the fuse. So That power end of the wire is wrapped around the fuse which runs the parking light on the right rear taillight.

j. With these connections made, I then ran the remaining unused wires across the firewall in the engine compartment, to the driver side of the Jeep. From here, I made the ground connection for the switch on another similar bolt located on the body which I removed, then placed the ground connect on the bolt and reinserted the bolt to the proper hole.
***Extra side note...please do not drop the bolt when you loosen it to get the ground connection on. My buddy helping me dropped the bolt, and the location that it was at, it fell in between the engine compartment panel and the driver front body panel, and was almost nearly impossible to get out, but luckily, I was able to move the wheel well and get a magnetized screw driver just far enough into the small hole in between the panels and get the bolt back out, but that was another 20 minutes wasted just getting that out, so be careful when handling those!***


a. Drivers side was as simple as removing the torque screws at the base of the windshield on the front side (just 2 torque screws)
b. Line the bracket with the padding on the back (in between the bracket and the windshield frame) with the existing holes on the windshield frame
c. Reinsert the 2 torque screws you had just removed
d. Make sure the screws thread into the holes
e. Tighten down the torque screws, and your are good to go. And as you can see in the picture, the stock torque screws are used and the light is fastened just fine!
f. The passenger side provided much more of an issue for me, as you begin the same way be removing the existing 2 torque screws on the front of the windshield frame.
g. I then attempted to place the light bracket the same way as the driver side, but I found that if it was attached the same way, it pinched the passenger side wiper to the windshield and did not allow it to move.
h. Therefore, one more trip to AutoZone for some washers and longer bolts which matched the size of the holes in the windshield frame.
i. Once I had the correct sized bolts, I tried to reattached the bracket
j. It took some fiddling and test fits with washers as spacers, but I was able to tighten the bracket down without it pinching the passenger side wiper. It took two washers on the more inward hole to tilt the passenger side bracket out slightly, but it is 100% clear then. Eventually, I may go ahead and have the bracket reworked a bit so as not to have to have “spacers” in there at all, but for the time being, it has worked exactly how I needed it to! So as you can see below, there are now silver bolts which are longer than the stock holding it in, as well as in the second picture you can see the washers inserted as spacers behind the bracket and the weather stripping which is also behind the bracket!
10. So with the actual lights mounted to the Jeep now, the next task was wiring
a. I started by splicing the ends of wires coming off of the lights, into the new AutoZone switch harness ends which were meant for the lights (2 splices for each light, and while I would have loved to solder the connections together, I did not have those tools available when I did this so I used wire splices from AutoZone, which were the blue clips that you clamp close and they tap the two wires…one day I will go back and make those connections better)
b. Anyhow, that is a total of 4 splices per side of the Jeep and then the connection points were wrapped extremely good and tight with tape!
c. I then undid the 4 torque screws which are located on the panel the wipers are located in
d. From here, I was able to lift the panel up just enough and slide the harness down underneath this panel, which as you can see as a lot of empty and unused space.
e. Once you tighten the panel just in front of the windshield back on, you can then work on making the connections to the power and ground.
f. First was to make the connection to the battery for power. This was connected to the positive pole by removing one of the bolts on the connector on top, sliding the end of the harness on for a power connection, and then reattaching the bolt
g. Then, we had to find a location to hang the fuse. For this, I ran the wire harness forward from the battery up next to the fuse box and undid one of the bolts on the edge of the body of the hood.
h. Then lined the hole up in the top of the fuse holder and put the bolt back through that, and into its original hole. You can also see the ground connection I made for the fuse itself in the first picture
i. After the fuse was held in place, I then ran the other power end of the wire to a switched power source. The directions with the harness said to find the parking lamp wire and splice this wire into it, however a buddy of mine showed me a trick her used on his Camaro for an easier connection, which was to find a fuse to one of the parking/running lights and wrap the end of the wire around the fuse. So That power end of the wire is wrapped around the fuse which runs the parking light on the right rear taillight.
j. With these connections made, I then ran the remaining unused wires across the firewall in the engine compartment, to the driver side of the Jeep. From here, I made the ground connection for the switch on another similar bolt located on the body which I removed, then placed the ground connect on the bolt and reinserted the bolt to the proper hole.
***Extra side note...please do not drop the bolt when you loosen it to get the ground connection on. My buddy helping me dropped the bolt, and the location that it was at, it fell in between the engine compartment panel and the driver front body panel, and was almost nearly impossible to get out, but luckily, I was able to move the wheel well and get a magnetized screw driver just far enough into the small hole in between the panels and get the bolt back out, but that was another 20 minutes wasted just getting that out, so be careful when handling those!***
Thread Starter
JK Enthusiast
Joined: Sep 2015
Posts: 419
Likes: 22
From: Madison Heights, MI
Windshield LED Light Install (continued)
11. With all of the proper connection made, the last part was to get the connector to power the switch into the cabin of the Jeep!
a. The first step was finding where to run the connector that attaches to the switch, into the Jeep. I first located where the main harness for the Jeep was going through the firewall, but I wanted to avoid that if possible because I did not want to mess that up
b. So with a little more investigating, I found a rubber grommet on either side of the Jeep on the firewall which is not punched through and not being used at all, however, it goes right through the firewall to the interior of the jeep (Almost light they might have built it this way!)

c. So I pushed the connector through this grommet and grabbed it from the inside of the Jeep

d. Once through, I then made the connection between the connector and the switch itself
12. So last step was to run the switch to a spot of the dash for me to be able to use it. The switch that I purchased required no drilling or cutting as it just had the automotive 3M tape on the back, so it was just going to be suck to the dash where I ran it!
13. I removed the panel below the steering wheel on the dash, which all you do it pull down on the top of the panel and it will release.
14. I then ran the wiring from the firewall, up behind this panel.
15. I zip-tied the extra wires up inside the dash so they stay out of the way
16. I then stuck the switch to the dash, just to the left of the steering wheel and above the speaker on the driver side
17. I then carefully reinstalled the knee panel below the steering wheel, as to make sure that no wires got cut/pinched

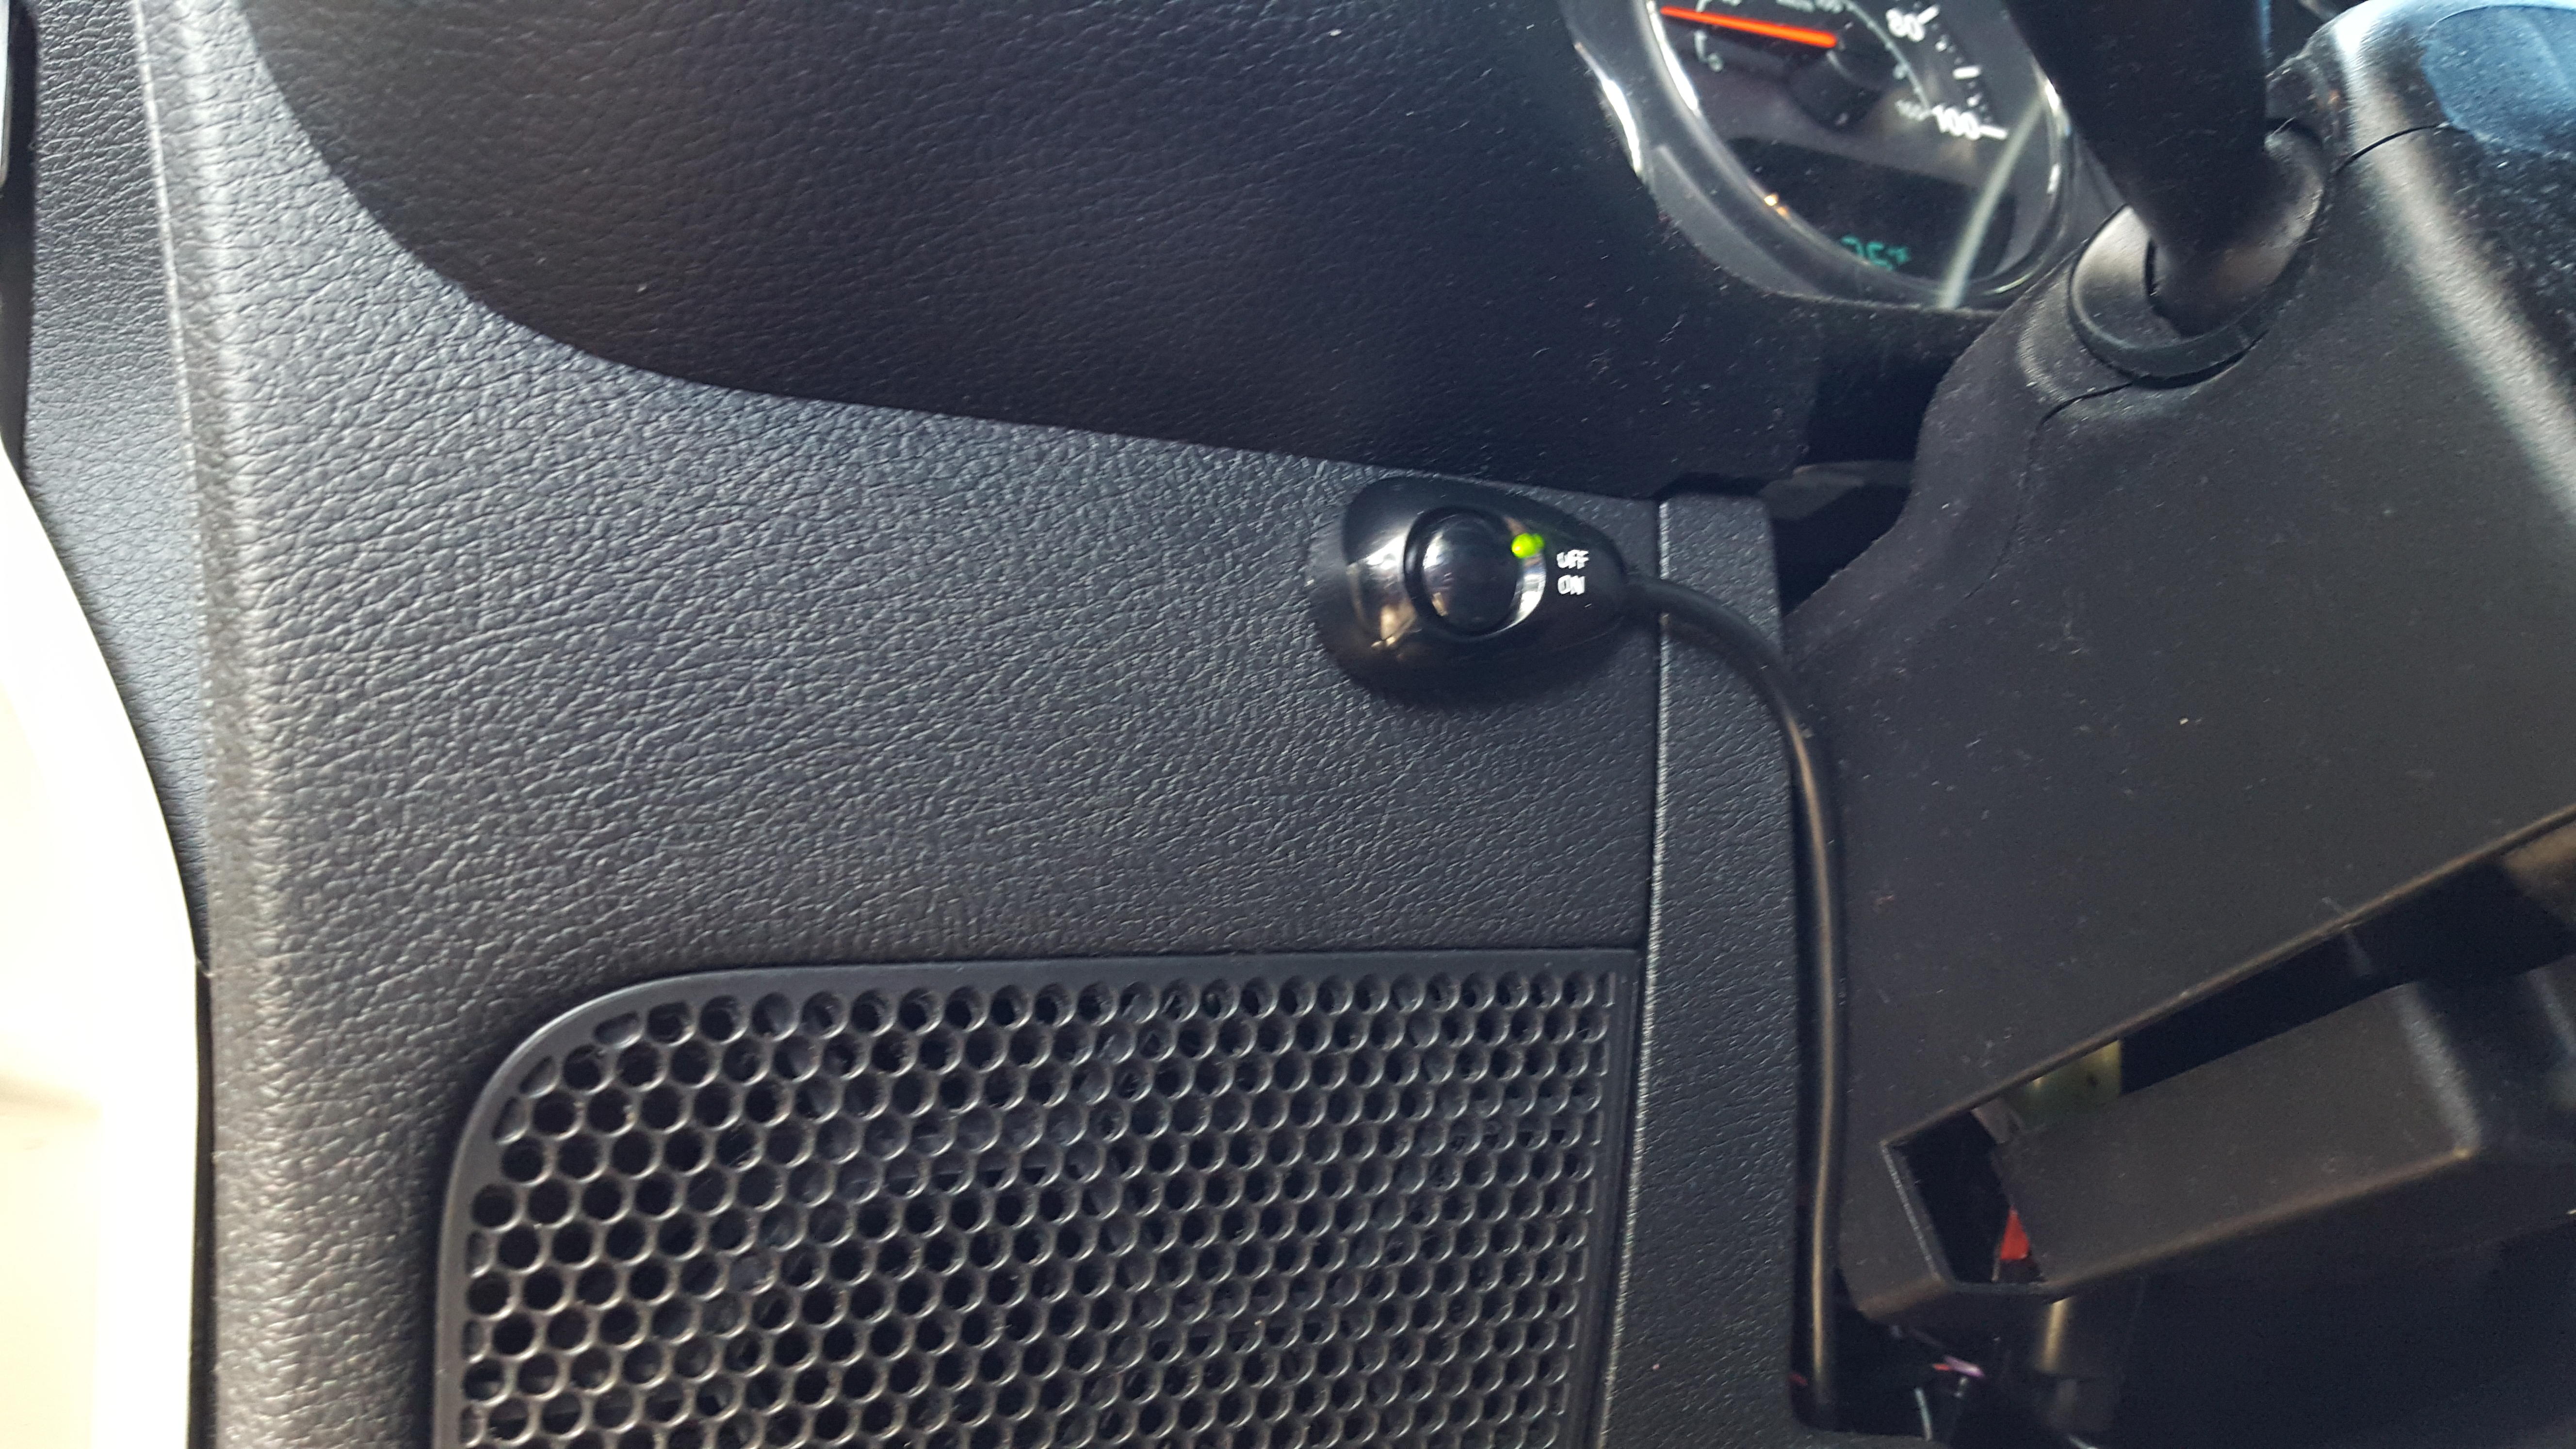
18. And then turned the parking lights on and tested the LED lights, and…
19. They work! These lights however can only be run when I have at least the parking lights on, as that is their switched power source, but I would always have those on when I need the LEDs, so no problem at all for me!
a. The first step was finding where to run the connector that attaches to the switch, into the Jeep. I first located where the main harness for the Jeep was going through the firewall, but I wanted to avoid that if possible because I did not want to mess that up
b. So with a little more investigating, I found a rubber grommet on either side of the Jeep on the firewall which is not punched through and not being used at all, however, it goes right through the firewall to the interior of the jeep (Almost light they might have built it this way!
)c. So I pushed the connector through this grommet and grabbed it from the inside of the Jeep
d. Once through, I then made the connection between the connector and the switch itself
12. So last step was to run the switch to a spot of the dash for me to be able to use it. The switch that I purchased required no drilling or cutting as it just had the automotive 3M tape on the back, so it was just going to be suck to the dash where I ran it!
13. I removed the panel below the steering wheel on the dash, which all you do it pull down on the top of the panel and it will release.
14. I then ran the wiring from the firewall, up behind this panel.
15. I zip-tied the extra wires up inside the dash so they stay out of the way
16. I then stuck the switch to the dash, just to the left of the steering wheel and above the speaker on the driver side
17. I then carefully reinstalled the knee panel below the steering wheel, as to make sure that no wires got cut/pinched
18. And then turned the parking lights on and tested the LED lights, and…
19. They work! These lights however can only be run when I have at least the parking lights on, as that is their switched power source, but I would always have those on when I need the LEDs, so no problem at all for me!
Last edited by WxNerd2015; Nov 4, 2015 at 05:27 AM.
Thread Starter
JK Enthusiast
Joined: Sep 2015
Posts: 419
Likes: 22
From: Madison Heights, MI
Windshield LED Light Install (continued)
And here are some pictures of the lights at work at night! They are way way waaaaaaaaay brighter than the stock lights on the Jeep, and to be honest, I can’t even tell my high beams are on when I am running the LEDs on! 
The first two pics are just sitting in the garage looking at the lights


The next two are from the driver seat, looking through the windshield. The first is with just the lowbeams and fogs, and then the second is lowbeams and fogs, with the LED Cube lights on
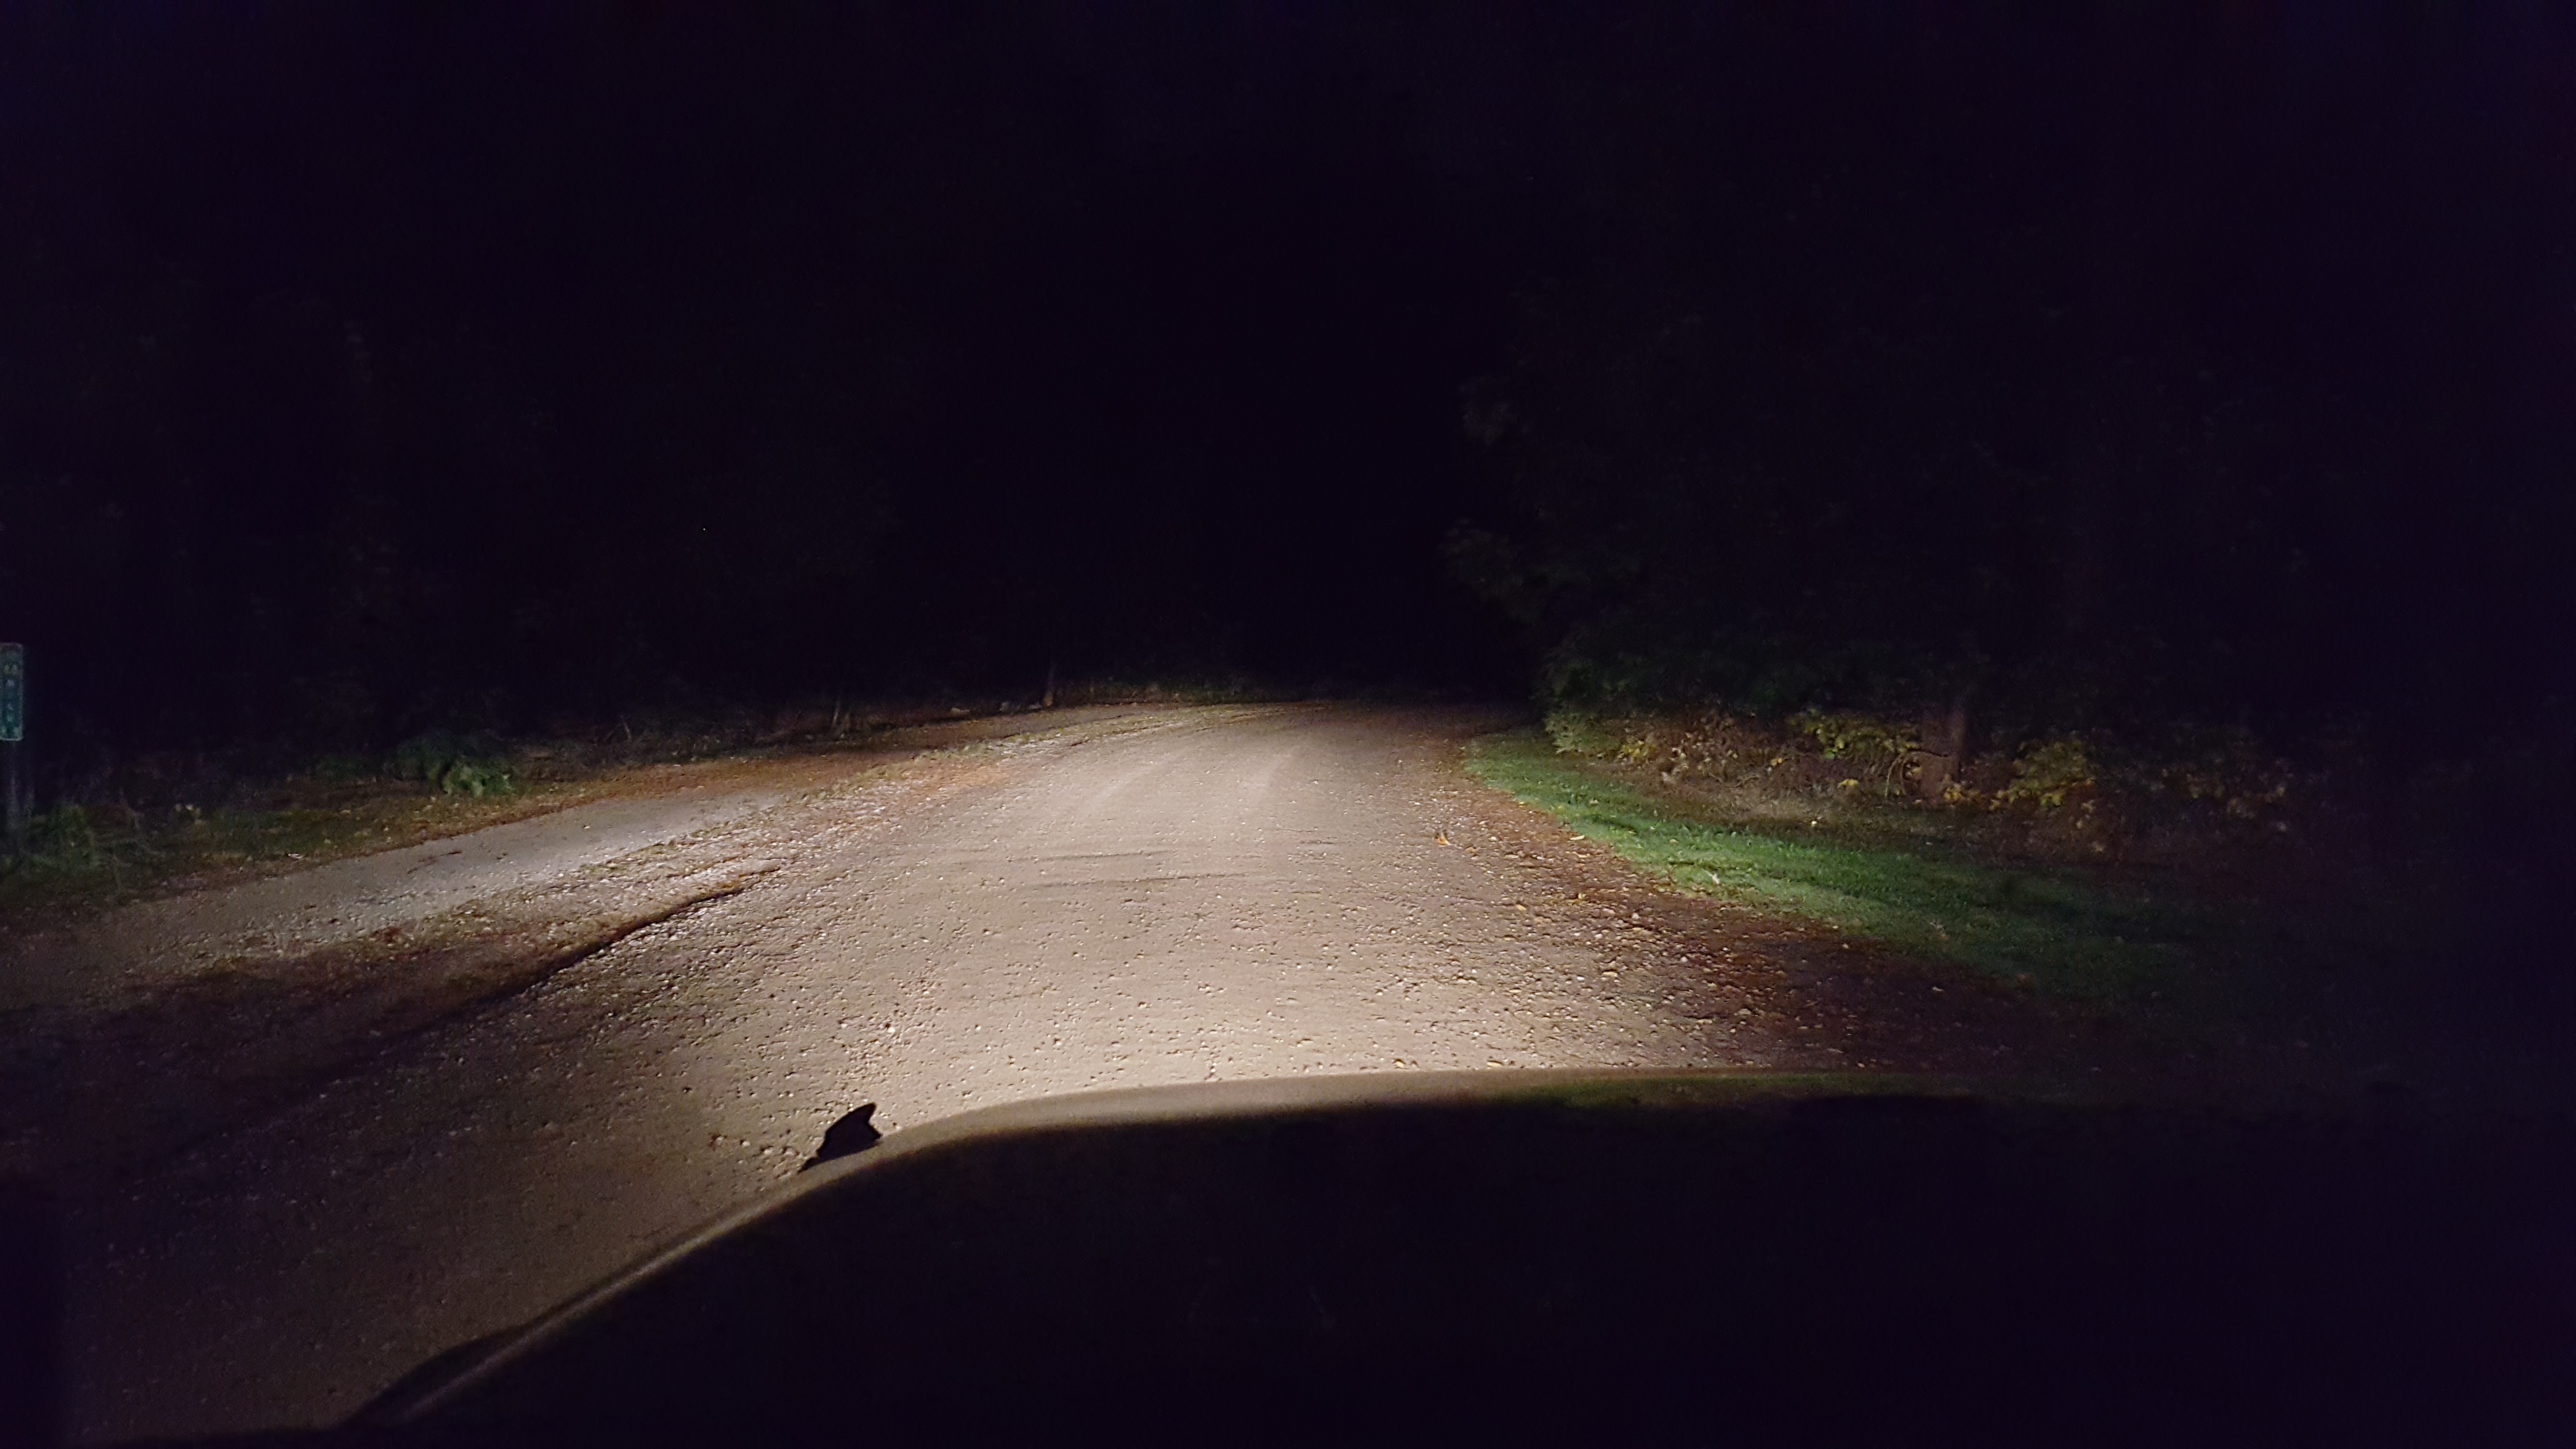

The next two are standing outside the driver side of the Jeep. Thie first picture is low beams and fogs, and then the second is lowbeams, fogs, and the LED cubes


The next two are from the drivers seat again, but with the high beams. The first is just the high beams, and the second is the high beams and LED Cubes


The last 3 are just looking back at the Jeep from in front, with first just the low beams and fogs, and then the low beams, fogs, and the LED cubes


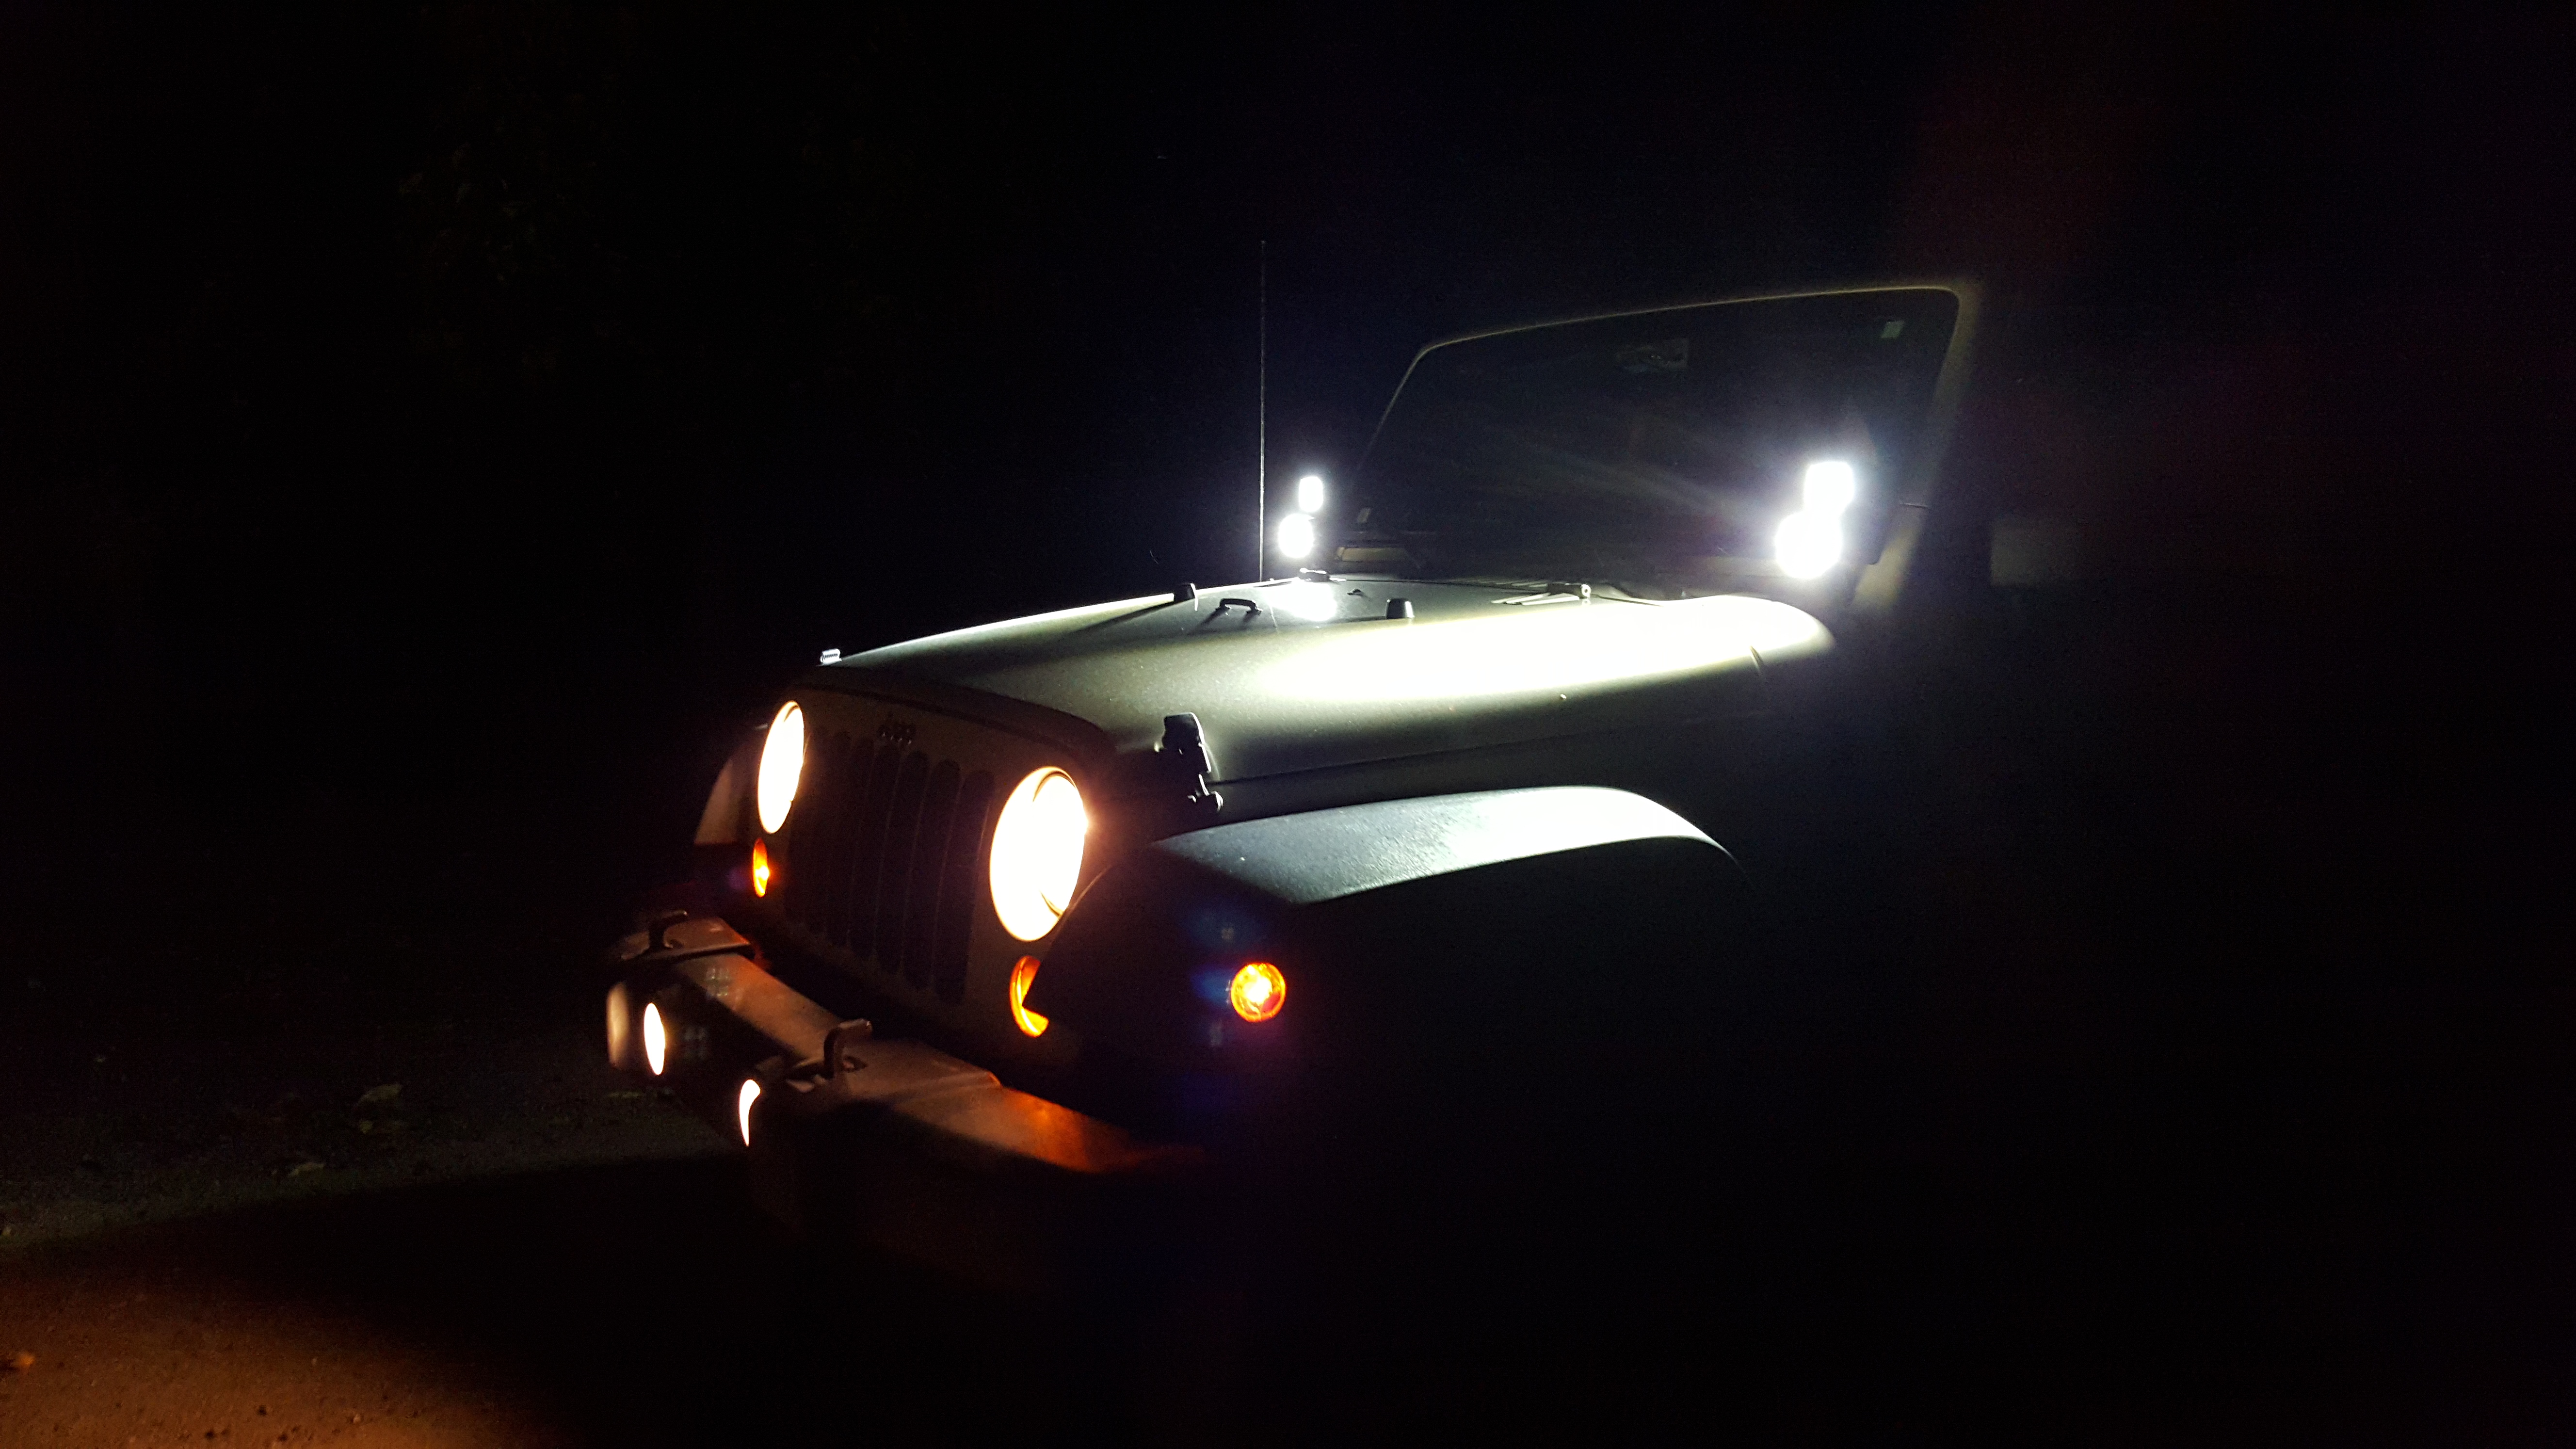
They put out an impressive amount of light, for a pretty great price! The beam patterns are great and I am extremely happy with my choice! All in all, this is an extremely impressive mod for under $200! And I have been running them for about7 months now, and I have no issues to report or complaints at all about these lights! Disappointed a little with the fit of the passenger side bracket as well as the hardware not being right for the one set of lights, but no big deal and I was still able to get em on and working awesome!
Hope y’all enjoyed the write-up and let me know if you have any questions and if you need any more details that I may have left out! Thanks for reading!
The first two pics are just sitting in the garage looking at the lights
The next two are from the driver seat, looking through the windshield. The first is with just the lowbeams and fogs, and then the second is lowbeams and fogs, with the LED Cube lights on
The next two are standing outside the driver side of the Jeep. Thie first picture is low beams and fogs, and then the second is lowbeams, fogs, and the LED cubes
The next two are from the drivers seat again, but with the high beams. The first is just the high beams, and the second is the high beams and LED Cubes
The last 3 are just looking back at the Jeep from in front, with first just the low beams and fogs, and then the low beams, fogs, and the LED cubes
They put out an impressive amount of light, for a pretty great price! The beam patterns are great and I am extremely happy with my choice! All in all, this is an extremely impressive mod for under $200! And I have been running them for about7 months now, and I have no issues to report or complaints at all about these lights! Disappointed a little with the fit of the passenger side bracket as well as the hardware not being right for the one set of lights, but no big deal and I was still able to get em on and working awesome!
Hope y’all enjoyed the write-up and let me know if you have any questions and if you need any more details that I may have left out! Thanks for reading!

