
What was done to your JK this week?

JK Junkie
Joined: Feb 2011
Posts: 2,318
Likes: 12
From: New Hampshire
JK Newbie

Joined: Sep 2016
Posts: 84
Likes: 1
From: Gilbertsville PA
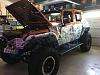
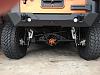
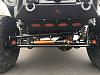
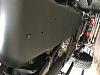
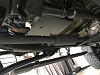
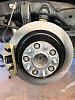
I spent the last week and went old school style, and wet sanded all suspension parts as well as all the pinch seems on both sides and the back, I than removed all the Krawl Works stickers. After that I masked the Jeep and repainted everything Flat Black and Semi Gloss Black and repainted the Poison Spyder Diff plates mango Tango, along with the PSC piston. Jeep looks brand new again, and this was the last project for this year, and now it's time to enjoy Sarge.
JK Newbie
Joined: Sep 2016
Posts: 84
Likes: 1
From: Gilbertsville PA
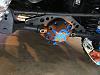
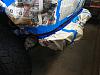
A couple more pictures of the re-refurbed underneath the Jeep. I also took the 50 cent band straps off the shocks and reservoirs and installed the billet Fox Shock clamps. What a difference it made, they are definitely a more solid and look so much better. Used lock-tight for extra added protection.
JK Freak

Joined: Oct 2014
Posts: 750
Likes: 1
From: Huntington Beach, CA
I spent the last week and went old school style, and wet sanded all suspension parts as well as all the pinch seems on both sides and the back, I than removed all the Krawl Works stickers. After that I masked the Jeep and repainted everything Flat Black and Semi Gloss Black and repainted the Poison Spyder Diff plates mango Tango, along with the PSC piston. Jeep looks brand new again, and this was the last project for this year, and now it's time to enjoy Sarge.Attachment 673964Attachment 673965Attachment 673966Attachment 673967Attachment 673968Attachment 673969
Attachment 673964Attachment 673965Attachment 673966Attachment 673967Attachment 673968Attachment 673969, what did you use to paint your diff's spray can or paint brush?
JK Newbie
Joined: Sep 2016
Posts: 84
Likes: 1
From: Gilbertsville PA
I used Mopar spray paint for the Mango Tango and Rustolium flat black and semi gloss sray for the suspension and diff, and brush for touch ups. i used Eastwoods exhaust ceramic paint flat black for the exhaust. I think it came out pretty awesome.
Last edited by Shelby73; Aug 7, 2017 at 05:25 PM.

JK Enthusiast
Joined: Jul 2016
Posts: 143
Likes: 0
From: West Coast Florida
JK Newbie
Joined: Aug 2012
Posts: 90
Likes: 0
From: Missouri
JK Enthusiast
Joined: Feb 2015
Posts: 191
Likes: 14
From: Palos Verdes, CA
Aside from installing LED headlights, THIS has been the best bang for the buck install that I have done to date!
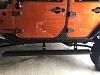
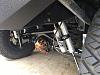
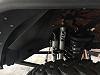
Dynatrac Pro Grip's installed. Finally. OMG what a difference!

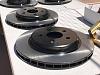

Front
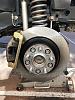
Rear
Rear stock vs Dynatrac
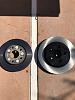
So easy a caveman (with awesome tools) can do in an afternoon. If you're riding lifted with anything over 33" rubber, these are a no-brainer. Just have a heavy duty aftermarket rear bumper because rear endings may ensue. No really.
Dynatrac Pro Grip's installed. Finally. OMG what a difference!
Front
Rear
Rear stock vs Dynatrac
So easy a caveman (with awesome tools) can do in an afternoon. If you're riding lifted with anything over 33" rubber, these are a no-brainer. Just have a heavy duty aftermarket rear bumper because rear endings may ensue. No really.
JK Enthusiast
Joined: Jul 2016
Posts: 143
Likes: 0
From: West Coast Florida
Aside from installing LED headlights, THIS has been the best bang for the buck install that I have done to date!
Dynatrac Pro Grip's installed. Finally. OMG what a difference!
Attachment 674057Attachment 674058Attachment 674059
Front
Attachment 674060
Rear
Attachment 674061
Rear stock vs Dynatrac
Attachment 674062
So easy a caveman (with awesome tools) can do in an afternoon. If you're riding lifted with anything over 33" rubber, these are a no-brainer. Just have a heavy duty aftermarket rear bumper because rear endings may ensue. No really.