
Centerforce Clutch Install Write-Up

Thread Starter
JK Super Freak
Joined: Nov 2010
Posts: 1,575
Likes: 0
From: NE, Ohio
2010 Jeep JK Wrangler Clutch Install
A disclaimer before going any further. I am not a professional mechanic. These steps worked for me and are only meant as a guide. Installing a new clutch is a big job and will require significant time and basic mechanical skill.
Prior to beginning make sure you have
oReplacement Clutch - Centerforce or Spec will do (call Dave @ Northridge for a nice Centerforce)


oReplacement Throw Out Bearing (TOB). There is a lot of forum activity about this. Jeeps are known to have bad TOB. The market is flooded with TOBs, but almost all of them are from Chrysler (same weak one you have now). Getting a non-Chrysler TOB is a project. I called National Auto (hxxp://www.nationalautostores.com/) and got a Moog. It was more expensive, but supposed to be much higher quality.

oReplacement Flywheel - may not be necessary. I was able to clean mine and use it. Some people get theirs machined and reuse it. If yours is badly burned you will need a new one. As far as I know there is no way to know before seeing it. I only had 13,000 miles and risked not ordering one ahead of time.
o2 quarts ATF+4 fluid for the transfer case
o3 Quarts Mopar MS-9224 Transmission fluid ( I used Royal Purple syncromesh)
oFluid pump that hooks to 1 qt container for filling
oGrease
oBrake Cleaner
oGear Puller
oClutch install tool
o1-1/4" Socket (that fits your impact wrench)
o17mm to make drain tool (if you drop your exhaust you will not need to cut this down)
o14mm Allen
oRed loctite
oMany small closing container for hardware (there will be hundreds of pieces)
oPainters tape (I labeled all of the containers with the step # for
the hardware)

oPermanent marker
oBoom mat or similar product to recover the bottom of the jeep. Optional, but helps the ride quality inside the jeep
oJacks, floor jack, regular tools for working on your jeep, air compressor and impact wrench
oLots of plastic gloves
Now the write-up
1. Disconnect the positive battery terminal.
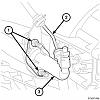
2. Remove drive shafts
(http://project-jk.com/jeep-jk-write-...ation-write-up, https://www.jk-forum.com/forums/show...ear-Driveshaft).
a. Remove front transmission and transfer case skid. 18mm x 4 bolts
b. Remove front 2 bolts on gas tank skid to free cross member. 18mm x 2 bolts
c. Remove front and rear top drive shaft bolts. 8mm (short socket) x 8 bolts & 4 brackets each drive shaft
d. Remove rear drive shaft lower bolts. 8mm x 8 bolts & 4 brackets
e. Use a dead hit mallet and a flat head screwdriver to gently pry the rear upper shaft out
f. Place shaft on jack stand to avoid stressing the bottom flange
g. Use a dead hit mallet to persuade the rear bottom shaft out
h. Remove front drive shaft lower bolts. 15mm x 4 bolts
i. Remove front drive shaft, upper may require dead hit mallet for persuasion
3. Remove transmission gear shifter
a. From the inside of the jeep remove the shifter knob (https://www.jk-forum.com/forums/show...ing-shift-knob)
b. Remove the outer boot (the one you see in the jeep) by prying gently around the back edge first.
c. Remove the inner shifter boot by pulling up
d. Leave the jeep in gear (not neutral) and unscrew the shifter shaft at base. (I have the Rough Country extension so my bolt is different than stock, stock should be torx) #6 Metric Allen x 1 bolt, #3 Metric Allen x 1 bolt.
4. Remove transfer case (tcase) shifter linkage
a. Drain transfer case (http://project-jk.com/jeep-jk-write-...r-case-service). 10mm Allen key x 2 bolts
b. Using a 1-1/4 socket remove the front tcase output yoke nut to access the tcase linkage
c. Using a gear puller remove tcase output yoke to access tcase shifter linkage tab behind it
d. Use a flat head screw driver to gently pry the linkage from the tcase (white plastic press fitting over a metal stud)
e. Release green clip on tcase shifter linkage where the tranny and tcase meet
5. Remove all wires and hoses from the transmission/tcase
a. Driver's side zip/clipped in all the way down and to the cross member
b. Passenger side
i. 2 fuel lines
ii. Electrical connector high front with red disconnect
c. Quick disconnect on top of transfer case
i. Follow wire loom back to tcase sensor plug
1)Remove sensor with 8mm socket x 1 bolt
d. Remove tcase breather from top of tcase. Just pull
6. Remove slave cylinder
a. Remove bolts. 13mm x 2 bolts
7. Disconnect exhaust
a. Remove front 4 bolts where headers meet "Y" pipe. 15mm x 4bolts (2/side)
b. Disconnect O2 sensors between headers and "Y". 4 wiring harness plugs, 2/side one high, one low
c. Spray hanger rearward of cross member with wd40, let soak then pull. Exhaust is now supported by cross member and loose, but not dropped.
8. Drain transmission fluid
(http://project-jk.com/jeep-jk-write-...ission-service).
With exhaust dropped you will not need to make the drain plug tool. The standard 17mm Allen key will work.
a. Remove fill plugs. 17mm Allen drain plug and 14mm Allen fill plug
b. Replace drain and fill plug
9. Remove front Transmission bolts where transmission meets the back of the engine
a. Starting Driver side (there are (2) 18mm bolts on the very top you will not be able to reach until the transmission is dropped down)
i. 18mm x 1 (Holds small metal angled clip in place, must be threaded through)
ii. 15mm x 1 (Master Cylinder)
iii. 16mm x 1 (catch heat shield clip)
iv. 18mm x 1
v. 15mm x 4
vi. 18mm x 1 bolt
vii. 18mm x 1 bolt (angled bracket that this bolt is threaded through holds a mount for the wiring loom. This will need to be aligned when the transmission goes back in)
10. Remove transmission mount nuts that pass through the cross member
a. 16mm x 3 bolts
11. Support transmission and transfer case with jacks

12. Remove cross member (WATCH TRANNY AND EXHAUST)
a. 18 mm x 4 (2/side) use (2) 18mm wrenches
b. Loosen the remaining front 4 gas tank skid plate bolts to allow passenger side of cross member to drop free. 18mm x 4 bolts. DO NOT REMOVE, LOOSEN TO SUPPORT GAS TANK WEIGHT
13. Remove Transmission/Transfer case
a. Remove transmission bracket. This will allow you to support the transmission weight better. 17mm x 4 bolts
b. Remove lower plate that the transmission bolted into at the back of the engine to allow a grip on the tranny for removal. This will help avoid torqueing the metal gasket
i. 15mm x 3 bolts
c. Tilt the transmission by lowering the jacks and remove the 2 upper 18mm bolts. Think 11:30 and 12:30 on the clock. This will be the hardest task of the job. I used a 6" extension and the impact wrench
d. Slide the transmission back being careful not to catch the shifter nub. You can slide it back and out to the ground with the exhaust loose, but not dropped.

14. Find fiber dust and chunks from your smoked clutch in the bell housing and clean up
a. Sweep out the transmission housing

b. ShopVac out all dust
c. Wipe down with brake cleaner
d. Lube shaft (sorry had to say it)
15. Replace your throw out bearing. DO NOT LOSE THE CLIP ON THE END OF THE BRACE
a. Reach inside the transmission housing and remove the brace that holds the TOB. Just pull gently.

b. Remove the old TOB by releasing the clips

c. Thoroughly clean the brace
d. Install the new TOB
e. Grease brace and TOB
f. Reinstall brace w/ TOB in transmission housing

16. Clean (brake cleaner) and grease slave cylinder end
17. Install Clutch
a. Remove old clutch. 10mm x 6 bolts


Old clutch plate

Vs new

b. Clean flywheel (brake cleaner)

c. Inspect fly wheel for burn damage. If found consider replacing or having it machined, your local auto parts store will do this. Mine was fine as it only had 13k miles.
d. Use clutch install tool to align clutch

i. Find proper end cap
ii. Mount rod

e. Slide friction disc on making sure the proper side faces the flywheel (remove sticker)

f. Slide wedge down to center friction disk
g. Slide clutch plate over rod

g. Tighten plate in a circular manner a few turns at a time until all bolts are snug. 10mm x 6 bolts. I'd be cautious not to strip the bolts

18. Clean Master cylinder
a. Use brake cleaner
b. Lube

19. Install new sound/thermal proofing if desired on the underside of the body above the transmission. Mine was torn up when we removed the transmission (Boom mat or a similar product)

20. If you haven't extended your transfer case breather now is a good time. Keep the end cap from the old breather to reuse.
21. Replace the lower plate removed in step #13. 15mm x 3 bolts
22. Using at least 2 people start working the transmission/transfer case back into position. Watch all wires and hoses
a. Replace the bottom 4 transmission bell housing bolts. 15mm x 4 (the middle 4) leave loose.
i. The 2nd to top 18mm bolt on the passenger side must pass through a bracket. Align and bolt NOW
b. Work the wire loom around and start reinstalling everything from step #5
i. Transfer case sensor from step #5-C-1. 8mm x 1 bolt
c. Reinstall all of the remaining transmission bolts
i.The longest one, driver side is used for the master cylinder and should have a clip for the heat shield
d. Reinstall the slave cylinder from step #6. 13mm x 2 bolts
e. Reconnect the transfer case linkage
i. Make sure everything is in neutral
ii. Press on the white clip to tcase
iii. Green clip goes rearward of bracket
iv. Recheck everything is in neutral. There is no fluid in yet don't forget
23. Reinstall the transmission bracket. 17mmx 4 bolts from step #13
24. Reinstall cross member. It is one directional, look for the holes for the gas tank skid to be on the passenger side. Also align bracket bolts from step above.
a. 18mm x 4 bolts 2/side
b. 17mm x 3 bolts (a deep socket may not reach all of the way up, the loose bolts caused a bad vibration for me until I got them tight)
25. Tighten Gas tank skid
a. 18mm x 4 bolts (that were loosened and not removed)
b. 18mm x 2 bolts that were removed in step #2. These attach to the cross member
26. Fill the transmission and transfer case fluids
http://project-jk.com/jeep-jk-write-...ission-service
a. Open the 14mm Allen fill on the passenger side
b. (Direct quote from Project-JK) Attach a bottle pump to your Mopar transmission fluid bottle, insert the feeder tube into the side of your NSG 370 manual transmission and then begin pumping the fluid into it. It should take just a tad over 2 quarts of fluid to fill and you'll know when it's full when fluid starts to ooze back out the fill hole.
c. Replace 14mm fill cap
http://project-jk.com/jeep-jk-write-...r-case-service
d. Open the 10mm Allen fill on the rear of the transfer case
e. (Direct quote from Project-JK) Attach a bottle pump to your ATF+4 fluid bottle, insert the feeder tube into the fill hole on your NV241 transfer case and then begin pumping the fluid into it. It should take about 2 quarts of fluid to fill and you'll know when it's full when fluid starts to ooze back out the fill hole.
f. Replace 10mm fill cap
27.Attach exhaust
a. Rehang driver side rubber bracket
b. Bolt exhaust "Y" pipe back into headers. 15mm x 4 bolts 2/side
i. May be helpful to have some hold the nuts from the front wheel wells
28. Reinstall drive shafts
a. Front
i. Reinstall front tcase yoke. 1-1/4" socket x 1 bolt use red Loctite to secure
ii. Align front drive shaft, and place a few bolts to hold it up
iii. Replace the lower bolts. 15mm x 4 bolts
iv. Replace the upper bolts. 8mm x 8 bolts w/4 brackets. Check that the brackets are in the same position as when you removed. You will need to tighten these down in a circular fashion to seat the drive shaft fully
b. Rear
i. Align rear drive shaft place a few bolts
ii. Reinstall the top and bottom. 8mm x 8 bolts w/4 brackets at each end. Align the brackets where they were when you removed them. Tighten in a circular fashion to seat both ends.
29. Reinstall the transmission/transfer case skid
a. 18mm x 4 bolts
30. Reattached transmission shifter
a. Consider extending your transmission breather at this stage if desired. The breather is flush mounted to the transmission below the spongy pad. You access it from the inside.
b. Replace the transmission shifter. #6 Metric Allen x 1 bolt, #3 Metric Allen x 1 bolt. Use Loctitie and check for range of motion before tightening (This step describes my Rough Country shift adapter install)
c. Press the inner shifter boot down tight. Make sure to get a good seal to keep mud and water out
d. Reinstall outer shifter boot
e. Reinstall shifter knob
31. Reconnect your positive battery terminal
32. Pour yourself and everyone that helped a stiff adult beverage (assuming everyone is 21 or older), you've earned it.
Centerforce recommends a 500 mile break in period before exposing the new clutch to full throttle. Registering your new clutch will activate your warranty process.
A disclaimer before going any further. I am not a professional mechanic. These steps worked for me and are only meant as a guide. Installing a new clutch is a big job and will require significant time and basic mechanical skill.
Prior to beginning make sure you have
oReplacement Clutch - Centerforce or Spec will do (call Dave @ Northridge for a nice Centerforce)
oReplacement Throw Out Bearing (TOB). There is a lot of forum activity about this. Jeeps are known to have bad TOB. The market is flooded with TOBs, but almost all of them are from Chrysler (same weak one you have now). Getting a non-Chrysler TOB is a project. I called National Auto (hxxp://www.nationalautostores.com/) and got a Moog. It was more expensive, but supposed to be much higher quality.
oReplacement Flywheel - may not be necessary. I was able to clean mine and use it. Some people get theirs machined and reuse it. If yours is badly burned you will need a new one. As far as I know there is no way to know before seeing it. I only had 13,000 miles and risked not ordering one ahead of time.
o2 quarts ATF+4 fluid for the transfer case
o3 Quarts Mopar MS-9224 Transmission fluid ( I used Royal Purple syncromesh)
oFluid pump that hooks to 1 qt container for filling
oGrease
oBrake Cleaner
oGear Puller
oClutch install tool
o1-1/4" Socket (that fits your impact wrench)
o17mm to make drain tool (if you drop your exhaust you will not need to cut this down)
o14mm Allen
oRed loctite
oMany small closing container for hardware (there will be hundreds of pieces)
oPainters tape (I labeled all of the containers with the step # for
the hardware)
oPermanent marker
oBoom mat or similar product to recover the bottom of the jeep. Optional, but helps the ride quality inside the jeep
oJacks, floor jack, regular tools for working on your jeep, air compressor and impact wrench
oLots of plastic gloves
Now the write-up
1. Disconnect the positive battery terminal.
2. Remove drive shafts
(http://project-jk.com/jeep-jk-write-...ation-write-up, https://www.jk-forum.com/forums/show...ear-Driveshaft).
a. Remove front transmission and transfer case skid. 18mm x 4 bolts
b. Remove front 2 bolts on gas tank skid to free cross member. 18mm x 2 bolts
c. Remove front and rear top drive shaft bolts. 8mm (short socket) x 8 bolts & 4 brackets each drive shaft
d. Remove rear drive shaft lower bolts. 8mm x 8 bolts & 4 brackets
e. Use a dead hit mallet and a flat head screwdriver to gently pry the rear upper shaft out
f. Place shaft on jack stand to avoid stressing the bottom flange
g. Use a dead hit mallet to persuade the rear bottom shaft out
h. Remove front drive shaft lower bolts. 15mm x 4 bolts
i. Remove front drive shaft, upper may require dead hit mallet for persuasion
3. Remove transmission gear shifter
a. From the inside of the jeep remove the shifter knob (https://www.jk-forum.com/forums/show...ing-shift-knob)
b. Remove the outer boot (the one you see in the jeep) by prying gently around the back edge first.
c. Remove the inner shifter boot by pulling up
d. Leave the jeep in gear (not neutral) and unscrew the shifter shaft at base. (I have the Rough Country extension so my bolt is different than stock, stock should be torx) #6 Metric Allen x 1 bolt, #3 Metric Allen x 1 bolt.
4. Remove transfer case (tcase) shifter linkage
a. Drain transfer case (http://project-jk.com/jeep-jk-write-...r-case-service). 10mm Allen key x 2 bolts
b. Using a 1-1/4 socket remove the front tcase output yoke nut to access the tcase linkage
c. Using a gear puller remove tcase output yoke to access tcase shifter linkage tab behind it
d. Use a flat head screw driver to gently pry the linkage from the tcase (white plastic press fitting over a metal stud)
e. Release green clip on tcase shifter linkage where the tranny and tcase meet
5. Remove all wires and hoses from the transmission/tcase
a. Driver's side zip/clipped in all the way down and to the cross member
b. Passenger side
i. 2 fuel lines
ii. Electrical connector high front with red disconnect
c. Quick disconnect on top of transfer case
i. Follow wire loom back to tcase sensor plug
1)Remove sensor with 8mm socket x 1 bolt
d. Remove tcase breather from top of tcase. Just pull
6. Remove slave cylinder
a. Remove bolts. 13mm x 2 bolts
7. Disconnect exhaust
a. Remove front 4 bolts where headers meet "Y" pipe. 15mm x 4bolts (2/side)
b. Disconnect O2 sensors between headers and "Y". 4 wiring harness plugs, 2/side one high, one low
c. Spray hanger rearward of cross member with wd40, let soak then pull. Exhaust is now supported by cross member and loose, but not dropped.
8. Drain transmission fluid
(http://project-jk.com/jeep-jk-write-...ission-service).
With exhaust dropped you will not need to make the drain plug tool. The standard 17mm Allen key will work.
a. Remove fill plugs. 17mm Allen drain plug and 14mm Allen fill plug
b. Replace drain and fill plug
9. Remove front Transmission bolts where transmission meets the back of the engine
a. Starting Driver side (there are (2) 18mm bolts on the very top you will not be able to reach until the transmission is dropped down)
i. 18mm x 1 (Holds small metal angled clip in place, must be threaded through)
ii. 15mm x 1 (Master Cylinder)
iii. 16mm x 1 (catch heat shield clip)
iv. 18mm x 1
v. 15mm x 4
vi. 18mm x 1 bolt
vii. 18mm x 1 bolt (angled bracket that this bolt is threaded through holds a mount for the wiring loom. This will need to be aligned when the transmission goes back in)
10. Remove transmission mount nuts that pass through the cross member
a. 16mm x 3 bolts
11. Support transmission and transfer case with jacks
12. Remove cross member (WATCH TRANNY AND EXHAUST)
a. 18 mm x 4 (2/side) use (2) 18mm wrenches
b. Loosen the remaining front 4 gas tank skid plate bolts to allow passenger side of cross member to drop free. 18mm x 4 bolts. DO NOT REMOVE, LOOSEN TO SUPPORT GAS TANK WEIGHT
13. Remove Transmission/Transfer case
a. Remove transmission bracket. This will allow you to support the transmission weight better. 17mm x 4 bolts
b. Remove lower plate that the transmission bolted into at the back of the engine to allow a grip on the tranny for removal. This will help avoid torqueing the metal gasket
i. 15mm x 3 bolts
c. Tilt the transmission by lowering the jacks and remove the 2 upper 18mm bolts. Think 11:30 and 12:30 on the clock. This will be the hardest task of the job. I used a 6" extension and the impact wrench
d. Slide the transmission back being careful not to catch the shifter nub. You can slide it back and out to the ground with the exhaust loose, but not dropped.
14. Find fiber dust and chunks from your smoked clutch in the bell housing and clean up
a. Sweep out the transmission housing
b. ShopVac out all dust
c. Wipe down with brake cleaner
d. Lube shaft (sorry had to say it)
15. Replace your throw out bearing. DO NOT LOSE THE CLIP ON THE END OF THE BRACE
a. Reach inside the transmission housing and remove the brace that holds the TOB. Just pull gently.
b. Remove the old TOB by releasing the clips
c. Thoroughly clean the brace
d. Install the new TOB
e. Grease brace and TOB
f. Reinstall brace w/ TOB in transmission housing
16. Clean (brake cleaner) and grease slave cylinder end
17. Install Clutch
a. Remove old clutch. 10mm x 6 bolts
Old clutch plate
Vs new
b. Clean flywheel (brake cleaner)
c. Inspect fly wheel for burn damage. If found consider replacing or having it machined, your local auto parts store will do this. Mine was fine as it only had 13k miles.
d. Use clutch install tool to align clutch
i. Find proper end cap
ii. Mount rod
e. Slide friction disc on making sure the proper side faces the flywheel (remove sticker)
f. Slide wedge down to center friction disk
g. Slide clutch plate over rod
g. Tighten plate in a circular manner a few turns at a time until all bolts are snug. 10mm x 6 bolts. I'd be cautious not to strip the bolts
18. Clean Master cylinder
a. Use brake cleaner
b. Lube
19. Install new sound/thermal proofing if desired on the underside of the body above the transmission. Mine was torn up when we removed the transmission (Boom mat or a similar product)
20. If you haven't extended your transfer case breather now is a good time. Keep the end cap from the old breather to reuse.
21. Replace the lower plate removed in step #13. 15mm x 3 bolts
22. Using at least 2 people start working the transmission/transfer case back into position. Watch all wires and hoses
a. Replace the bottom 4 transmission bell housing bolts. 15mm x 4 (the middle 4) leave loose.
i. The 2nd to top 18mm bolt on the passenger side must pass through a bracket. Align and bolt NOW
b. Work the wire loom around and start reinstalling everything from step #5
i. Transfer case sensor from step #5-C-1. 8mm x 1 bolt
c. Reinstall all of the remaining transmission bolts
i.The longest one, driver side is used for the master cylinder and should have a clip for the heat shield
d. Reinstall the slave cylinder from step #6. 13mm x 2 bolts
e. Reconnect the transfer case linkage
i. Make sure everything is in neutral
ii. Press on the white clip to tcase
iii. Green clip goes rearward of bracket
iv. Recheck everything is in neutral. There is no fluid in yet don't forget
23. Reinstall the transmission bracket. 17mmx 4 bolts from step #13
24. Reinstall cross member. It is one directional, look for the holes for the gas tank skid to be on the passenger side. Also align bracket bolts from step above.
a. 18mm x 4 bolts 2/side
b. 17mm x 3 bolts (a deep socket may not reach all of the way up, the loose bolts caused a bad vibration for me until I got them tight)
25. Tighten Gas tank skid
a. 18mm x 4 bolts (that were loosened and not removed)
b. 18mm x 2 bolts that were removed in step #2. These attach to the cross member
26. Fill the transmission and transfer case fluids
http://project-jk.com/jeep-jk-write-...ission-service
a. Open the 14mm Allen fill on the passenger side
b. (Direct quote from Project-JK) Attach a bottle pump to your Mopar transmission fluid bottle, insert the feeder tube into the side of your NSG 370 manual transmission and then begin pumping the fluid into it. It should take just a tad over 2 quarts of fluid to fill and you'll know when it's full when fluid starts to ooze back out the fill hole.
c. Replace 14mm fill cap
http://project-jk.com/jeep-jk-write-...r-case-service
d. Open the 10mm Allen fill on the rear of the transfer case
e. (Direct quote from Project-JK) Attach a bottle pump to your ATF+4 fluid bottle, insert the feeder tube into the fill hole on your NV241 transfer case and then begin pumping the fluid into it. It should take about 2 quarts of fluid to fill and you'll know when it's full when fluid starts to ooze back out the fill hole.
f. Replace 10mm fill cap
27.Attach exhaust
a. Rehang driver side rubber bracket
b. Bolt exhaust "Y" pipe back into headers. 15mm x 4 bolts 2/side
i. May be helpful to have some hold the nuts from the front wheel wells
28. Reinstall drive shafts
a. Front
i. Reinstall front tcase yoke. 1-1/4" socket x 1 bolt use red Loctite to secure
ii. Align front drive shaft, and place a few bolts to hold it up
iii. Replace the lower bolts. 15mm x 4 bolts
iv. Replace the upper bolts. 8mm x 8 bolts w/4 brackets. Check that the brackets are in the same position as when you removed. You will need to tighten these down in a circular fashion to seat the drive shaft fully
b. Rear
i. Align rear drive shaft place a few bolts
ii. Reinstall the top and bottom. 8mm x 8 bolts w/4 brackets at each end. Align the brackets where they were when you removed them. Tighten in a circular fashion to seat both ends.
29. Reinstall the transmission/transfer case skid
a. 18mm x 4 bolts
30. Reattached transmission shifter
a. Consider extending your transmission breather at this stage if desired. The breather is flush mounted to the transmission below the spongy pad. You access it from the inside.
b. Replace the transmission shifter. #6 Metric Allen x 1 bolt, #3 Metric Allen x 1 bolt. Use Loctitie and check for range of motion before tightening (This step describes my Rough Country shift adapter install)
c. Press the inner shifter boot down tight. Make sure to get a good seal to keep mud and water out
d. Reinstall outer shifter boot
e. Reinstall shifter knob
31. Reconnect your positive battery terminal
32. Pour yourself and everyone that helped a stiff adult beverage (assuming everyone is 21 or older), you've earned it.
Centerforce recommends a 500 mile break in period before exposing the new clutch to full throttle. Registering your new clutch will activate your warranty process.
Last edited by BadPunkin; Jun 27, 2012 at 07:06 PM.
JK Junkie
Joined: Dec 2007
Posts: 3,343
Likes: 3
From: Amherst, Ohio
I'm glad to see the extent of the write up, no suprise in the detail taken to create it because you took the time to write each step after it was completed. I know this will greatly help out other manual JK's in tackling this huge repair, but if i had a manual, having this write up would exponentially raise my confidence level to replace a clutch. 
JK Freak
Joined: Jan 2011
Posts: 933
Likes: 0
From: El Paso, TX
I'm glad to see the extent of the write up, no suprise in the detail taken to create it because you took the time to write each step after it was completed. I know this will greatly help out other manual JK's in tackling this huge repair, but if i had a manual, having this write up would exponentially raise my confidence level to replace a clutch.


Thread Starter
JK Super Freak
Joined: Nov 2010
Posts: 1,575
Likes: 0
From: NE, Ohio
well it took 4 hours but the write up is much better in the first post now.
Have 50+ miles on the new clutch and it is noticeably different. The action is much lighter and shorter. The plate grabs harder, so at lower RPMs it drops the RPMs as it engages causing a stutter. This is not a bad thing, just different then the stock. I am sure having a grabby clutch will be nice for wheeling. The most noticeable change is how smooth the tranny is with Royal Purple Syncromesh in it.
I'll post more updates as the miles rack up.
BP
Trending Topics


JK Freak
Joined: Jan 2011
Posts: 933
Likes: 0
From: El Paso, TX
well it took 4 hours but the write up is much better in the first post now.
Have 50+ miles on the new clutch and it is noticeably different. The action is much lighter and shorter. The plate grabs harder, so at lower RPMs it drops the RPMs as it engages causing a stutter. This is not a bad thing, just different then the stock. I am sure having a grabby clutch will be nice for wheeling. The most noticeable change is how smooth the tranny is with Royal Purple Syncromesh in it.
I'll post more updates as the miles rack up.
BP
Have 50+ miles on the new clutch and it is noticeably different. The action is much lighter and shorter. The plate grabs harder, so at lower RPMs it drops the RPMs as it engages causing a stutter. This is not a bad thing, just different then the stock. I am sure having a grabby clutch will be nice for wheeling. The most noticeable change is how smooth the tranny is with Royal Purple Syncromesh in it.
I'll post more updates as the miles rack up.
BP
JK Enthusiast
Joined: Oct 2008
Posts: 182
Likes: 1
From: Oman
Nice write up
how is the padel response now? same as stock ?
my brother had spec on his TJ 2002 which was very jumpy with just a little foot off padel till he changed it with centreforce and its much much better now.
how is the padel response now? same as stock ?
my brother had spec on his TJ 2002 which was very jumpy with just a little foot off padel till he changed it with centreforce and its much much better now.