
JCR Dagger rear bumper install

Thread Starter
JK Enthusiast
Joined: Apr 2010
Posts: 390
Likes: 0
From: Manitou Springs, CO
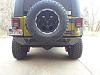
I've been considering JCR's Dagger rear bumper because of its low profile when a member here put one up for sale. it was never used and still raw steel. There was quite a bit of surface corrosion on one end but a wire wheel made quick work of it.
I used self etching primer and put on about 2-3 coats.
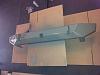
Then used Rustoleum's Hamertone paint. I decided this over bedliner as it better matches my Powdercoated front bumper.
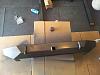
To mount this bumper, you have to cut off a bit of the frame and the crossmember. I found it easier to cut the crossmember away 1st then the ends. By the way, the metal cut of weighs 20 pounds.
Once all the cutting was done, I painted the bare metal. I also (re)painted the muffler and the bit below the tailgate.
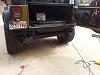
There was a couple of holes to drill on the passenger side frame rail. the driver side already has these holes. One the hole were drilled, the holes were painted over and it was time for the install. Beacuase I was by myself, I had to get creative with how the bumper was going to be held. I ended up with jack stands and one of my wife's exercise steps.
The bumper is held with 5 bolts on each frame rail. Two go into the the same mounts used on the factory bumper. JCR sends an insert for the other three bolts.
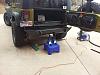
DONE!!!
I used self etching primer and put on about 2-3 coats.
Then used Rustoleum's Hamertone paint. I decided this over bedliner as it better matches my Powdercoated front bumper.
To mount this bumper, you have to cut off a bit of the frame and the crossmember. I found it easier to cut the crossmember away 1st then the ends. By the way, the metal cut of weighs 20 pounds.
Once all the cutting was done, I painted the bare metal. I also (re)painted the muffler and the bit below the tailgate.
There was a couple of holes to drill on the passenger side frame rail. the driver side already has these holes. One the hole were drilled, the holes were painted over and it was time for the install. Beacuase I was by myself, I had to get creative with how the bumper was going to be held. I ended up with jack stands and one of my wife's exercise steps.
The bumper is held with 5 bolts on each frame rail. Two go into the the same mounts used on the factory bumper. JCR sends an insert for the other three bolts.
DONE!!!
Last edited by 4fox; Apr 12, 2013 at 05:14 PM.
Thread Starter
JK Enthusiast
Joined: Apr 2010
Posts: 390
Likes: 0
From: Manitou Springs, CO
Like I mentioned, the cut frame weighed in at 20 lbs.
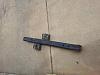
The factory bumper weighs 15 lbs, so thats 35 lb off and the JCR bumper weighs 50 lb.
For only an additional 15 lbs I got a great low profile, full steel bumper with hitch!
looking forward to testing it out on the trails.
The factory bumper weighs 15 lbs, so thats 35 lb off and the JCR bumper weighs 50 lb.
For only an additional 15 lbs I got a great low profile, full steel bumper with hitch!
looking forward to testing it out on the trails.

 I am about to ditch my bumper/tire carrier combo and go with this bumper. I will only throw my spare in the back when needed instead of lugging it around all the time.
