


Making enhanced Rubi rails 4DR and 2DR


Thread Starter
JK Enthusiast
Joined: May 2007
Posts: 421
Likes: 4
From: Indianapolis, IN
 Making enhanced Rubi rails 4DR and 2DR
Here are the ones I made.......Sorry for the mud splatter
Directions are to follow
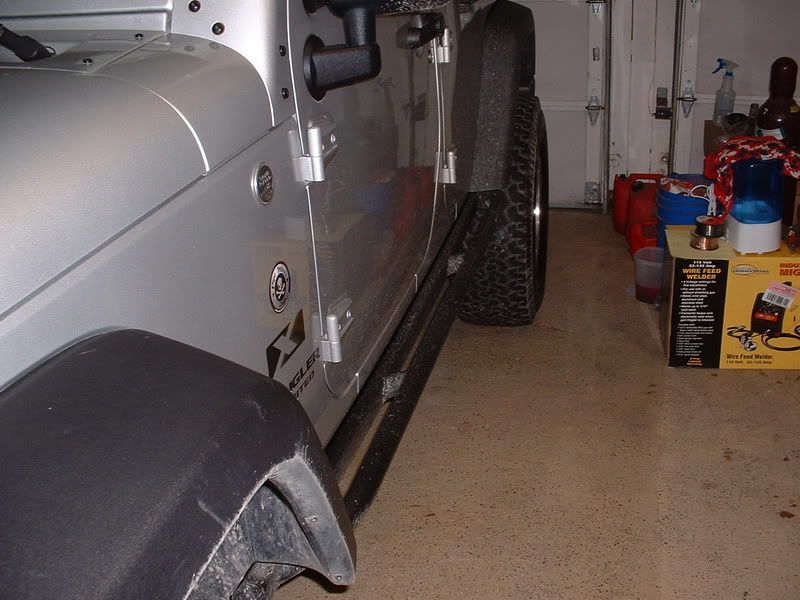
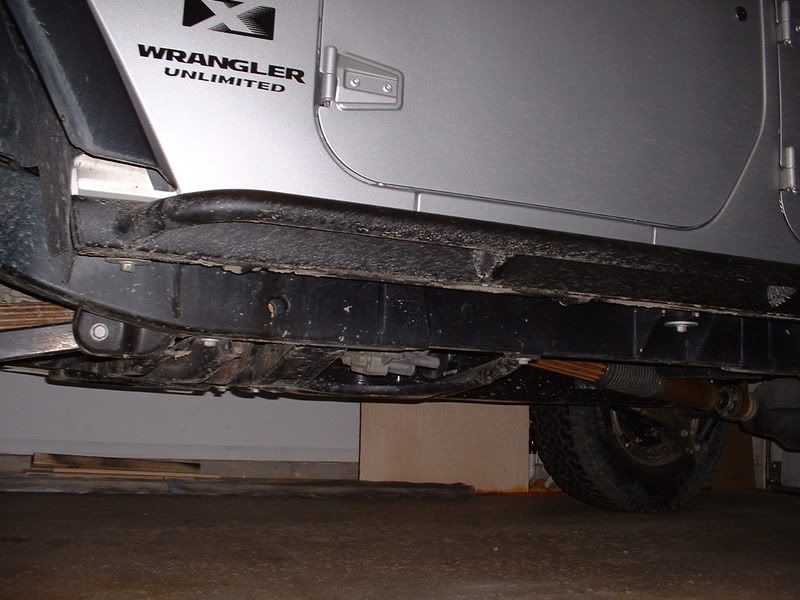
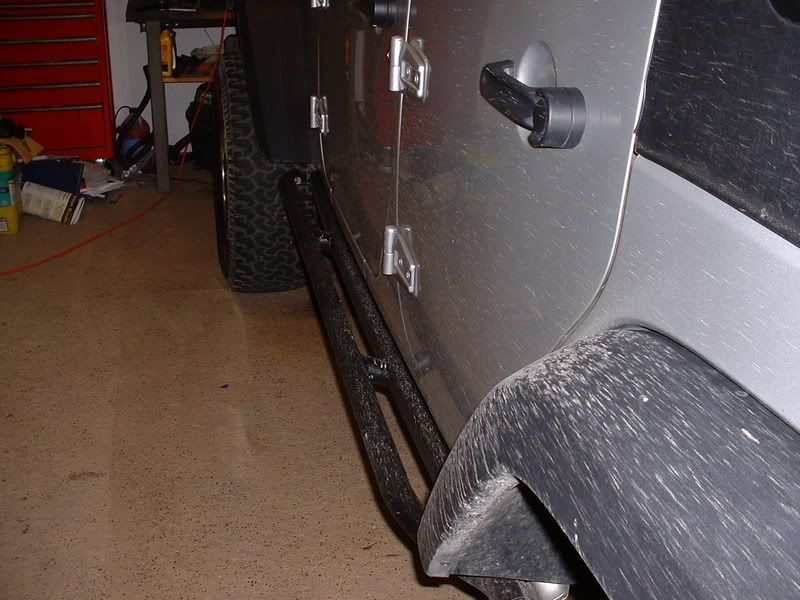
I found a pic of a 2 Dr so I'll use it to help you out. If anyone wants directions for a 4 Dr, let me know. There are some differences because of the length of the 4 Dr....EDIT.....basic 4 DR difference will be discussed at the end.
Here are the basics:
What I used/needed
1. Stock Rubi Rails
2. Angle grinder/ sandpaper will work but will take longer
3. Mig Welder (One powerful enough to make good penatration on >1/8 steel)
4. 1.75 " steel/DOM tubing
5. Primer
6. Duplicolor Truck bed spray lining
Steps:
1. You first need to find where you want the rails to mount to (Represented by A and M in the diagram). Mark those spots on the rail.
2. You will then measure from A to B to get the correct calculations for the tube bending place (I used a race shop that builds roll cages)
3. You will also need the calculations for how far you want the bar to stick out from the rail. So now measure from C to D.
*****Take the measurement near the back fender. If you want the bar to stick out the same amount as the rear fender, take the measurement from there. DO NOT take the measurement from under the door*****
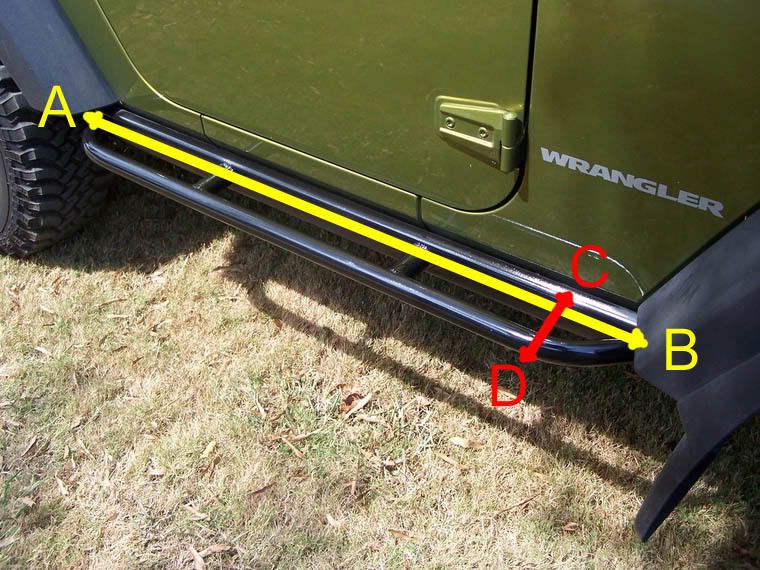
4. Take a picture of what you're building to the tube bending place and give them the measurements. My tube bender makes a nice 8 in. radius bend. It's perfect for our rails.
5. I used my angle grinder to grind off the paint on the rubi rails where the new rails will be welded. I also grinded the area where to 2 middle supports will be welded to.
6. Once you have the rails bent, hold them up to the Rubi rails and do any fine tuning that you may have to do. I actually angled my rails up instead of coming straight out from the rubi rails.
7. I tacked (simple welds spots that are easy to break if there's a mistake) the rails in place and started measuring for the 2 center supports.
8. With left over tubing, I cut out 2 center supports for each side and tacked them in place.
9. Once everything was in place and looked good, I went back and welded everything up.
10. I again used the angle grinder to clean up and welds or spatter.
11. I washed the rails down and wiped them down with alcohol. This removes and fingerprints and grease that will screw up your paint.
12. Once drie, I primed the entire rail.
13. To finish it off I used duplicolor spray on truck bed liner. I would let it dry about 10-15 between coats. I used about 3-4 coats
*****4 DR Model******
Whether you noticed or not the 4 DR's body seems to bow out at the doors and then get more narrow at the front fender.
When I did my rails I wanted the rail even with how far the back fender stuck out. With this in mind, take your C/D measurement at the rear fender. If you take it at the doors, it will throw everything off.
Ask if you need more clarification or pictures.
Good luck.
Directions are to follow
I found a pic of a 2 Dr so I'll use it to help you out. If anyone wants directions for a 4 Dr, let me know. There are some differences because of the length of the 4 Dr....EDIT.....basic 4 DR difference will be discussed at the end.
Here are the basics:
What I used/needed
1. Stock Rubi Rails
2. Angle grinder/ sandpaper will work but will take longer
3. Mig Welder (One powerful enough to make good penatration on >1/8 steel)
4. 1.75 " steel/DOM tubing
5. Primer
6. Duplicolor Truck bed spray lining
Steps:
1. You first need to find where you want the rails to mount to (Represented by A and M in the diagram). Mark those spots on the rail.
2. You will then measure from A to B to get the correct calculations for the tube bending place (I used a race shop that builds roll cages)
3. You will also need the calculations for how far you want the bar to stick out from the rail. So now measure from C to D.
*****Take the measurement near the back fender. If you want the bar to stick out the same amount as the rear fender, take the measurement from there. DO NOT take the measurement from under the door*****
4. Take a picture of what you're building to the tube bending place and give them the measurements. My tube bender makes a nice 8 in. radius bend. It's perfect for our rails.
5. I used my angle grinder to grind off the paint on the rubi rails where the new rails will be welded. I also grinded the area where to 2 middle supports will be welded to.
6. Once you have the rails bent, hold them up to the Rubi rails and do any fine tuning that you may have to do. I actually angled my rails up instead of coming straight out from the rubi rails.
7. I tacked (simple welds spots that are easy to break if there's a mistake) the rails in place and started measuring for the 2 center supports.
8. With left over tubing, I cut out 2 center supports for each side and tacked them in place.
9. Once everything was in place and looked good, I went back and welded everything up.
10. I again used the angle grinder to clean up and welds or spatter.
11. I washed the rails down and wiped them down with alcohol. This removes and fingerprints and grease that will screw up your paint.
12. Once drie, I primed the entire rail.
13. To finish it off I used duplicolor spray on truck bed liner. I would let it dry about 10-15 between coats. I used about 3-4 coats
*****4 DR Model******
Whether you noticed or not the 4 DR's body seems to bow out at the doors and then get more narrow at the front fender.
When I did my rails I wanted the rail even with how far the back fender stuck out. With this in mind, take your C/D measurement at the rear fender. If you take it at the doors, it will throw everything off.
Ask if you need more clarification or pictures.
Good luck.
Last edited by VBS4; Dec 14, 2007 at 12:30 PM.

Thread Starter
JK Enthusiast
Joined: May 2007
Posts: 421
Likes: 4
From: Indianapolis, IN
Other people who have them have reported the same results. The others that reported it were 200 lbs or greater. I believe that the Rubi rails just naturaly fex in that range. But once there, they stop.
Another JKer (well known person on here) has actually pivotted over rocks with his. He reports they've worked quite well for him.


JK Enthusiast
Joined: Oct 2006
Posts: 158
Likes: 0
From: Denver Colorado
I just emailed a couple welders off of my local Craigslist to see what they think they can do it for. My guess is it should be $150.
If that is the case...I'll be getting this done soon as my wife this morning saw another JK with the plastic steps and said I should have something like that...Well ok honey!
If that is the case...I'll be getting this done soon as my wife this morning saw another JK with the plastic steps and said I should have something like that...Well ok honey!
