Nitro Sleeve Install - that went well! Plus, a few new tips.
 09-20-2013, 07:22 AM
#1
JK Junkie
Thread Starter
I know I wished there were a couple more install write-ups on the Nitro hammer-in sleeves, so I thought I would add one more. Plus, I spent less than 10 minutes hammering! I borrowed some ideas and created a few new. What I think some will find particularly useful is that I used only products that are easily sourced and created tools that don't require fabrication/welding skills.
I'll start at the point following removal of the axle shafts (there are plenty of articles on how to disassemble and reassemble).
Two important parts to focus on: 1. Shrinking the sleeves, and 2. Cleaning the axle tubes.
Shrinking the sleeves
Do yourself a favor and buy some dry ice! Dry ice hangs out around -110 degrees. Way colder than your freezer. It is easy to find and not too expensive. Remember not to let the ice touch your cooler directly (line with cardboard and newspaper). Lay some dry ice down, set the sleeves on top, and then put dry ice on top of them. Cover it with newspaper and then wad newspaper up to take up any remaining air space in the cooler. Leave them for 6 hours and you will have some shrinkage!
Clean them before putting them on ice and don't leave any residue on them (it will freeze).
Cleaning axle tubes
Rust remover/paint prep (I used Rustoleum Rust Stripper)
PB Blaster
Mineral Spirits (or similar)
I spent hours trying to figure out a way to create a drill extension. I tried harbor freight, etc. I wanted an easy way to use a wire wheel. I stumbled on a solution as a result of another idea.
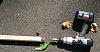
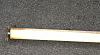
To clean the axle tubes, I realized that a standard roller cover for a paint roller was the perfect fit for the axle tubes! Plus, they are lint free and a great material for cleaning. I then purchased a dowel that was a perfect fit for the roller covers (I believe it was a 1.25"?). Stuff the dowel in the roller cover and it works like a champ. Axle tube cleaner!

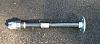
For the wire brush, I found that Lowes carries 2" wire wheels that have a hex bit rather than round bit. I drilled a small hole in each end of the dowel rod and hammered the wheel in one end and a drill adapter in the other. Yes, there is probably a much better solution, but this was cheap and it worked!
I started with a roller covered in the rust remover and then used the wire wheel. Once done, I cleaned the tubes with mineral spirits. I then used PB Blaster on a roller and then mineral spirits again. All clean!
The tool
I went to the plumbing section in Lowes and created a tool. Worked awesome.
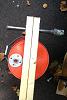
To spare the hands of my helper, I used some 2x4 with holes drilled to hold the tool. I admit that the tool failed prematurely, so I had to hit the end of the pipe. I'm not a great shot with a sledge hammer...
It is important to move quickly once you pull the sleeves from the ice. The metal heats up quickly (which I think has caused problems for others). For the longer passenger side sleeve, I decided to add an extreme pressure lubricant I picked up at Pep Boys. It definitely helped out (note that in a press fit tolerance application such as this, most lubricants won't work - you need something for extreme pressure/interference fit). I put it on a clean roller cover and applied it on the inside of the axle tube before inserting the sleeve.
All in, it took about 3 minutes of hammering for the driver sleeve and 5 minutes for the passenger. It would have been quicker, but a few misses with the hammer disrupted my helpers focus.
Total time from start to finish was about 3.5 hours.
I'll start at the point following removal of the axle shafts (there are plenty of articles on how to disassemble and reassemble).
Two important parts to focus on: 1. Shrinking the sleeves, and 2. Cleaning the axle tubes.
Shrinking the sleeves
Do yourself a favor and buy some dry ice! Dry ice hangs out around -110 degrees. Way colder than your freezer. It is easy to find and not too expensive. Remember not to let the ice touch your cooler directly (line with cardboard and newspaper). Lay some dry ice down, set the sleeves on top, and then put dry ice on top of them. Cover it with newspaper and then wad newspaper up to take up any remaining air space in the cooler. Leave them for 6 hours and you will have some shrinkage!
Clean them before putting them on ice and don't leave any residue on them (it will freeze).
Cleaning axle tubes
Rust remover/paint prep (I used Rustoleum Rust Stripper)
PB Blaster
Mineral Spirits (or similar)
I spent hours trying to figure out a way to create a drill extension. I tried harbor freight, etc. I wanted an easy way to use a wire wheel. I stumbled on a solution as a result of another idea.
To clean the axle tubes, I realized that a standard roller cover for a paint roller was the perfect fit for the axle tubes! Plus, they are lint free and a great material for cleaning. I then purchased a dowel that was a perfect fit for the roller covers (I believe it was a 1.25"?). Stuff the dowel in the roller cover and it works like a champ. Axle tube cleaner!
For the wire brush, I found that Lowes carries 2" wire wheels that have a hex bit rather than round bit. I drilled a small hole in each end of the dowel rod and hammered the wheel in one end and a drill adapter in the other. Yes, there is probably a much better solution, but this was cheap and it worked!
I started with a roller covered in the rust remover and then used the wire wheel. Once done, I cleaned the tubes with mineral spirits. I then used PB Blaster on a roller and then mineral spirits again. All clean!
The tool
I went to the plumbing section in Lowes and created a tool. Worked awesome.
To spare the hands of my helper, I used some 2x4 with holes drilled to hold the tool. I admit that the tool failed prematurely, so I had to hit the end of the pipe. I'm not a great shot with a sledge hammer...
It is important to move quickly once you pull the sleeves from the ice. The metal heats up quickly (which I think has caused problems for others). For the longer passenger side sleeve, I decided to add an extreme pressure lubricant I picked up at Pep Boys. It definitely helped out (note that in a press fit tolerance application such as this, most lubricants won't work - you need something for extreme pressure/interference fit). I put it on a clean roller cover and applied it on the inside of the axle tube before inserting the sleeve.
All in, it took about 3 minutes of hammering for the driver sleeve and 5 minutes for the passenger. It would have been quicker, but a few misses with the hammer disrupted my helpers focus.
Total time from start to finish was about 3.5 hours.
Last edited by Invest2m4; 09-20-2013 at 07:24 AM.
 09-20-2013, 07:31 AM
#2
Good work. I used a paint roller on mine too. I used a threaded rod with washers and nuts to keep it still then put the threaded rod in my drill. Clean as a whistle. I guess the dry ice is key because that the only thing I didn't do. My install was 9 hrs!
09-20-2013, 07:51 AM
#3
JK Junkie
Thread Starter
I tried to find a way to use LN2 (about 2.5x colder than dry ice), but quickly realized that wasn't practical.
Based on some reading I did on some machine shop forums, using an extreme pressure lubricant is highly recommended as well.
10-14-2013, 06:40 PM
#5
JK Enthusiast
Join Date: Jul 2012
Location: Charlotte, NC
Posts: 247
Likes: 0
Received 0 Likes
on
0 Posts
Just to add a tip to cleaning out the axle tubes before the install I used a cylinder honing tool rented from Autozone; prep is everything on this install. You can either spend hours hammering, sweating, and cussing or whack them roughly 5 times with a 3lb dead blow and call it a day.
10-14-2013, 07:35 PM
#6
JK Freak

Join Date: Jan 2009
Location: Carlsbad, CA
Posts: 722
Likes: 0
Received 0 Likes
on
0 Posts
Another tip is too make sure you install the Nitro sleeves BEFORE you weld on any C gussets. The heat from the welds can slightly warp the tubes and make it impossible for the sleeves to go in.
Trending Topics
06-04-2014, 04:12 AM
#8
JK Junkie
Thread Starter
Yeah, works well. I set up 4 under the axle just to be safe and chocked the rear wheels. Dry ice and be fast and it's easy (and clean the tubes well). I'm doing another set this weekend, but this time going the air hammer method as shown above. That was a brilliant idea!
 one though what size hammer did you use? we used a 15 pounder,no dry ice and it only took less than a minute to knock them in
06-25-2015, 10:44 AM
one though what size hammer did you use? we used a 15 pounder,no dry ice and it only took less than a minute to knock them in
06-25-2015, 10:44 AM
#10
JK Newbie

Join Date: Apr 2015
Location: petoskey, mi
Posts: 2
Likes: 0
Received 0 Likes
on
0 Posts
so I'm getting ready to do this and researching the hell outta it because I've seen good (5 minute) and horrible (5 hour installs). my question is about the prep, which is obviously the key.
do you disassemble the diff? if not, when you're doing the cleaning aren't you pushing crap up into it? any thoughts? I know this is an old thread...
do you disassemble the diff? if not, when you're doing the cleaning aren't you pushing crap up into it? any thoughts? I know this is an old thread...