
Successful electric side mirror relocation

Thread Starter
JK Newbie
Joined: Dec 2011
Posts: 43
Likes: 0
From: Suwanee, GA
I bought some mirror relocation brackets off a member on this forum, all went well there. Anyway, I have not needed to adjust my fancy electronic side mirrors, and therefore was lost on the idea that they were actually electric. I found that out when I tried to remove the mirror and found then little black cord.
I was at the dealer cashing in on my free oil change, and asked about disconnecting the cord from the mirror. He responded that the disconnect was user the dash, and the whole door came off, not just the mirror. I walked him to a jeep and explained using the mirror and jeep as a model. I tried my best to explain that I want to remove the mirror. He kept saying, just take it off, of course, if you move it, it won't have power. We went around and around for 10 minutes. He still didn't get it. So, I asked the mechanic. He said it would be next to impossible, stating that the glass portion of the mirror cannot be removed unless it breaks. I drove straight home, 30 minutes later, cord disconnected, secured inside the door for reconnection (if I ever decide to sell the jeep). Mirror relocated successfully, but obviously without the unnecessary power option.
I know, this thread is useless without pictures. If anyone is really interested, I can walk you through the process.
JK Newbie
Joined: May 2012
Posts: 45
Likes: 1
From: virginia
this was one of the very first things i did to my 2011 as i wanted to be doorless but law states that i needed mirrors,,was kinda easy,,but yeah,dealers just dont understand the "wrangler" unless they have owned one.
Thread Starter
JK Newbie
Joined: Dec 2011
Posts: 43
Likes: 0
From: Suwanee, GA
I'll try to put this together with pictures.
I removed the door and did this with it off, but it may actually be easier with the door on.
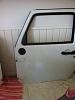
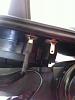
Remove all mirror attachment points and pull a little on the power cord to create some slack. You don't need much, but just allow the mirror to hang loose on the cord.
The next step is done with the mirror hanging, slack in the power cord. As mine is already off, it does not show this in the photo.
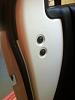
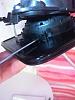
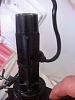
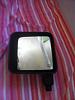
What you will do is push the glass portion of the mirror toward the inside (toward the heat symbol in the corner)
Using a flashlight, you will see two star screws. Remove these.
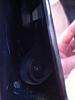
Then, push the mirror to the other side and remove one more screw.
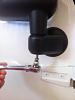
The whole internal assembly will now be free of the casing. However, the power cord will be keeping it all together.
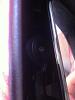
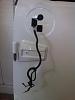
I first removed the two heating plugs at the bottom of the mirror.
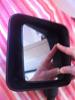
Now the glass portion can be removed. This is done by placing a small flat screwdriver at three points (small tabs) and twisting.
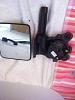
Now, all that is left is to remove the 4 cord plug that controls the motor moving the mirror. I used the same small screwdriver to disconnect this by pressing alternately on the tabs holding it in. WARNING....I don't know how difficult this will be to re-insert. It may he very difficult, so of power mirrors are necessary for you...don't remove this.
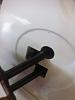
Now, the power supply is held to the mirror stem by a black zip tie. Do not cut this, it will easily slide down the stem and the power cord is disconnected from your mirror assembly.
I tucked the cable inside the door, and made sure my zip tie ring was secured around the relocation plug so the cable will not fall into the door. It is then easily retrievable and can be reconnected (I hope) if I ever decide to sell.
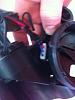
Replace the stem and motor unit inside the housing an screw in place prior to replacing the glass. The glass then, simply snaps back into place.
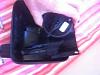

Attach mirror to your favorite relocation bracket.
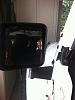
My only concern is not being able to re-attach the 4 pin connection. For personal use, I don't care. Never used the power function, never will. It's only for re-sale, but that's not on the radar.
I removed the door and did this with it off, but it may actually be easier with the door on.
Remove all mirror attachment points and pull a little on the power cord to create some slack. You don't need much, but just allow the mirror to hang loose on the cord.
The next step is done with the mirror hanging, slack in the power cord. As mine is already off, it does not show this in the photo.
What you will do is push the glass portion of the mirror toward the inside (toward the heat symbol in the corner)
Using a flashlight, you will see two star screws. Remove these.
Then, push the mirror to the other side and remove one more screw.
The whole internal assembly will now be free of the casing. However, the power cord will be keeping it all together.
I first removed the two heating plugs at the bottom of the mirror.
Now the glass portion can be removed. This is done by placing a small flat screwdriver at three points (small tabs) and twisting.
Now, all that is left is to remove the 4 cord plug that controls the motor moving the mirror. I used the same small screwdriver to disconnect this by pressing alternately on the tabs holding it in. WARNING....I don't know how difficult this will be to re-insert. It may he very difficult, so of power mirrors are necessary for you...don't remove this.
Now, the power supply is held to the mirror stem by a black zip tie. Do not cut this, it will easily slide down the stem and the power cord is disconnected from your mirror assembly.
I tucked the cable inside the door, and made sure my zip tie ring was secured around the relocation plug so the cable will not fall into the door. It is then easily retrievable and can be reconnected (I hope) if I ever decide to sell.
Replace the stem and motor unit inside the housing an screw in place prior to replacing the glass. The glass then, simply snaps back into place.
Attach mirror to your favorite relocation bracket.
My only concern is not being able to re-attach the 4 pin connection. For personal use, I don't care. Never used the power function, never will. It's only for re-sale, but that's not on the radar.


Trending Topics
Thread Starter
JK Newbie
Joined: Dec 2011
Posts: 43
Likes: 0
From: Suwanee, GA
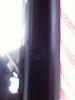
I did not re-route the wiring. I do not have need for the electric function. In addition, the mirror relocation bracket is not a closed system like the stock mirror, therefore the wire would be exposed to the elements. According to some, it can be re-routed through the A pillar, but I think this would be a tough job as the lower half of the wire is connected inside the door. It would need to be disconnected, and then completely re-wired under the dash. There would be no way of re-connecting it to it's original location as it is inside the door itself, which is off the truck anyway.
So, I simply used the stock zip-tie that had the wiring held to the mirror stem and placed it around the post of the system that closes the hole in the door. It will keep the wiring from falling down inside the door.
I'll try to get a close up of what that that looks like.
So, I simply used the stock zip-tie that had the wiring held to the mirror stem and placed it around the post of the system that closes the hole in the door. It will keep the wiring from falling down inside the door.
I'll try to get a close up of what that that looks like.