Upgrade stock fog lights with Pilot PL360C
 07-10-2012, 01:03 PM
#1
JK Enthusiast
Thread Starter
I've read a couple of threads here and there talking about replacing the fog lights with the blue-ish driving lights. However, the details on the mounts were ambiguous and they didn't mention the white fog lights. So here's what I did.
In this write-up, I don't drill any holes in the bumper, this is all do-able without removing the bumper and should take about 1 hour with wire splicing and all. Also, I'm using a 2009 but I did not need any relays or anything, just splice into the existing wires.
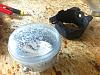
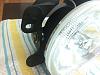
The reason I had to replace my fogs is because this is the second set that seems to have the crappy plastic lens flake away. I figure it's do to either dirt or car wash detergent, either way it sucks (compare in the box below, on the right is the stock light).
What you'll need:
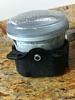
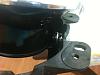
Basically the first step is the most difficult. I wanted to re-use the factory mounts from the fog lights, as opposed to using the mounts that came with the lights and required drilling. What you first need to do is to pop-out the old plastic fog lights. Gently use a flat screw driver to pop-out one side, and then the other (be careful, heat up the plastic with a hair drier if it'll help).
The second thing you'll need to do is to align the Pilot fogs with the stock mounts. Make sure that you're the fog light is not upside down, the "TOP" marking should be at the top.
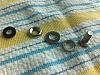
You'll notice that there is some space between the light and the mount, which is where you'll use the rubber washer and dish washer. Screw in one side first, then the other. This should be tight enough to ensure correct alignment. (Bolt, washer | plastic mounts | lock washer, dish washer, rubber washer || light).
Once the lights are mounted on the factory mounts all you need to do is cut the factory wire right below the factory socker, and splice the wires together (both colored white/black which makes it easy). I'd recommend you test that everything lights up before splicing.
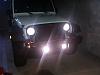
I didn't really take before/after pics, the lights are better, but mostly they're made of metal and glass so I don't have to worry about them flaking. (Also used xPel protective film for added insurance).
In this write-up, I don't drill any holes in the bumper, this is all do-able without removing the bumper and should take about 1 hour with wire splicing and all. Also, I'm using a 2009 but I did not need any relays or anything, just splice into the existing wires.
The reason I had to replace my fogs is because this is the second set that seems to have the crappy plastic lens flake away. I figure it's do to either dirt or car wash detergent, either way it sucks (compare in the box below, on the right is the stock light).
What you'll need:
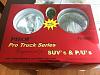
- Pilot PL-360C Fog Light kit (about $56)
- 4 x [1/4" bolt, rubber washer, lock washer, dish washer)
- 4 x 18 gauge butt splice
Basically the first step is the most difficult. I wanted to re-use the factory mounts from the fog lights, as opposed to using the mounts that came with the lights and required drilling. What you first need to do is to pop-out the old plastic fog lights. Gently use a flat screw driver to pop-out one side, and then the other (be careful, heat up the plastic with a hair drier if it'll help).
The second thing you'll need to do is to align the Pilot fogs with the stock mounts. Make sure that you're the fog light is not upside down, the "TOP" marking should be at the top.
You'll notice that there is some space between the light and the mount, which is where you'll use the rubber washer and dish washer. Screw in one side first, then the other. This should be tight enough to ensure correct alignment. (Bolt, washer | plastic mounts | lock washer, dish washer, rubber washer || light).
Once the lights are mounted on the factory mounts all you need to do is cut the factory wire right below the factory socker, and splice the wires together (both colored white/black which makes it easy). I'd recommend you test that everything lights up before splicing.
I didn't really take before/after pics, the lights are better, but mostly they're made of metal and glass so I don't have to worry about them flaking. (Also used xPel protective film for added insurance).


 12-06-2012, 07:08 AM
#6
JK Enthusiast
Thread Starter
If I remember correctly it was 1", it may be 1 1/4 but I would buy both and try with 1" first. You definitely don't want to start and have to go to HP in the middle. It should be short enough that should need to squeeze the plastic bracket a little, this is also what makes it sturdy once it's set.
12-06-2012, 07:42 AM
#7
JK Enthusiast

Join Date: Nov 2009
Location: Washington D.C.
Posts: 466
Likes: 0
Received 0 Likes
on
0 Posts
If I remember correctly it was 1", it may be 1 1/4 but I would buy both and try with 1" first. You definitely don't want to start and have to go to HP in the middle. It should be short enough that should need to squeeze the plastic bracket a little, this is also what makes it sturdy once it's set.

Trending Topics
11-16-2013, 03:54 PM
#10
JK Newbie

Join Date: Oct 2013
Location: Charleston, WV
Posts: 2
Likes: 0
Received 0 Likes
on
0 Posts
Did this mod on a 2014 JKU today splicing into the stock wires, but it appears the canbus (which I am not even really sure what it is) will not allow them to operate properly. Sometimes one will come on, sometimes the other or sometimes both. Once you switch to high beam and back to low they are sporadic if they will come back on or not. They also flash several times to even come on at all when they do.
The connections are all tight, so it not that.
Any changes to the 2014 wiring system that anyone is aware of that might affect these working properly?
Anyone have a suggestion on how to get them to work properly??
The connections are all tight, so it not that.
Any changes to the 2014 wiring system that anyone is aware of that might affect these working properly?
Anyone have a suggestion on how to get them to work properly??