Winch Mounting; Solenoid Under Hood; Routing Freakin Wires **Picture Heavy**
 03-22-2013, 08:12 AM
#1
JK Enthusiast
Thread Starter
Join Date: Oct 2011
Location: Sioux Center, IA
Posts: 209
Likes: 0
Received 0 Likes
on
0 Posts
Yes, I know other people have write-ups about mounting the winch, but when I was looking for some advise on routing the 2 GA cables to mount the solenoid under the hood I didn't find much detail or pictures. So I did it my way (not sure if it's the best) and here's how it turned out. **ALERT: picture heavy**
Background: I bought the Engo 10K synthetic off the great deal on this forum (Thanks JeepAddOns-Chris). Came promptly and couldn't wait to mount it. I wanted to retain the stock bumper b/c #1 - I don't have the cash for the kind of front bumper I'd really like and #2 - I really don't mind the OE bumper b/c I really haven't gotten to beat it up yet. **Sidenote - headed to Moab mid-April 2013** After some research I ordered the Rough Country Winch Plate with the D rings so that if I decided to remove the winch (I commute 60 min each way to work with my Jeep) there wouldn't be a gapping hole in the front.
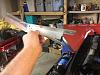
When deciding solenoid location I saw some great write-ups on putting it right next to the battery box, but I decided to mount it more towards the front and drivers side so I wouldn't have the hood open so far when using. There is a nice indentation in the padding under the hood on the drivers side front so I started making a bracket to mount the solenoid just behind the wiper fluid container. I used an existing bolt which mounts through a rubber piece into a part with a few brake lines in it (?? anti-lock brake setup). I like using aluminum b/c of weight and no need to paint, so I took a piece of angled aluminum and cut a short length to bear the weight of the solenoid. It bolts at the bottom and will support the bracket up top.
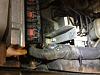
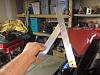
Next, I took two more pieces of the angled aluminum and decided to use the upper fender bolts for sidewall mounting. I cut the first one nearest the firewall and decided to angle another off to reach the other fender bolt up front. It was very much trial and error, but came out looking like this when mounted. I then attached it to the first angled piece from underneath.
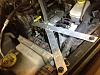
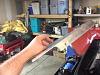
Here are a few pictures of the upper aluminum bracket showing the material I had to remove to allow it to reach the upper fender bolt mounts. I had to allow for the wiring looms, etc. I did pop rivet it together for stability.
So, when I went to mount the Engo solenoid box I saw that it had four bolts through it's bottom to the original winch top bracket. I got some longer bolts and realized that due to the 'angled' nature of my bracket, it wasn't going to line up right. So I bought a piece of galvanized metal (from Menards) and cut it to fit over my bracket. Then I mounted the metal plate to my aluminum bracket, attached the solenoid box to the plate and mounted it all back in to the engine bay. In retrospect, had I used steel to start with I could have just cut and welded the bracket as one piece, but since I had spent so much time with the aluminum and it seemed pretty strong i decided to call it done. **see next post for picture**
To Be Continued......
Background: I bought the Engo 10K synthetic off the great deal on this forum (Thanks JeepAddOns-Chris). Came promptly and couldn't wait to mount it. I wanted to retain the stock bumper b/c #1 - I don't have the cash for the kind of front bumper I'd really like and #2 - I really don't mind the OE bumper b/c I really haven't gotten to beat it up yet. **Sidenote - headed to Moab mid-April 2013** After some research I ordered the Rough Country Winch Plate with the D rings so that if I decided to remove the winch (I commute 60 min each way to work with my Jeep) there wouldn't be a gapping hole in the front.
When deciding solenoid location I saw some great write-ups on putting it right next to the battery box, but I decided to mount it more towards the front and drivers side so I wouldn't have the hood open so far when using. There is a nice indentation in the padding under the hood on the drivers side front so I started making a bracket to mount the solenoid just behind the wiper fluid container. I used an existing bolt which mounts through a rubber piece into a part with a few brake lines in it (?? anti-lock brake setup). I like using aluminum b/c of weight and no need to paint, so I took a piece of angled aluminum and cut a short length to bear the weight of the solenoid. It bolts at the bottom and will support the bracket up top.
Next, I took two more pieces of the angled aluminum and decided to use the upper fender bolts for sidewall mounting. I cut the first one nearest the firewall and decided to angle another off to reach the other fender bolt up front. It was very much trial and error, but came out looking like this when mounted. I then attached it to the first angled piece from underneath.
Here are a few pictures of the upper aluminum bracket showing the material I had to remove to allow it to reach the upper fender bolt mounts. I had to allow for the wiring looms, etc. I did pop rivet it together for stability.
So, when I went to mount the Engo solenoid box I saw that it had four bolts through it's bottom to the original winch top bracket. I got some longer bolts and realized that due to the 'angled' nature of my bracket, it wasn't going to line up right. So I bought a piece of galvanized metal (from Menards) and cut it to fit over my bracket. Then I mounted the metal plate to my aluminum bracket, attached the solenoid box to the plate and mounted it all back in to the engine bay. In retrospect, had I used steel to start with I could have just cut and welded the bracket as one piece, but since I had spent so much time with the aluminum and it seemed pretty strong i decided to call it done. **see next post for picture**
To Be Continued......
 03-22-2013, 08:24 AM
#2
JK Enthusiast
Thread Starter
Join Date: Oct 2011
Location: Sioux Center, IA
Posts: 209
Likes: 0
Received 0 Likes
on
0 Posts
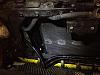
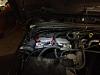
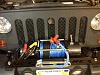
Here's the Engo solenoid mounted on metal plate/aluminum bracket.
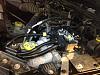
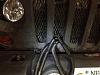
On the solenoid, there are two red power cables (one to battery, one to winch) and two black cables (both to winch). There's also a small grounding wire. I used 6 foot 2 GA cable covered in Harbor Freight black cable protector and ran the outer two towards the fender, behind the hood sensor switch and through the opening btw the headlight and radiator support. The inner black cable went straight forward and through the same opening. It is pretty tight with all those cables between the headlight and radiator support and I zip tied them towards the headlight to keep them away from the aluminum tubes (heat). Here's a picture of the cables going forward:
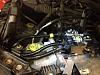
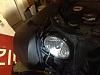
And here's the cables traveling down and along the upper portion of the radiator/front support. You do have to be careful not to zip tie over the holes that mount the front grill.
More to come:
On the solenoid, there are two red power cables (one to battery, one to winch) and two black cables (both to winch). There's also a small grounding wire. I used 6 foot 2 GA cable covered in Harbor Freight black cable protector and ran the outer two towards the fender, behind the hood sensor switch and through the opening btw the headlight and radiator support. The inner black cable went straight forward and through the same opening. It is pretty tight with all those cables between the headlight and radiator support and I zip tied them towards the headlight to keep them away from the aluminum tubes (heat). Here's a picture of the cables going forward:
And here's the cables traveling down and along the upper portion of the radiator/front support. You do have to be careful not to zip tie over the holes that mount the front grill.
More to come:
03-22-2013, 08:46 AM
#3
JK Enthusiast
Thread Starter
Join Date: Oct 2011
Location: Sioux Center, IA
Posts: 209
Likes: 0
Received 0 Likes
on
0 Posts
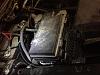
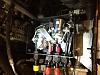
Next, you have to run another black 2 GA cable from the winch back to the battery. I was able to use another 6 foot length (by the way, Harbor Freight sells 2 GA battery cables (one red/one black) for around $40 for the set. Getting them made at NAPA cost me $50 for one 7 ft 2 GA power cable with soldered ends. I ran this cable similarly through the space btw the radiator and the headlight support.
Then I went under the headlight mount and curved towards the firewall. I was able to travel just inside the fender wall and back towards the battery.
Then after I put the grill in place and checked for length of the cables reaching the winch, I cut a relief into the rubber/plastic partition to hold the cable.
Sidenote: I bought an extra (yellow) front grill off craigslist and used duplicolor bedliner on it. I bought a thicker still mesh cover and zip tied it to mounts held with epoxy. In order to make the 6 foot cable work, I did have to make my cables travel THROUGH the grill slot. So I had to cut some of the steel mesh out of the way. With all these cables running through it, it's a bit tight but works well. **see pic** My goal is that when I remove the winch/plate, I can zip tie these cables behind the grill. Yes, I realize I'm probably committing some "Jeep Sin", but when I travel 8 hours to see family I try to drop the weight. I'll even change out to my stock tires/rims to get a few mpg for the trip. Yes, it feels wrong, but I gotta save some money to fund these projects!! Next, I'll run the last red cable to the battery, show how the solenoid box looks and show my final look on the front with winch/plate/cables.
03-22-2013, 05:07 PM
#4
JK Enthusiast
Thread Starter
Join Date: Oct 2011
Location: Sioux Center, IA
Posts: 209
Likes: 0
Received 0 Likes
on
0 Posts
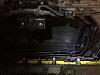
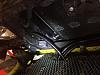
Finally, here is the red power cable from the solenoid to the battery. I ran it along the firewall. I did need a custom made cable b/c the 6 ft one that came in the kit wasn't long enough. I had a 7 ft cable made (which is perfect).
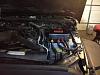
Here is the Engo solenoid box after I replaced the short original cables with three 6 ft and one 7 ft cables. I marked any power cable with red tape and the accessory black cable with yellow tape.
Lastly, here what the front end looks like all buttoned up.
Just tonight I hooked up the cables to the battery and tried everything out. It all worked perfect. Now I'm starting to think about a wireless remote system, but that's for another day. Hope this thread helps someone. Let me know if you see any potential downfalls in my setup. I can't wait to use (or not use) this in Moab.
JeepJeremy
03-23-2013, 08:36 AM
#6
JK Enthusiast

Join Date: Oct 2012
Location: Spotsylvania, VA
Posts: 116
Likes: 0
Received 0 Likes
on
0 Posts
Very nice. I hope to do the same thing with my Engo. Question...I had the solenoid cover off the other day and was wondering...Was it diffucult to remove the existing cable from the plastic nuts holding them on the solenoid box?
03-23-2013, 01:52 PM
#7
JK Enthusiast
Thread Starter
Join Date: Oct 2011
Location: Sioux Center, IA
Posts: 209
Likes: 0
Received 0 Likes
on
0 Posts
JeepJeremy
Trending Topics
03-24-2013, 02:57 PM
#8
JK Enthusiast
Join Date: Oct 2012
Location: Spotsylvania, VA
Posts: 116
Likes: 0
Received 0 Likes
on
0 Posts
No it's not. Just take the 4 screws holding on the cover. Remove the black plastic nut on the inside of the mount, unscrew the black outer piece and unscrew the mount that actually threads through the hole. Also, there is a short rubber sleeve inside the mount that threads into the hole. The problem I ran into was that when I bought the longer cables, the crimped ends were a little larger than the hole in the black plastic nut/threaded piece. I had to either push like heck or remove a little of the inner black plastic. I made it work and it looks good to me. Routing the wires was more of a chore to me.
JeepJeremy
JeepJeremy
03-24-2013, 03:54 PM
#9
JK Newbie
Join Date: May 2011
Location: Douglas AZ
Posts: 78
Likes: 0
Received 0 Likes
on
0 Posts
"Now I'm starting to think about a wireless remote system, but that's for another day. Hope this thread helps someone. Let me know if you see any potential downfalls in my setup. I can't wait to use (or not use) this in Moab.
JeepJeremy[/QUOTE]"
I bought this wireless remote from ebay, a year ago, and have not used my cord remote since then, never had issues. I always carry my cord remote just in case and a extra battery, still going on the same battery for a year now.
65ft Wireless Winch Remote Control Kit for Car ATV SUV UTV 12V Switch Handset | eBay
03-25-2013, 07:44 AM
#10
JK Enthusiast
Thread Starter
Join Date: Oct 2011
Location: Sioux Center, IA
Posts: 209
Likes: 0
Received 0 Likes
on
0 Posts
I bought this wireless remote from ebay, a year ago, and have not used my cord remote since then, never had issues. I always carry my cord remote just in case and a extra battery, still going on the same battery for a year now.
65ft Wireless Winch Remote Control Kit for Car ATV SUV UTV 12V Switch Handset | eBay[/QUOTE]
Ahhhhh crap. Now I'm gonna install the winch remote you mentioned. Just bought it off ebay. Wiring looks simple compared to what I've done so far. It would be nice to keep a little more distance from the vehicle just in case something happened OR use it from inside the jeep rather than running more wires through the firewall. Thanks for the tip.
JeepJeremy