
Fox 2.0 resi install

Thread Starter
JK Enthusiast
Joined: Nov 2015
Posts: 457
Likes: 3
From: Bethel CT
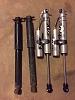
Fox shocks showed up yesterday so just like a kid who gets a new lego toy i put everything together.
this was done in the driveway in about an hour and a half and a beer
![Click image for larger version
Name: image1[1].JPG
Views: 254
Size: 94.6 KB
ID: 646192](https://www.jk-forum.com/forums/attachment.php?attachmentid=646192&thumb=1&d=1513729624)
these are for the 1-3 inch lift
step 1 was getting the stockers out.rears take a 16mm to remove from body,and 18 from axle, fronts i think were a 16/17 for top and again an 18 for the bottom. total removal time maybe 15 minutes total.
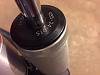
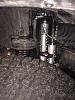
2, get unboxed and resis clamped mostly in the right place, a short call to fox they told me to loosen jam nut on hose to rotate, maybe 1/8 turn. if you see oil coming out youve done it wrong is what they said.
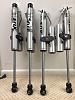
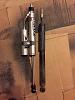
side by sides for comparison. the metalcloak lift that i installed came with stem extensions...not needed on the front anymore as you can see. the rear shock bracket that it came with may still get intalled at a later date but i am still up in the air on that as well given overall length of shock and total lift height of just over 2 inches...im thinking if i relocate the rears ill need limiting straps on the rear( still trying to figure all this out) you can see how much shorter the fronts are even with the stem extenders from metalcloak.
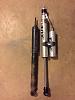
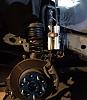
it was tricky getting them compressed and lined up in the rear without a ton of space, the fronts were better but still not a cakewalk. for driver side because of exhaust/trac bar etc i bolted up the top first, then compressed the bottom half and put bottom bolt on, Took a few tries to get it without pinching hand but i got it. These are extremely high pressure and im sure if you got your hand caught between them and a solid part on the vehicle it could be bad so watch out. passenger rear i did opposite, bolted up bottom, compressed and let the upper portion extend into place. again, this is a bit tricky but theres nothing in the way really on the passenger side to get in the way.
fronts,
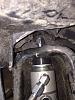
Compress shock and quickly without pinching your hand put it in place and let it extend. thats how i have always done this type of damper.
Since these dont have a wire twist to keep them compressed like a monroe or billstein shock typically does, after you align the top, top in you gotta be quick and catch the bottom as it slides past with a screw driver through the bushing to align the bolt.
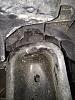
Driver side went in pretty easy, passenger side i pulled out the dremel and hacked away some plastic under the fuse box/battery box to get access to the bolt, didnt feel like taking things apart from above and want easy access if i need to change in the future
compared to stock shocks from a sport with just shy of 30K miles on them these things ride like a dream. where i could compress the stockers easily by hand without body weight, these i needed to put on the ground and put my weight on to get them to move. not enough time on them(obviously) to say how they are long term or on dirt but compared to the billstein 4600s i had on my XJ and the ones on my wifes WK they are firmer, vehicle feels more planted and stable. Ride is not harsh and can handle multiple succsessive compressions extremely well.... worth every penny for sure. these paired with the new coils is night and day compared to stock..less head toss,mr toads wild ride and more in control over the rough stuff.
so just like a kid who gets a new lego toy i put everything together.this was done in the driveway in about an hour and a half and a beer
these are for the 1-3 inch lift
step 1 was getting the stockers out.rears take a 16mm to remove from body,and 18 from axle, fronts i think were a 16/17 for top and again an 18 for the bottom. total removal time maybe 15 minutes total.
2, get unboxed and resis clamped mostly in the right place, a short call to fox they told me to loosen jam nut on hose to rotate, maybe 1/8 turn. if you see oil coming out youve done it wrong is what they said.
side by sides for comparison. the metalcloak lift that i installed came with stem extensions...not needed on the front anymore as you can see. the rear shock bracket that it came with may still get intalled at a later date but i am still up in the air on that as well given overall length of shock and total lift height of just over 2 inches...im thinking if i relocate the rears ill need limiting straps on the rear( still trying to figure all this out) you can see how much shorter the fronts are even with the stem extenders from metalcloak.
it was tricky getting them compressed and lined up in the rear without a ton of space, the fronts were better but still not a cakewalk. for driver side because of exhaust/trac bar etc i bolted up the top first, then compressed the bottom half and put bottom bolt on, Took a few tries to get it without pinching hand but i got it. These are extremely high pressure and im sure if you got your hand caught between them and a solid part on the vehicle it could be bad so watch out. passenger rear i did opposite, bolted up bottom, compressed and let the upper portion extend into place. again, this is a bit tricky but theres nothing in the way really on the passenger side to get in the way.
fronts,
Compress shock and quickly without pinching your hand put it in place and let it extend. thats how i have always done this type of damper.
Since these dont have a wire twist to keep them compressed like a monroe or billstein shock typically does, after you align the top, top in you gotta be quick and catch the bottom as it slides past with a screw driver through the bushing to align the bolt.
Driver side went in pretty easy, passenger side i pulled out the dremel and hacked away some plastic under the fuse box/battery box to get access to the bolt, didnt feel like taking things apart from above and want easy access if i need to change in the future
compared to stock shocks from a sport with just shy of 30K miles on them these things ride like a dream. where i could compress the stockers easily by hand without body weight, these i needed to put on the ground and put my weight on to get them to move. not enough time on them(obviously) to say how they are long term or on dirt but compared to the billstein 4600s i had on my XJ and the ones on my wifes WK they are firmer, vehicle feels more planted and stable. Ride is not harsh and can handle multiple succsessive compressions extremely well.... worth every penny for sure. these paired with the new coils is night and day compared to stock..less head toss,mr toads wild ride and more in control over the rough stuff.

JK Junkie
Joined: Dec 2012
Posts: 2,203
Likes: 4
From: Jacksonville NC
Yep did mine a few weeks ago. Besides Taking a wire brush to get all the dried mud off the bolts it took me 30 minutes and when I work on my Jeep I work kinda slow. Its not a DD more of a hobby so I want to enjoy it.
I'm glad it worked out for you looks great!!
I'm glad it worked out for you looks great!!
Thread Starter
JK Enthusiast
Joined: Nov 2015
Posts: 457
Likes: 3
From: Bethel CT