
JK Pentastar Swap


Thread Starter
JK Newbie
Joined: Aug 2015
Posts: 53
Likes: 8
From: Fairfax, VA
Day 4, 1.5 hrs:
Invented 13 new curse words
Labeled some wires
Disconnected the shift lever: Carefully pry the shift boot from the center console, and then unbolt the lever from the transmission interface with a torx head socket. Remove the shift lever.
Pulled some muscles trying to figure out the transfer case, swore some more
Undid 2 pointless bolts
Was totally stumped on how to separate the transfer case from the tranny.
As an epilogue I figured out how to remove the T-Case many days later. You will need a short 14mm ratcheting wrench (Harbor Freight had a great set for a great price, could have been shorter in length) and you will need to remove the rear engine mount to lower the tranny. More later when it comes time to remove it.
Day 5, 5-8hrs:
Removed the exhaust. Thats it. It was pretty seized on there. It required a disc grinder to cut mount posts, a sledge hammer, wd40, ball joint seperator, and an air hammer that I totally demolished the bit on. The air hammer allowed me to essentially cut the muffler off. What a PITA!
This was the second longest part of the entire project.

Pointless pic except to show the muffler gone.
Invented 13 new curse words
Labeled some wires
Disconnected the shift lever: Carefully pry the shift boot from the center console, and then unbolt the lever from the transmission interface with a torx head socket. Remove the shift lever.
Pulled some muscles trying to figure out the transfer case, swore some more
Undid 2 pointless bolts
Was totally stumped on how to separate the transfer case from the tranny.
As an epilogue I figured out how to remove the T-Case many days later. You will need a short 14mm ratcheting wrench (Harbor Freight had a great set for a great price, could have been shorter in length) and you will need to remove the rear engine mount to lower the tranny. More later when it comes time to remove it.
Day 5, 5-8hrs:
Removed the exhaust. Thats it. It was pretty seized on there. It required a disc grinder to cut mount posts, a sledge hammer, wd40, ball joint seperator, and an air hammer that I totally demolished the bit on. The air hammer allowed me to essentially cut the muffler off. What a PITA!
This was the second longest part of the entire project.
Pointless pic except to show the muffler gone.
Thread Starter
JK Newbie
Joined: Aug 2015
Posts: 53
Likes: 8
From: Fairfax, VA
Day 6, ~1.5hrs
Disconnected front propeller shaft from front differential (below)
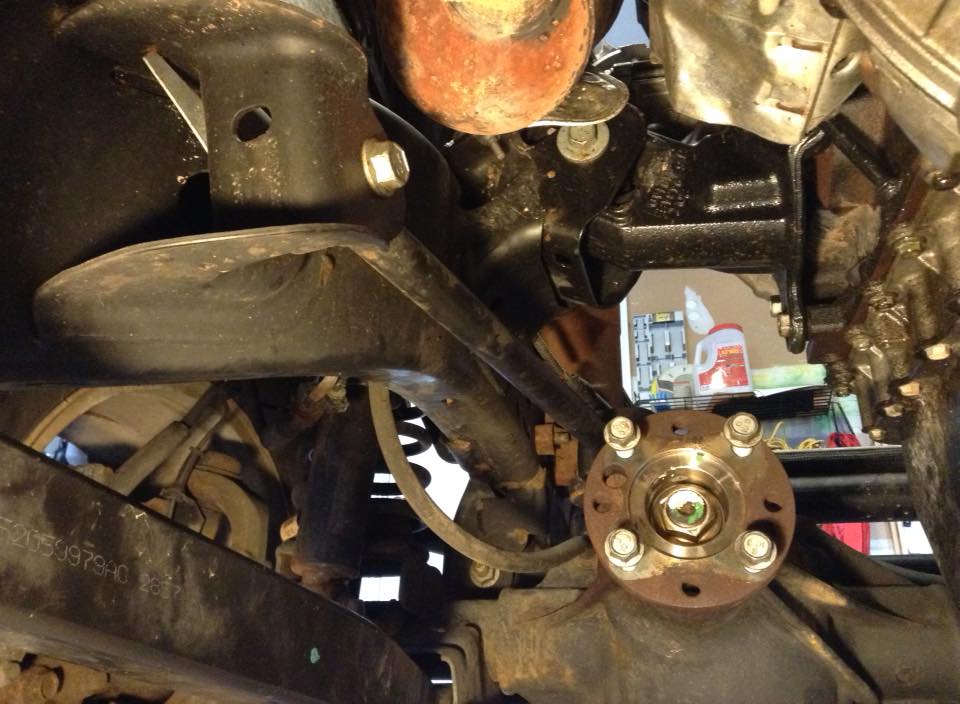
Disconnected rear driveshaft from transfer case (need a very short 1/4 drive socket wrench and 8mm socket) (below)
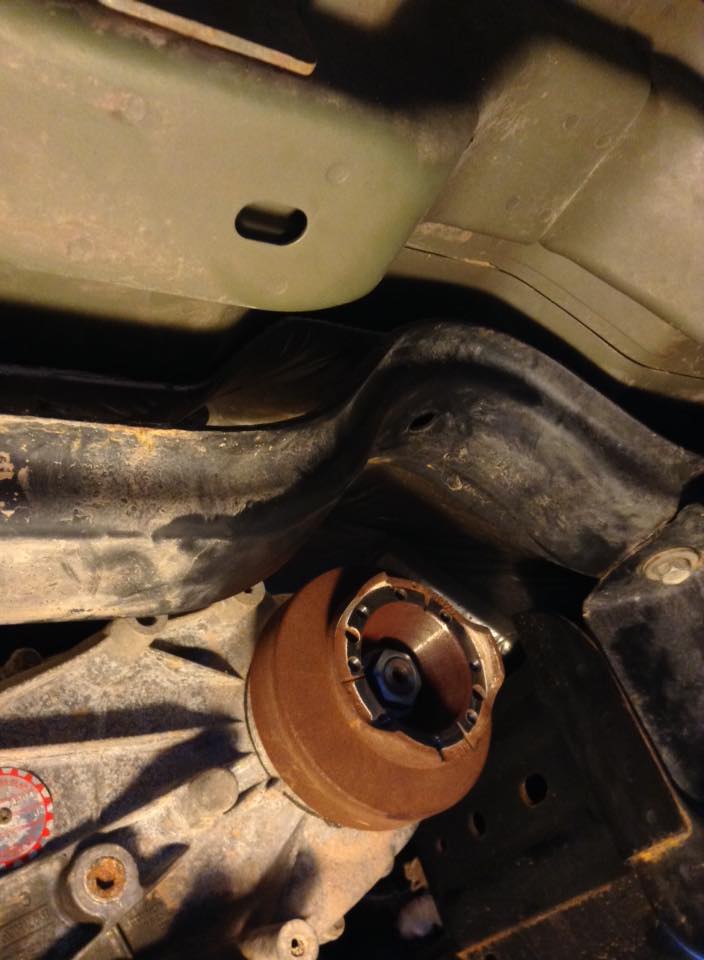
Disconnected propeller shaft from transfer case (need a very short 1/4 drive socket wrench and 8mm socket) (below)
Note the t-case shift bracket bolted to the tcase in this above picture (this is looking from front to back)
Front of transfer case to propeller shaft, marked the shaft before removing to line up when you put everything back together
Note the shift cable attach points for the T-Case
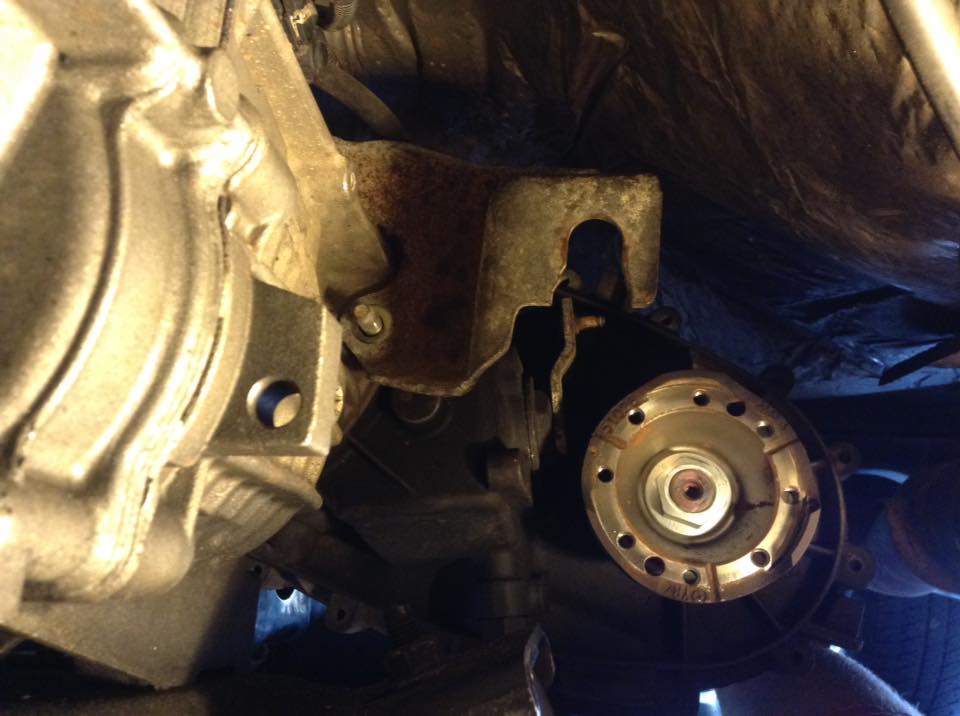
Shifted transfer case into neutral and disconnected shift cable careful not to break plastic connection
Was able to get 4 transfer to tranny bolts loose on the bottom half of the interface without lowering tranny. The other two on top will require removing the engine first
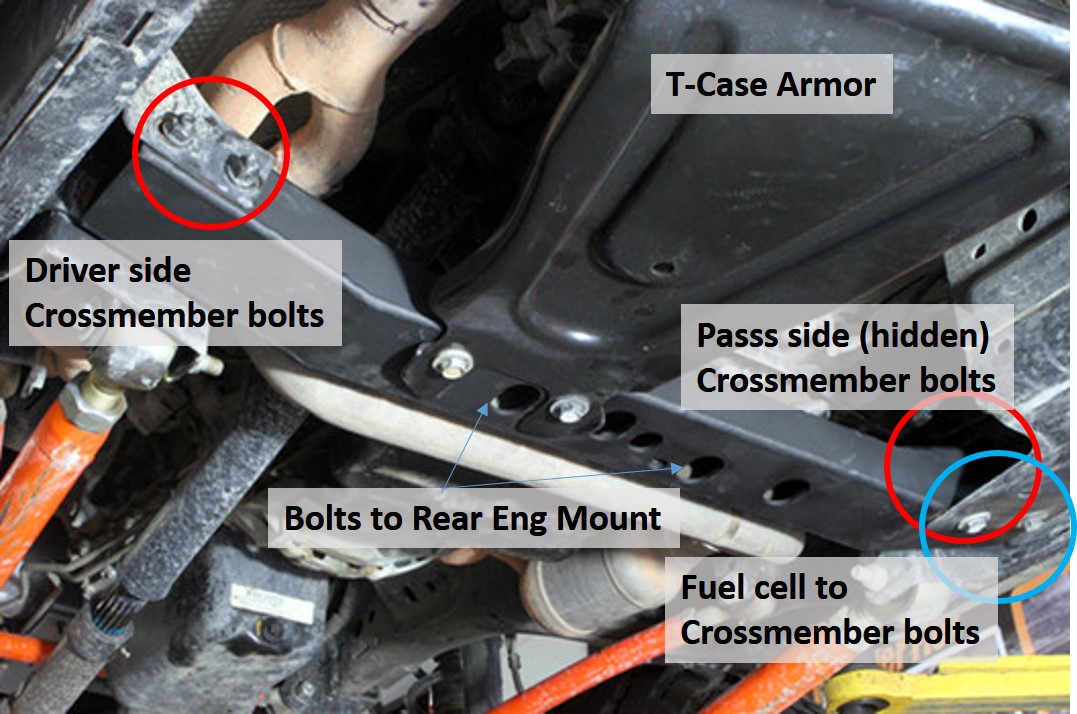
To lower the transmission, remove the clutch slave cylinder very carefully it must be pulled straight back or it could be damaged. Then remove the transfer case shifter cable from the transfer case and the bracket. Again be careful since the shift cable is held into the bracket with a plastic retainer, and held onto the transfer case lever with a very fragile plastic connection. Move these two items out of the way so they don�t get caught later. Next you will put a floor jack under the transmission to support it. Unbolt the two bolts holding the fuel cell armor to the crossmember, and unbolt the innermost bolt for the passenger side crossmember to frame attachment (loosen the other passenger crossmember bolt but don�t remove it yet). Then unbolt two bolts on the driver side of the crossmember. Slowly lower the floor jack to gain access to the top two bolts that attach the transfer case to the transmission. You may have to pound down on the crossmember with a rubber mallet to get the transmission to drop a bit. You will only be able to lower the tranny by a couple inches since the front two engine mounts are still attached. Once the transfer case bolts are removed/loosened (6 bolts), be ready with a transmission jack under the transfer case (about 100lbs). Before removing the transfer case, remember to detach the wiring connector and the vent hose on the top of the t-case. Carefully pull the transfer case from the transmission onto the transmission jack. Once the case is out of the way, jack the transmission up enough to slide a bolt back into the driver side cross member (no need to bolt it in) until you are ready to remove the engine.
Unbolt the rear engine mount from the cross member (two bolts going up from the crossmember through the transmission mount), but leave everything in place for now.
Disconnected front propeller shaft from front differential (below)
Disconnected rear driveshaft from transfer case (need a very short 1/4 drive socket wrench and 8mm socket) (below)
Disconnected propeller shaft from transfer case (need a very short 1/4 drive socket wrench and 8mm socket) (below)
Note the t-case shift bracket bolted to the tcase in this above picture (this is looking from front to back)
Front of transfer case to propeller shaft, marked the shaft before removing to line up when you put everything back together
Note the shift cable attach points for the T-Case
Shifted transfer case into neutral and disconnected shift cable careful not to break plastic connection
Was able to get 4 transfer to tranny bolts loose on the bottom half of the interface without lowering tranny. The other two on top will require removing the engine first
To lower the transmission, remove the clutch slave cylinder very carefully it must be pulled straight back or it could be damaged. Then remove the transfer case shifter cable from the transfer case and the bracket. Again be careful since the shift cable is held into the bracket with a plastic retainer, and held onto the transfer case lever with a very fragile plastic connection. Move these two items out of the way so they don�t get caught later. Next you will put a floor jack under the transmission to support it. Unbolt the two bolts holding the fuel cell armor to the crossmember, and unbolt the innermost bolt for the passenger side crossmember to frame attachment (loosen the other passenger crossmember bolt but don�t remove it yet). Then unbolt two bolts on the driver side of the crossmember. Slowly lower the floor jack to gain access to the top two bolts that attach the transfer case to the transmission. You may have to pound down on the crossmember with a rubber mallet to get the transmission to drop a bit. You will only be able to lower the tranny by a couple inches since the front two engine mounts are still attached. Once the transfer case bolts are removed/loosened (6 bolts), be ready with a transmission jack under the transfer case (about 100lbs). Before removing the transfer case, remember to detach the wiring connector and the vent hose on the top of the t-case. Carefully pull the transfer case from the transmission onto the transmission jack. Once the case is out of the way, jack the transmission up enough to slide a bolt back into the driver side cross member (no need to bolt it in) until you are ready to remove the engine.
Unbolt the rear engine mount from the cross member (two bolts going up from the crossmember through the transmission mount), but leave everything in place for now.
JK Enthusiast
Joined: Mar 2012
Posts: 205
Likes: 1
From: ruther glen va
Awesome thread man. I always like when people go against the grain and try something everybody else says is not possible. Then to take the time to show pics and info is a added bonus. After I would finish each day the last thing I would want to do is edit pictures, etc.. That has to add a lot of time to the overall transformation.
Great job...
Great job...
JK Freak
Joined: Aug 2010
Posts: 920
Likes: 0
From: Ohio
Did you buy just the engine/trans from the donor Jeep, or did you buy the whole wrecked vehicle? I think it would be less complicated in the long wrong to have the entire donor vehicle on hand [if possible] and swap everything; engine, trans, ecm, gauge cluster, dashboard etc. instead of trying to make two different systems work together.
Thread Starter
JK Newbie
Joined: Aug 2015
Posts: 53
Likes: 8
From: Fairfax, VA
Did you buy just the engine/trans from the donor Jeep, or did you buy the whole wrecked vehicle? I think it would be less complicated in the long wrong to have the entire donor vehicle on hand [if possible] and swap everything; engine, trans, ecm, gauge cluster, dashboard etc. instead of trying to make two different systems work together.
Last edited by Saharacon; Aug 19, 2015 at 11:18 AM.
Thread Starter
JK Newbie
Joined: Aug 2015
Posts: 53
Likes: 8
From: Fairfax, VA

There is a bit more interface between the TIPM and the auto tranny. I remember looking into it briefly and thinking it would be much more difficult than this. I believe there are a few other items that must be changed. If I remember to look back at my notes I will see if I can dig up potential issues with the auto.
Thread Starter
JK Newbie
Joined: Aug 2015
Posts: 53
Likes: 8
From: Fairfax, VA
Big day, Prep: 2.5hrs, Remove and install: took me ~4hrs, should have been ~2hrs:
Unplugged o2 sensors
Removed catalytic converter which involved unbolting the cat from the exhaust headers, and was pretty difficult to reach these bolts. I ended up mostly removing the headers at the same time.
Clutch slave moved slightly to the side to prevent damage during engine extraction
Removed top ac tube from the firewall (one 10mm bolt)
Removed cross member from below the tranny: take out those last two bolts and make sure you support the tranny from underneath with a floor jack or transmission jack
Unplugged clutch sensor
Removed passenger header
Only two bolts at the engine mounts holding engine in now as well as the jack underneath the tranny
I bolted the engine hoist to the exhaust headers with a chain, using the header bolts. This seemed to hold very well, just make sure you thread it all the way in.
Then loosen the two engine mount bolts (18mm socket)
With a helper, gradually hoist the engine about an inch. Make sure the hoist doesn’t leak.
Remove the two engine mount bolts so they don’t get stuck
Gradually lower the tranny jack till the stick shift clears the stuff in the way. Once I was sure the hoist would hold, I ended up removing the transmission jack and pulling down on the transmission from underneath, while pushing the whole engine forward, and slowly jacking the engine. I didn’t remove the aluminum power steering line that runs across the frame in front of the engine, so you will have to hoist high enough for the oil pan to clear that. It’s a bit of acrobatics, to do this with the transmission attached, but I didn’t think it was too bad.
Once the engine is clear, I built a floor mount for the engine by cutting and screwing 2x4’s together to form a box to go around the oil pan, and I supported the transmission at the rear with a flat 2x4.
Installing the new engine was a bit trickier.
Install the two engine mounts (torqued to 45ft-lbs). I ended up using too short of a engine mount to engine bolt on one side and stripped the hole. If this happens, get a M10x1.5 helicoil kit and tap and re-thread the hole.
Make sure you have a good hoist point, and hoist over the PS line in the front, and pull down on the tranny in the rear while sliding backward. Lining up the two engine mounts was a pain, and just takes practice, but I lay under the jeep, legs braced against the two front wheels, and pulled down and back on the tranny to get the engine close to the frame mounts. Then slowly wiggle them in, and get the two bolts in there. Be careful not to get the center mount post stuck on the frame mounts, cause it could destroy the rubber part of the mount.
Once the front mounts are in, the back was even worse. I found the rear engine mount (the one under the tranny) was misaligned from the cross member by about two inches, as well as the stick shift not lining up with the hole in the floor. This took me two weeks to figure out, but I eventually discovered that the bolts that hold the rear mount to the cross member are actually in slots. Loosen those bolts up. Put one bolt in the outer most passenger side of the cross member (but don’t tighten). Then it will take some finagling, and possibly a come-along to winch the transmission into the right orientation so the two rear engine mount posts will line up with the frame under the tranny. Once they are in place and threaded a bit, then jack the cross member up till you can put in a driver side bolt. The trick here is to get everything in place before tightening bolts. Since the rubber mounts distort asymmetrically, the three mounts need to be in place before any final tightening. So at first it will look like things don’t fit, but they will in the end.
I would like to attach the video of this, but not quite sure how to.
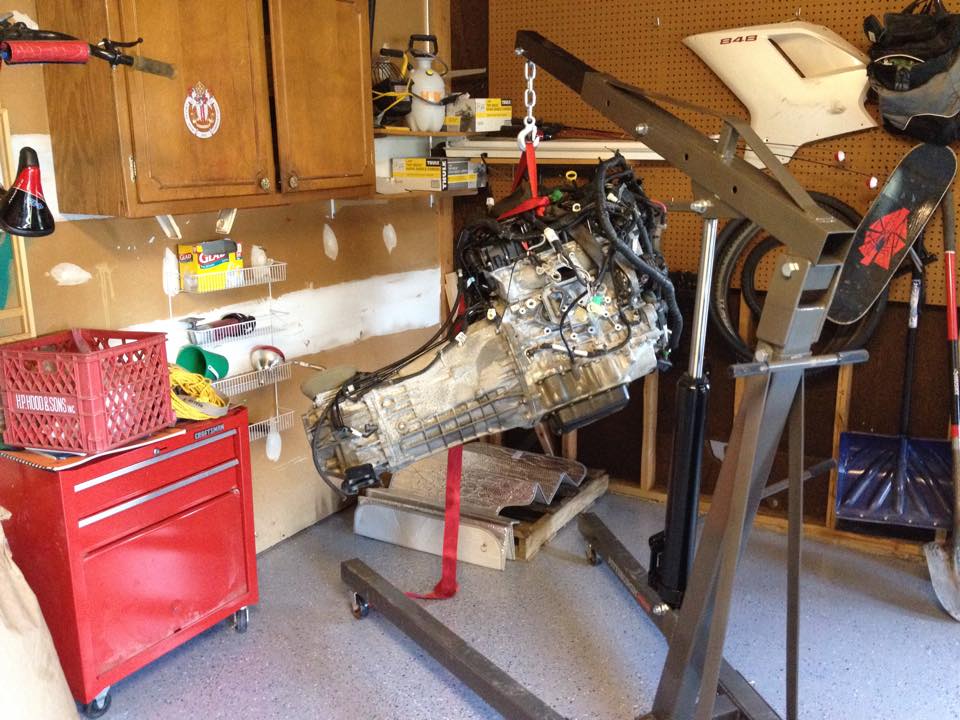
New engine with fancy "seat belt" hoist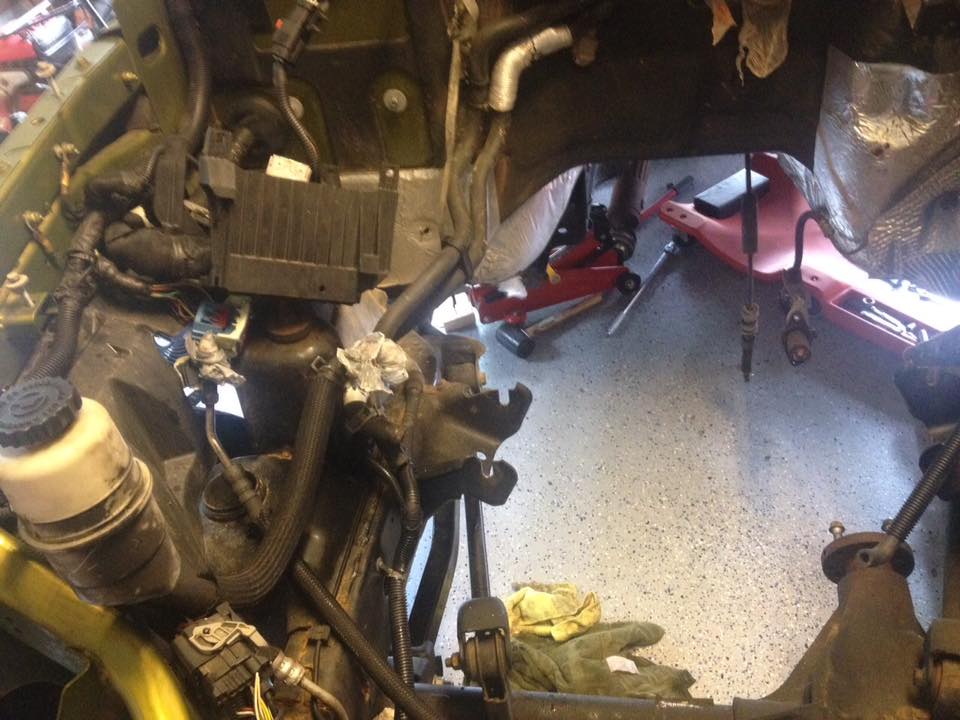
Pass side engine bay after eng removed
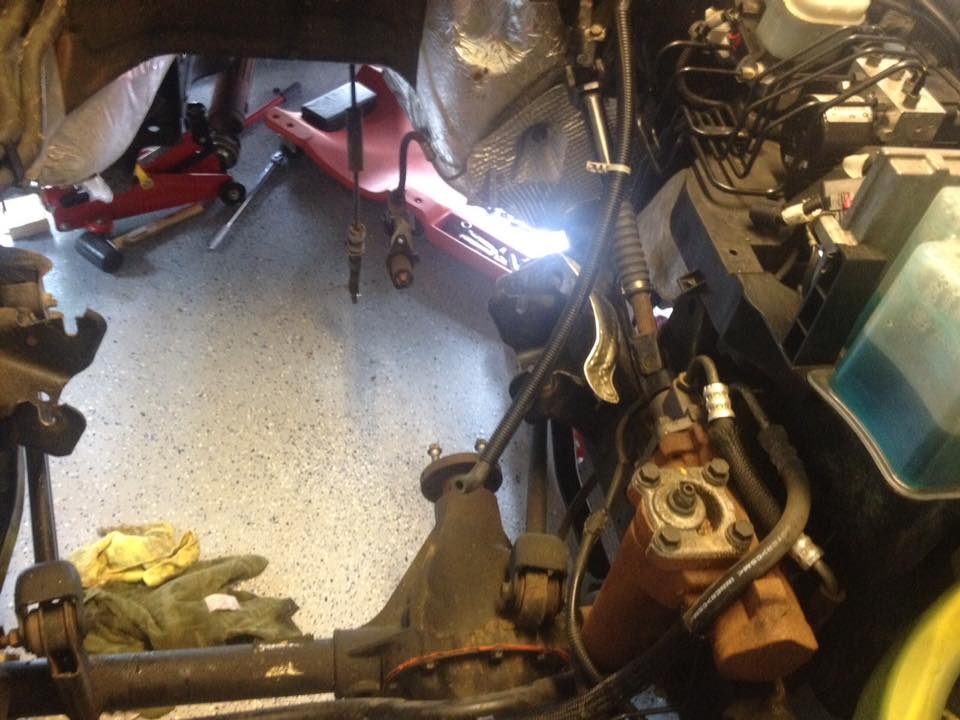
Driver side bay with not engine. Note the fragile T-Case shift cable and clutch slave hanging down in the back. Dont break those during these steps.
Shift lever on the top back is the biggest issue here. It can tear the insulation as you try and do this swap.

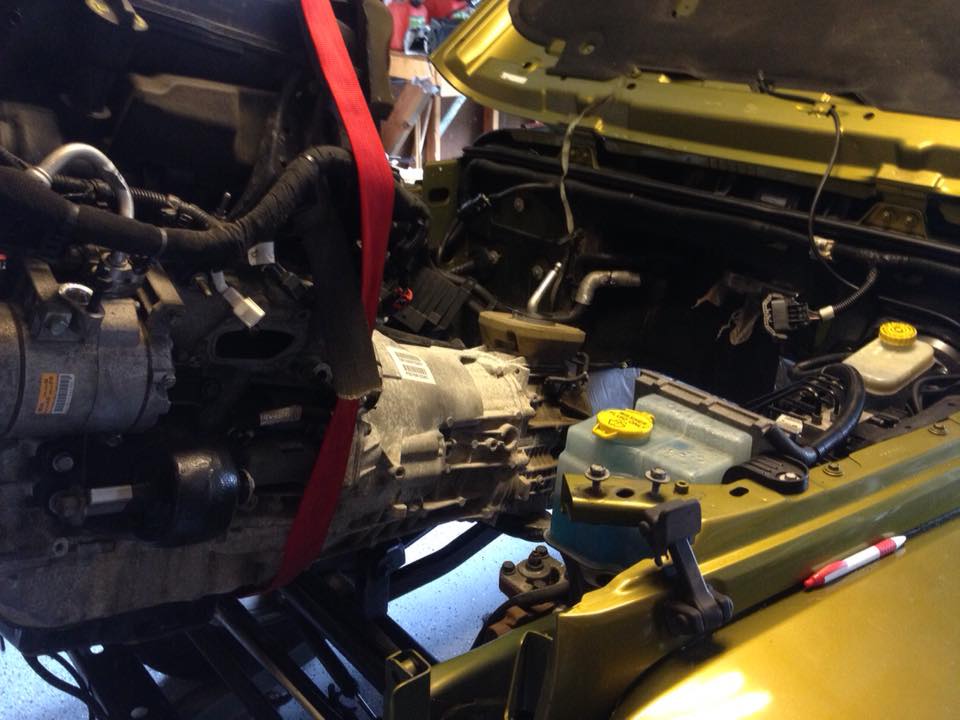
See how the oil pan barely clears the PS line going across the front. You could remove it to make this easier.. but I was kinda tired of removing things.
Unplugged o2 sensors
Removed catalytic converter which involved unbolting the cat from the exhaust headers, and was pretty difficult to reach these bolts. I ended up mostly removing the headers at the same time.
Clutch slave moved slightly to the side to prevent damage during engine extraction
Removed top ac tube from the firewall (one 10mm bolt)
Removed cross member from below the tranny: take out those last two bolts and make sure you support the tranny from underneath with a floor jack or transmission jack
Unplugged clutch sensor
Removed passenger header
Only two bolts at the engine mounts holding engine in now as well as the jack underneath the tranny
I bolted the engine hoist to the exhaust headers with a chain, using the header bolts. This seemed to hold very well, just make sure you thread it all the way in.
Then loosen the two engine mount bolts (18mm socket)
With a helper, gradually hoist the engine about an inch. Make sure the hoist doesn’t leak.
Remove the two engine mount bolts so they don’t get stuck
Gradually lower the tranny jack till the stick shift clears the stuff in the way. Once I was sure the hoist would hold, I ended up removing the transmission jack and pulling down on the transmission from underneath, while pushing the whole engine forward, and slowly jacking the engine. I didn’t remove the aluminum power steering line that runs across the frame in front of the engine, so you will have to hoist high enough for the oil pan to clear that. It’s a bit of acrobatics, to do this with the transmission attached, but I didn’t think it was too bad.
Once the engine is clear, I built a floor mount for the engine by cutting and screwing 2x4’s together to form a box to go around the oil pan, and I supported the transmission at the rear with a flat 2x4.
Installing the new engine was a bit trickier.
Install the two engine mounts (torqued to 45ft-lbs). I ended up using too short of a engine mount to engine bolt on one side and stripped the hole. If this happens, get a M10x1.5 helicoil kit and tap and re-thread the hole.
Make sure you have a good hoist point, and hoist over the PS line in the front, and pull down on the tranny in the rear while sliding backward. Lining up the two engine mounts was a pain, and just takes practice, but I lay under the jeep, legs braced against the two front wheels, and pulled down and back on the tranny to get the engine close to the frame mounts. Then slowly wiggle them in, and get the two bolts in there. Be careful not to get the center mount post stuck on the frame mounts, cause it could destroy the rubber part of the mount.
Once the front mounts are in, the back was even worse. I found the rear engine mount (the one under the tranny) was misaligned from the cross member by about two inches, as well as the stick shift not lining up with the hole in the floor. This took me two weeks to figure out, but I eventually discovered that the bolts that hold the rear mount to the cross member are actually in slots. Loosen those bolts up. Put one bolt in the outer most passenger side of the cross member (but don’t tighten). Then it will take some finagling, and possibly a come-along to winch the transmission into the right orientation so the two rear engine mount posts will line up with the frame under the tranny. Once they are in place and threaded a bit, then jack the cross member up till you can put in a driver side bolt. The trick here is to get everything in place before tightening bolts. Since the rubber mounts distort asymmetrically, the three mounts need to be in place before any final tightening. So at first it will look like things don’t fit, but they will in the end.
I would like to attach the video of this, but not quite sure how to.
New engine with fancy "seat belt" hoist
Pass side engine bay after eng removed
Driver side bay with not engine. Note the fragile T-Case shift cable and clutch slave hanging down in the back. Dont break those during these steps.
Shift lever on the top back is the biggest issue here. It can tear the insulation as you try and do this swap.
See how the oil pan barely clears the PS line going across the front. You could remove it to make this easier.. but I was kinda tired of removing things.
Thread Starter
JK Newbie
Joined: Aug 2015
Posts: 53
Likes: 8
From: Fairfax, VA
Removing the old engine and putting the new one in are the quick and easy part of this project. A bigger challenge for me would be the next few weeks where I struggled to find little but important parts. The first issue I noticed was the 3.6l engine took up much more engine bay, so I would need a few parts I hadn�t planned on. The first two items I needed were the AC line going to the firewall mounted expansion valve, and the high pressure power steering line going from the PS pump. These turned out to be incredibly difficult to source the part numbers for. I knew exactly what they were, and what they looked like, but the Mopar online catalogue only produced the foreign part numbers. Eventually I found the PS line on ebay by looking at pics, and the AC line through a mopar overstock site (which took me weeks of calling them back and forth to get the right part).
It was around this time I realized I would need the new exhaust (I mistakenly thought the old exhaust would fit). I picked this up on craigslist. There were also a score of small nuts, bolts, and sundries that I had to figure out and order, which took some time.
While I was waiting weeks for the correct parts, I began the task of deconstructing the wiring for the engine. I downloaded all the wiring diagrams and began to examine the ways I could get the old TIPM to talk to the new PCM. What I came down to, was I could either unhook the wires from the old engine PCM connectors, unplug the wires from the new PCM, then plug the old wires into the new PCM connector, and then add any new components that existed with the new engine. This seemed cleaner, but fairly complicated.
The other wiring option I had was to cut the connectors I needed from the old harness and splice them into the new harness. This seemed like bad mojo (I hate splicing), but in the end this is what I decided would work better.
There were only two connectors (but about 60 wires) to splice. The main reason for this difference is the newer wrangler has a different Dash harness connector. Splicing was actually fairly easy since wiring color codes are mostly the same. When I get into more detail on that I will explain the slight differences.

Just a couple wires hanging around
The connectors on the harness can all be disassembled very easily. Connectors are each a bit different, but first remove the front cover gently. Then pop off the back cover and pull out the silicone gasket. Wires can be removed by shoving a small pin in the front of the connector while pulling gently back on the wire. See the attached photos.
It was around this time I realized I would need the new exhaust (I mistakenly thought the old exhaust would fit). I picked this up on craigslist. There were also a score of small nuts, bolts, and sundries that I had to figure out and order, which took some time.
While I was waiting weeks for the correct parts, I began the task of deconstructing the wiring for the engine. I downloaded all the wiring diagrams and began to examine the ways I could get the old TIPM to talk to the new PCM. What I came down to, was I could either unhook the wires from the old engine PCM connectors, unplug the wires from the new PCM, then plug the old wires into the new PCM connector, and then add any new components that existed with the new engine. This seemed cleaner, but fairly complicated.
The other wiring option I had was to cut the connectors I needed from the old harness and splice them into the new harness. This seemed like bad mojo (I hate splicing), but in the end this is what I decided would work better.
There were only two connectors (but about 60 wires) to splice. The main reason for this difference is the newer wrangler has a different Dash harness connector. Splicing was actually fairly easy since wiring color codes are mostly the same. When I get into more detail on that I will explain the slight differences.
Just a couple wires hanging around
The connectors on the harness can all be disassembled very easily. Connectors are each a bit different, but first remove the front cover gently. Then pop off the back cover and pull out the silicone gasket. Wires can be removed by shoving a small pin in the front of the connector while pulling gently back on the wire. See the attached photos.
Last edited by Saharacon; Aug 24, 2015 at 09:16 AM.