
"THE" Lift kit thread


Thread Starter
JK Newbie
Joined: Mar 2007
Posts: 26
Likes: 0
From: Navyland, VA
JK Super Freak
Joined: Nov 2006
Posts: 1,053
Likes: 0
From: Rockville, MD
Thread Starter
JK Newbie
Joined: Mar 2007
Posts: 26
Likes: 0
From: Navyland, VA
JK Super Freak
Joined: Feb 2007
Posts: 1,313
Likes: 0
From: Arkansas
Brand and size of lift
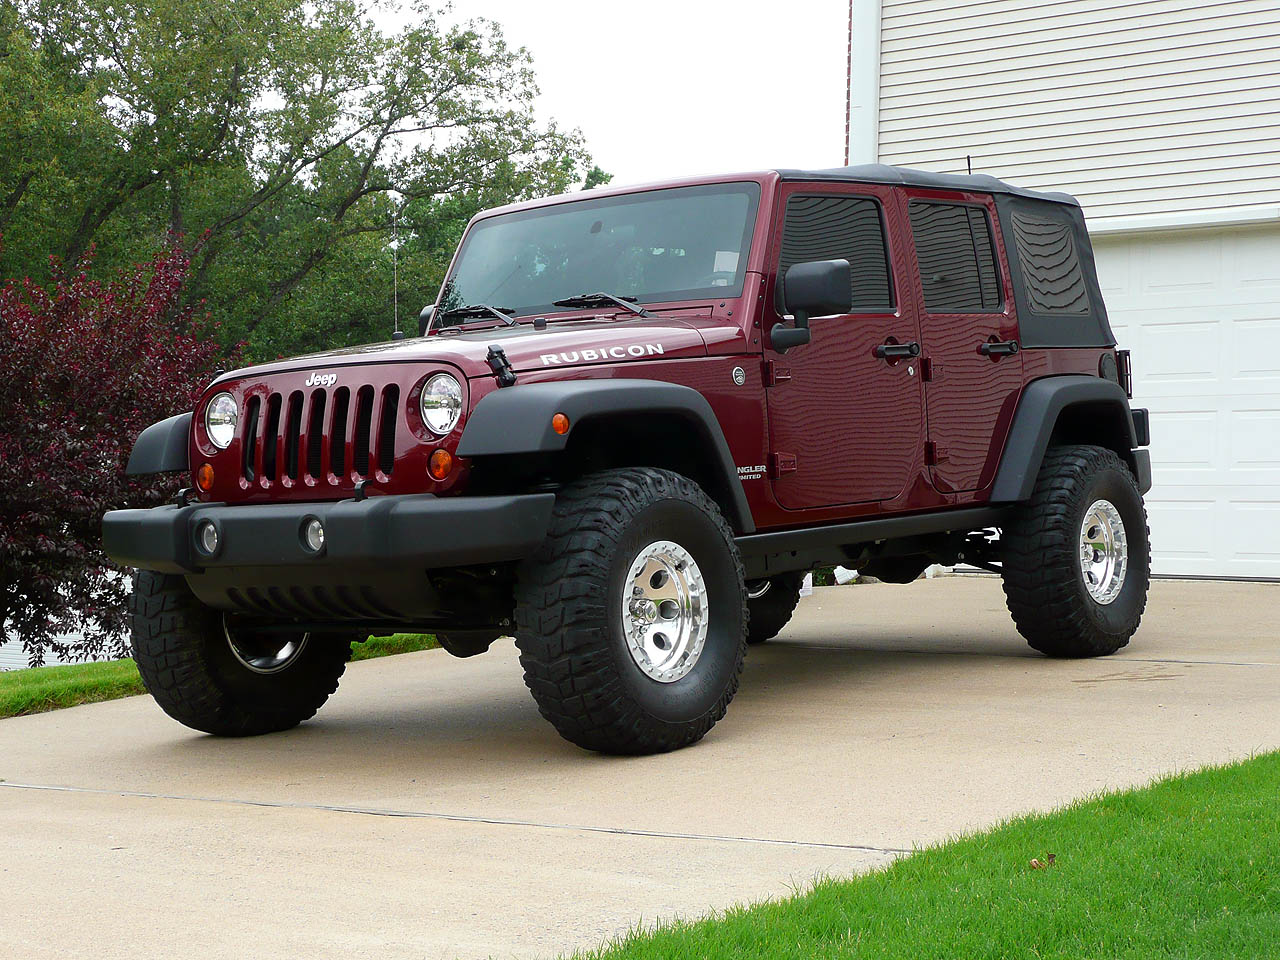
Black Diamond (Superlift) 3" lift with the base shocks.
Noteworthy options in that lift.
The kit comes stock with an adjustable front track bar. I also added a Full Traction adjustable rear track bar to eliminate the rear track bar bracket. That was personal preference only, I didn't see an immediate need for it.
Ease of installation and issues that came up - Special tools needed
Installation was straightforward, used common hand tools. It's a must for any lift install to have a good set of jackstands and a decent jack. A ratchet strap comes in handy to align the front axle when installing the adjustable front track bar. A torque wrench is a must when installing any lift so you get the proper torque on all the bolts.
Subjective ride quality change
Ride quality is about the same as the stock Rubicon ride, possibly slightly better. It is a good bit more firm than a stock 4x4 Unlimited X S model with 16x7's though. It's easy for me to compare the two since my wife's X is still bone stock and I drive it a lot.
Tires and rims used and approximate clearances
I've used several wheels now.
1) 17x7.5 Jeep Commander Hulk wheels and 1.5" Spidertrax spacers with 35" tires (315/70/17 Hankooks.)
2) 15x8 Cragar Soft 8's with 4" backspacing, no spacers, and 35x12.50x15 ProComp XTerrain tires.
3) Curent setup - 15x8 ION 170 wheels with 3.5" backspacing, no spacers, and 35x12.50x15 ProComp XTerrains.
The Hulk wheels fit great with the Spidertrax spacers, slightly rubbing on the front airdam at full lock. That was easily fixed by trimming the airdam slightly.
The Cragar 15x8's were a really close fit (the calipers had about 1/8" clearance front and rear.)
The ION 15x8's have more room between the caliper and wheel, more like 1/4".


.
.
.
Black Diamond (Superlift) 3" lift with the base shocks.
Noteworthy options in that lift.
The kit comes stock with an adjustable front track bar. I also added a Full Traction adjustable rear track bar to eliminate the rear track bar bracket. That was personal preference only, I didn't see an immediate need for it.
Ease of installation and issues that came up - Special tools needed
Installation was straightforward, used common hand tools. It's a must for any lift install to have a good set of jackstands and a decent jack. A ratchet strap comes in handy to align the front axle when installing the adjustable front track bar. A torque wrench is a must when installing any lift so you get the proper torque on all the bolts.
Subjective ride quality change
Ride quality is about the same as the stock Rubicon ride, possibly slightly better. It is a good bit more firm than a stock 4x4 Unlimited X S model with 16x7's though. It's easy for me to compare the two since my wife's X is still bone stock and I drive it a lot.
Tires and rims used and approximate clearances
I've used several wheels now.
1) 17x7.5 Jeep Commander Hulk wheels and 1.5" Spidertrax spacers with 35" tires (315/70/17 Hankooks.)
2) 15x8 Cragar Soft 8's with 4" backspacing, no spacers, and 35x12.50x15 ProComp XTerrain tires.
3) Curent setup - 15x8 ION 170 wheels with 3.5" backspacing, no spacers, and 35x12.50x15 ProComp XTerrains.
The Hulk wheels fit great with the Spidertrax spacers, slightly rubbing on the front airdam at full lock. That was easily fixed by trimming the airdam slightly.
The Cragar 15x8's were a really close fit (the calipers had about 1/8" clearance front and rear.)
The ION 15x8's have more room between the caliper and wheel, more like 1/4".
.
.
.

JK Enthusiast
Joined: Jun 2007
Posts: 144
Likes: 0
Hi, Do you have any castor angle issues with 4" lift. Do you need offset bushes, or the control arm relocation brackets as what Rancho use. And Drive line issues, is the standard tail shaft fine, or do you need a new tail shaft?
After seeing the large number of repetitive questions here is a thread for people to post their lift kits and input on each one. This gives a nice reference place for anyone looking to buy a lift kit to gather useful information.
Please list as much of the following as possible:
Brand and size of lift
Options in that lift.
Ease of installation and issues that came up
Special tools needed
Subjective ride quality change
Tires and rims used and approximate clearances
and any input you think would be worthwhile to someone looking to buy a kit.
To the reader: remember that the information posted is subjective, so your idea of a "smooth ride" may not be the same as someone else's.
The factory rear track bar mount has shitty welding from the factory. You may wish to have it reinforced no matter what lift you pick.
I will go first.
Superlift 4" lift kit with the hydro shocks
Installation was pretty strait forward with no real surprises in the instructions. Only special tools used (and you should have these anyway) were 6 ton jack stands, a floor jack, a power drill and bits. I also used a ratchet strap to pull the axle into location to make lining up the track bar easier.
It took me no more than 5 hours.
To pop in the replacement urethane bump stops the easiest way is to stick them in the cup and use a jack under the axle to force them in. After you install the front aluminum bump stop extensions TAKE THEM OFF and stick them in the front coil when installing it. This gives you a good 2" less height you have to get over to put the coils in.
A pipe or crow bar will pop the coils in, or a good swift kick.
Ride quality is BETTER than stock.
Lift would easily fit 36-37's but will not "stuff" them. I am running 35x12.5 radial claws on 15x8 Cregar "D" window rims with 3.75 backspacing. The tires stick out maybe 2" at the most past the flare if even that.
Once you get the kit installed you can fix the steering issue for the most part your self till you get an alignment. Loosen the 2 9/16 nuts on the locking/adjusting collar on the drag link and turn the collar "upward" around 5 times. Use a vice grip or whatever. Then go and turn the wheels back and forth a few times and see how much more you need to adjust till the steering and wheels are strait. If you drive and let go of the wheel you can see how much more you need as well. You can easily do this fix in a parking lot as you need to have it at normal ride height while doing it and the parking lot lets you drive forward and check.
total high is 6' 7"
Thread Starter
JK Newbie
Joined: Mar 2007
Posts: 26
Likes: 0
From: Navyland, VA
standard shaft.

JK Enthusiast
Joined: Dec 2006
Posts: 132
Likes: 0
Brand and size of lift
Skyjacker 4-5" long arm.
Overview of lift:
Adjustable High Clearance 34" lower arms with Johnny Joint on one end. Bolt on bracketry.
Ease of installation and issues that came up:
You need several odd size drill bits that gets very pricey. Spent approx. $75 on bits
If you have hesitations in cutting off all the stock brackets for control arms, this kit is not for you. Also, if you worry about things like lowering your fuel tank, it might not be something you want to tackle. You must have tall jack stands or a lift hoist and air tools and good cutting tools are very handy. This suspension took about 12-13 hours to install.
Extra Brace included that mounts from the diff to the rear track bar bracket, a must.
If you do not want to change out drive shafts, run the recommended shocks from Skyjacker, as they limit down travel.
Subjective ride quality change
Ride quality is very good. It is more firm over rutted roads and can be a little more jarring than stock. Over larger woops, etc, the porpoising is gone, mostly from the over dampening of the hydro shocks. I wouldn't hesitate to jump the Jeep!...or bump large ledges, as it is very stable and controlled.
Tires and wheels:
I run the stock tires and wheels on road and the highway.
Off road there is plenty of room for my 35" x 12.5 16 Maxxis Creepy Crawlers on custom steel bead locks at full flex. 37's will fit with some pretty good trimming, as there is much flex.