
Putting the 3D printer to work

Thread Starter
Super Moderator


Joined: Dec 2011
Posts: 1,088
Likes: 145
From: NJ
It's a Lulzbot Taz 6. Very happy with it!
I''l probably print before then. Being a prototype, I kept the walls thin so I don't expect it to last forever. Though I am pleasantly surprised with the rigidity, that's what comes of good design  I like PETG for most of my finished stuff, more than likely that's what the "final" version will be.
I like PETG for most of my finished stuff, more than likely that's what the "final" version will be.

Thread Starter
Super Moderator
Joined: Dec 2011
Posts: 1,088
Likes: 145
From: NJ
Since I traded up to 37s and slapped that spare on the back, my rear view has been lacking. I wanted to do a custom backup camera mount with the 3D printer. I went through the process, added some features along the way and ended up with a dual camera (full time rear view on a rearview mirror monitor and a backup low angle) and 3rd brake light concoction. Check it out
Start with some sketches and measurements. Funny how what I imagine initially only loosely resembles the finished parts.

Then fit templates, make the digital match the real life stuff. I try to use as little material as possible for this

Do it till it fits right

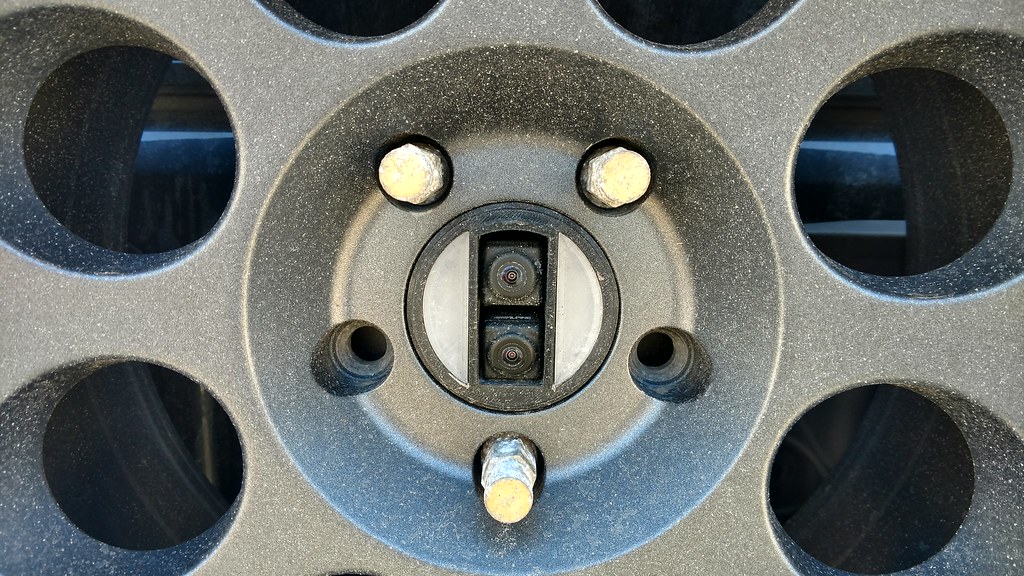
This was the original proof of concept. Camera mounts up, so far so good

On the carrier

Tire mounted

I drove around like that for a day in the rain, the camera got absolutely soaked. I added a rain shroud to my revision list. I know it will get wet, but I'd like to keep as much visibility as possible. This is also where I decided to use all that empty space for a relocated 3rd brake light. Back to modeling

Happy print


Rear wiring channels

There were a few revisions in the middle here as well to get the fit right. But it's coming along. The lenses are printed in a clear copolyester and then sanded to help diffuse those super bright LEDs. I will probably try printing these in something more opaque, the LED's still show as spots behind the lens.

Testing the cameras. The jeep was in for a regear so I ran it off my bike project. Yes, my garage is a nightmare with a wide angle lens. Don't judge me


Fitting and wiring the brake light LEDs

With the cameras in the final part

Testing the brake light

Fitting on the carrier

Fitting in the spare I have in the garage

I don't want to mount it all up yet, it's raining and I don't want the camera connectors just hanging out before I wire everything up. I'm confident enough everything is in the right spot. And if something is catastrophically wrong, I'll just revise and reprint. What a time to be alive!
Start with some sketches and measurements. Funny how what I imagine initially only loosely resembles the finished parts.
Then fit templates, make the digital match the real life stuff. I try to use as little material as possible for this
Do it till it fits right
This was the original proof of concept. Camera mounts up, so far so good
On the carrier
Tire mounted
I drove around like that for a day in the rain, the camera got absolutely soaked. I added a rain shroud to my revision list. I know it will get wet, but I'd like to keep as much visibility as possible. This is also where I decided to use all that empty space for a relocated 3rd brake light. Back to modeling
Happy print
Rear wiring channels
There were a few revisions in the middle here as well to get the fit right. But it's coming along. The lenses are printed in a clear copolyester and then sanded to help diffuse those super bright LEDs. I will probably try printing these in something more opaque, the LED's still show as spots behind the lens.
Testing the cameras. The jeep was in for a regear so I ran it off my bike project. Yes, my garage is a nightmare with a wide angle lens. Don't judge me
Fitting and wiring the brake light LEDs
With the cameras in the final part
Testing the brake light
Fitting on the carrier
Fitting in the spare I have in the garage
I don't want to mount it all up yet, it's raining and I don't want the camera connectors just hanging out before I wire everything up. I'm confident enough everything is in the right spot. And if something is catastrophically wrong, I'll just revise and reprint. What a time to be alive!
JK Freak
Joined: Aug 2009
Posts: 950
Likes: 8
From: Philly Suburbs
Since I traded up to 37s and slapped that spare on the back, my rear view has been lacking. I wanted to do a custom backup camera mount with the 3D printer. I went through the process, added some features along the way and ended up with a dual camera (full time rear view on a rearview mirror monitor and a backup low angle) and 3rd brake light concoction. Check it out Start with some sketches and measurements. Funny how what I imagine initially only loosely resembles the finished parts. Then fit templates, make the digital match the real life stuff. I try to use as little material as possible for this Do it till it fits right This was the original proof of concept. Camera mounts up, so far so good On the carrier Tire mounted I drove around like that for a day in the rain, the camera got absolutely soaked. I added a rain shroud to my revision list. I know it will get wet, but I'd like to keep as much visibility as possible. This is also where I decided to use all that empty space for a relocated 3rd brake light. Back to modeling Happy print Rear wiring channels There were a few revisions in the middle here as well to get the fit right. But it's coming along. The lenses are printed in a clear copolyester and then sanded to help diffuse those super bright LEDs. I will probably try printing these in something more opaque, the LED's still show as spots behind the lens. Testing the cameras. The jeep was in for a regear so I ran it off my bike project. Yes, my garage is a nightmare with a wide angle lens. Don't judge me Fitting and wiring the brake light LEDs With the cameras in the final part Testing the brake light Fitting on the carrier Fitting in the spare I have in the garage I don't want to mount it all up yet, it's raining and I don't want the camera connectors just hanging out before I wire everything up. I'm confident enough everything is in the right spot. And if something is catastrophically wrong, I'll just revise and reprint. What a time to be alive!
Thread Starter
Super Moderator
Joined: Dec 2011
Posts: 1,088
Likes: 145
From: NJ
Unfortunately this piece fits my wheel, my tire carrier and my cameras. I'm sure there's a reasonably universal arrangement, but it just sounds like a bit of a nightmare with the breadth of the JK aftermarket. Or maybe not, if I wake up with 4000 PMs tomorrow asking for one I'll look into it..
I got it mostly installed yesterday. Everything takes time because I like to clean up wiring where I can so there's a lot of soldering and heat shrinking and connectors to do, plus I got sidetracked doing a neighbor's brakes. I got the 3rd brake light finished up and I have a plan for the camera wiring. I'll be splicing an extension into the camera harnesses to 1. pass cleanly through a rubber grommet and 2. keep the connectors inside. I prefer everything on the outside of the jeep to be dunk-me-in-the-river waterproof. Here it is mounted up


And last night in the dark with the brakes lit


I'm very happy with the result so far. Now I just have to get the cameras and rear view monitor done.
I got it mostly installed yesterday. Everything takes time because I like to clean up wiring where I can so there's a lot of soldering and heat shrinking and connectors to do, plus I got sidetracked doing a neighbor's brakes. I got the 3rd brake light finished up and I have a plan for the camera wiring. I'll be splicing an extension into the camera harnesses to 1. pass cleanly through a rubber grommet and 2. keep the connectors inside. I prefer everything on the outside of the jeep to be dunk-me-in-the-river waterproof. Here it is mounted up
And last night in the dark with the brakes lit
I'm very happy with the result so far. Now I just have to get the cameras and rear view monitor done.
JK Newbie
Joined: Jun 2020
Posts: 2
Likes: 0
From: USA
looks pretty good!For such goals, I can use a simple color printer and do not spend a bunch of money on an expensive one. I am an artist and usually draw for some game - companies. For my portfolio, I needed a good color printer with ink cartridges. My girlfriend gave me the advice to check out this website https://www.mrdepot.ca where I could buy a high - quality printer for a good price. These guys have great customer service, fast, and more important, free delivery and superb quality of their products. I bought a great printer and I’m absolutely happy with it. Look over this site for more info, if u are searching for a good printer, bro!
Last edited by tinkypp; Jul 5, 2020 at 06:21 AM.


Super Moderator


Joined: Dec 2018
Posts: 2,726
Likes: 509
From: Calgary, AB, Canada
What about a deflector on the 2007-2010 windshield defroster vent so that in the winter not only can the passenger see where we are going but the driver can as well. For the age of the vehicle Dodge Mercedes Daimler Fiat <whatever> had the shittiest defrost design ever known to man. Air needs to be deflected to the left side of the screen as there it ices up about 6" in from the left side. Nothing wrong with passenger side!
JK Jedi
Joined: Dec 2010
Posts: 5,642
Likes: 486
From: Knoxville
What about a deflector on the 2007-2010 windshield defroster vent so that in the winter not only can the passenger see where we are going but the driver can as well. For the age of the vehicle Dodge Mercedes Daimler Fiat <whatever> had the shittiest defrost design ever known to man. Air needs to be deflected to the left side of the screen as there it ices up about 6" in from the left side. Nothing wrong with passenger side!