Jeep Wrangler JK: How to Make a Hard Top Cart
Building a storage cart for the Jeep Wrangler JK's hard top is not difficult. It takes a little effort and woodworking experience, but in the end you'll have a sturdy storage cart that will last you as long as you own your Jeep--or longer. Use it as a sales point when it's time to sell.
This article applies to the Jeep Wrangler JK (2007-Present).
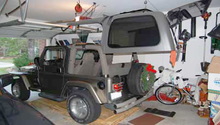
The hard top is a heavy, awkward piece of plastic and steel. After you remove the top, you don't want to just shove it into the corner of your garage and store it on the floor. It might become damaged and you will want to re-install an undamaged top when it rains or it becomes too cold to free-style. Read on to discover how to build a handy, inexpensive hard top cart for your Jeep Wrangler JK, so you can safely store and move the hard top as needed.

Materials Needed
- 1 59-inch length of 1x2
- 2 30-inch length of 2x4s
- 2 59-inch length of 2x4s
- 6 6-inch length of 2x4s
- 8 1/2-inch long wood screws
- 2 1-1/2-inch long wood screws
- 20 3-inch long wood screws
- 4 2-inch swivel castors, plastic, metal, or poly; locking castors recommended if you need to store the roof on an uneven surface
- 2 12x2 cuts of felt, foam, or soft fabric
- Glue
- Electric drill
- Phillips bit
- Hand or power saw
- 5/32 drill bit
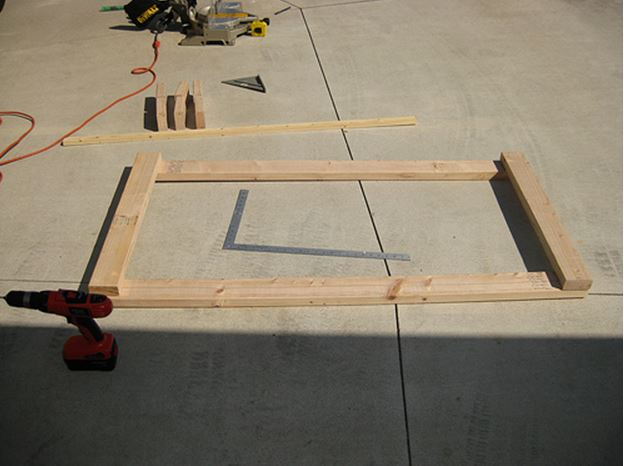
Step 1 – Assemble main section
- On a solid work surface, such as your driveway or garage floor, lay down the two 59-inch 2x4s parallel to one another.
- Lay the two 30-inch 2x4s over the top of the 59-inch pieces to create a rectangle. Line up the pieces of wood squarely.
- Drill two starter holes in each corner of the rectangle using the electric drill and 5/32-inch bit.
- Screw the corners together with the 3-inch wood screws.
Step 2 – Install the castors
- Place castors on the outside edges of the 59-inch 2x4s. Allow enough room for the wheels to swivel 360 degrees.
- Use your electric drill and Phillips bit to screw the castors in place. Use the 1/2-inch long wood screws, and use at least two screws per castor.

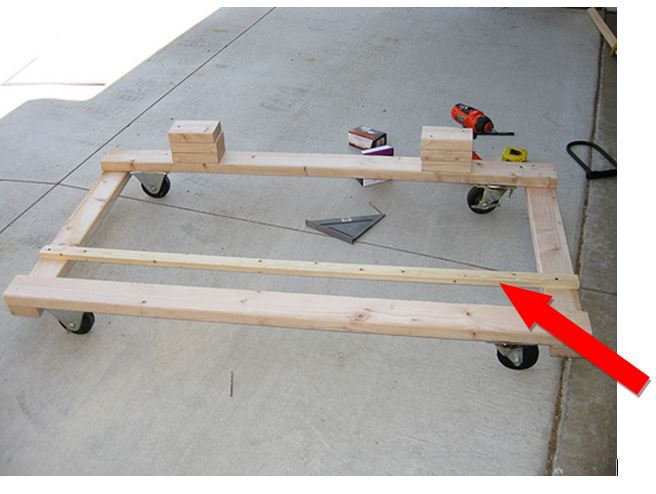
Step 3 – Install window bar
The window bar holds the rear window of the hard top in place.
- Turn the partially-completed cart over so it rests on the castors.
- Place the 59-inch 1x2 9-1/2 inches in from both sides of the cart.
- Use the 5/32 bit and the electric drill to drill starter holes.
- Use your drill and Phillips bit to install a 1/2-inch screw on each end.
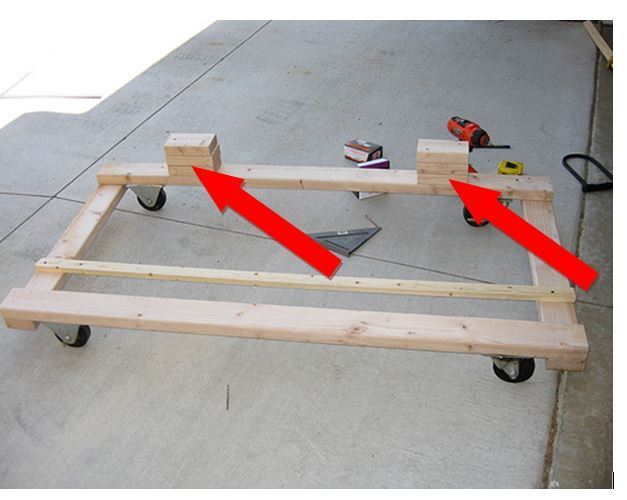
Step 4 – Create rear support pieces
These 6-inch pieces support much of the hard top's weight as it sits upright.
- On the farthest 59-inch 2x4 from the window bar, measure in 10-1/2 inches from each end and mark the locations.
- Place one 6-inch 2x4 on each location. Drill two 5/32 starter holes in each piece.
- Screw in two 3-inch screws per block.
- Do the same for two more 6-inch pieces on either side.
Step 5 – Cover the support blocks with felt, foam, or cloth
To help protect the top, glue felt, foam or cloth onto the support blocks. You can also cover the window bar and opposite end of the cart, if you so desire.

Figure 5. Support blocks, window bar, and one end of cart covered with felt for protection. 
Figure 6. Hard top on cart. 
Figure 7. Inside view of hard top on cart (note rear window resting on window bar).
Enjoy your new storage cart!
Step 6 – Create device to prevent rear window from opening (optional)
As an option, you can create a device from a garment rack or similar object and a bungee cord to prevent the rear window from flopping open when you lower the hard top off the Jeep. If you do this, there is no need to install the window bar (skip Step 3 above).

Featured Video: How to Remove Hard Top
Related Discussions
- DIY Hardtop Cart - JK-Forum.com
- Hardtop Storage Question - JK-Forum.com
- Hardtop Storage Carts - JK-Forum.com
- Hardtop Hoise/Storage Write-up - JK-Forum.com