Mr. T's boring but functional build
 08-15-2014, 04:56 PM
#1
JK Junkie

Thread Starter
Everyone's Jeep is a personal compromise between many competing choices and a budget, and this is no exception. The goal was to add a just little more rubber, add a little more ride height, add a bit more suspension down travel, and keep almost everything else boringly stock. The start point was an almost new 2008 Rubi JK. Bottom line is ~2.5" more belly clearance, ~0.5" more axle clearance, ~1" greater suspension travel, wider tire contact patch, better winter tire performance, and better skid protection. Despite the changes, highway MPG has stayed unchanged at ~19 during summer.
Lift: OME (Old Man Emu) 2" springs. 2615 in front & 2617 in the rear. These are not the "heavy springs". I've seen retailers refer to them as "Light" or "Medium". In the OME catalog, the lift height is rated for 50mm (Aussie 2") with a "bull bar" (Aussie heavy front bumper) on the 2615 front springs, and up to 150 Kg constant additional weight on the 2617 rear springs. The front spring rate is 120 lb/inch (same as stock) and the rear is 160 lb/inch (stiffer than stock). OME 10mm trim spacers above the springs were also added. Measured lift with bumpers, skids, tools, recovery gear, etc. is 2". With all weight on diagonal tires (axle's crossed and sway-bar disconnected), it's at the stock bump stops. This is an ideal spring rate for me, all the potential travel is being used during slow crawling, and it rides well on the street too.
Side note: No caster correction (control arms, cam colts, or drop brackets) was necessary. On a good highway, hands off the wheel, it will stay in a lane for a 5 to 10 seconds -- The steering is not flighty at any speed. And because of the relatively small changes (in lift, tire size, suspension down travel), there also wasn't any need to change driveshafts, brake lines, bump stops, or add track bar relocation brackets, etc. The stock steering stabilizer works fine for me as well, even in the stock location -- The bracket for 2008 is slightly higher than the later years, and the bottom of the stab sits even with the bottom of the tie rod.
Shocks: OME Nitrocharger Sport shocks; 60066 in front and 60067 in the rear. The extended lengths are 580mm / 22.83" (front) 619mm / 24.37" (rear) -- 1.1" longer than than standard Rubi shocks. The greater down travel centers the suspension travel (between full shock extension and the bump stop) with a 2" lift. Total front travel is 7" + bump stop compression and rear travel is 8-1/2" + bump stop compression. The collapsed length is shorter than stock Rubi shocks, so no issues with keeping the stock bump stops. OME designed the shock length to use stock brake lines, but in my case the rears were slightly taught at full extension -- Bending each rear hard line above the flexible line using a hand tubing bender a few degrees solved the issue. The CV joints still looked good at full down-travel, but not a lot of angularity left. The wiring ties for the e-Lockers and the axle breather tubes required adjustment to maintain slack at full droop as well.
Track Bars and Sway Links: Track bars such as from JKS and Teraflex are stiffer (especially the front), and handling is improved. Teraflex has a video of the stock trackbar flexing while moving the steering wheel. Unfortunately, the JKS front Track bar occasionally hit the front diff cover when the stock bump stops got compressed enough, so it was replaced by a Teraflex TER1753418 that has the same clearance as stock. Both the TER front & JKS rear are set to within 1/8" of stock length, measure centered, and nothing hits during suspension travel.
Rear sway links can be used on the front, but I used JKS links. The rear links are longer, and using them on the front sway bar keeps them from going over-center at full droop (because the new shocks have more down travel). To get the desired length on the JKS sway links, running a die to extend the threads was necessary to get them short enough.
Note on JKS swaybar links: If the swaybar lengths are too long they will hit stuff -- including the wheels. If they are too short, they can go over-center at full droop and bend stuff. Both front and rear lengths were set to a bit longer than the stock rear links (Rubicon model with the stock E-Disco unit). Blue locktite was used on the swaybar bolts to make sure they don't get loose. The JKS links pivot in a socket rather than flex rubber bushings..
Tires: With stock wheels and no wheel-spacers, hopefully the wear and tear on parts like ball joints (which are tested here) is going to be about the same as stock as long as the tires are not too much heavier.
And if a washer is added to the steering stops (see pic above) to reduce the max steering angle, tires with about 33" diameter and 9" tread width (~11" section width using 7.5" wide rims) will have clearance at full articulation - especially with a lift since the bump stops will get less compression due to the extra spring force. The "Mountain Snowflake" tire rating is my preference given the weather and the traction tire/chain laws here -- which limits the selection considerably. LT285/70-17 Goodyear AT Adventure was the choice.
These tires only weigh 6 pounds more than the original BFG KM's, are a little less than 1" taller, and the tread is about 1" wider. Despite being load range E, with ~4 psi less they feel the same as load range C KM's. Off-road is the same story, just a bit less air to get the desired cush. For some pics of tread & sidewall flexing plus the tire foot-print at different pressures, see this thread. To keep the spare tire from contacting/bending the third brake light, a 3/16" generic wheel spacer was added between the wheel and spare tire mount.
Note on setting tire size: Changing tire diameter requires setting the tire size parameter in the PCM (Powertrain Control Module) for accurate speedometer, odometer, ESP, etc. The dealer can do it, but purchasing a device like the AEV ProCal or an Aeroforce Scan Gauge is more convenient. The tire diameter on manufacturer's or retailer's web sites is the diameter with NO WEIGHT on the axle. The diameter or circumference entered into the Jeep's PCM is the "rolling diameter", which is the effective diameter with the vehicle weight on the axle. Measuring from the ground to the center of the wheel and multiplying by 2 is a quick way to get the approximate rolling diameter. The tire tread flattens as it contacts the road, and how much it flattens depends on tire pressure and weight. The flatter the tire gets, the less distance the Jeep goes for each revolution. In the case of the AEV Procal, this diameter is entered to the nearest 0.25", and for the Aeroforce Scan Gauge it's entered in millimeters circumference. 25.4 millimeters to the inch, and the circumference is 3.1416 times the diameter. After testing with mile markers on the highway, the most accurate setting for these LT-285/70-17 tires was 2540 millimeters circumference using the Aeroforce, and 32" would be the closest setting on the Procal.
Bumpers & Skids: Rugged Ridge XHD, front and rear. The rear bumper was modified with a power hack-saw for a bit more clearance behind the rear wheels. The approach and departure angles are better than stock, but too bad these are not available in aluminum for the weight savings. I made a nut-plate and added an extra bolt to beef up the rear drivers side bumper frame mount, similar to how the passenger side was designed. A Superwinch Talon 9.5 is up front, with synthetic rope to reduce weight (67 lbs total). Here's a write-up I did about adding a safety circuit breaker to protect the winch/wiring. Removed the lighter Rubi rock rails and replaced with Poison Spyder rocker knockers. Added a MORE evap skid and Mopar diff cover skid plates.
I started out with Pure Jeep engine + T-Case skids. But similar to the JKS front track bar occasionally rubbing the diff cover, the front support for the engine skid occasionally rubbed the diff when bump stops compressed. Now it has a Rancho oil pan skid, and a Rubicon Express T-Case skid that extends forward a few inches to protect the exhaust crossover and the cross-member. There was significant clearance gained in the change. Although much of the manual trans is now unprotected, it sits relatively high and isn't delicate.
Lastly, I welded on Synergy front & PureJeep rear LCA skids. There's only a tiny decrease in ground clearance, <1/8" at the lowest point.


Front bumper view. The shackles on either the front or rear bumper can be used for lifting, or pulling. The license plate has a removable mounting plate that covers up the fairlead.
Rear bumper view -- Modified with some minor saw cuts in the area just behind the tires for a bit less weight and more clearance. I wish this picture showed how steep that down-hill stretch was...

Last edited by Mr.T; 02-24-2022 at 08:32 AM. Reason: Fixed colors & formatting - Updated with latest mods...

The following users liked this post:
WestAusJeep (09-18-2022)
08-15-2014, 04:58 PM
#2
JK Junkie
Thread Starter
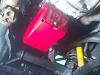
Insul-Liners installed on the roof interior. They made a huge difference in extreme temperatures.
Before the 285/70 tires - Even 32's worked pretty well! The RR XHD rear bumper is tapered for better departure angle -- This pic is before a couple saw cuts on each side that added a bit of additional clearance to the area behind the tires. The PS rock sliders sit very high, bolting to the pinch seam and under-body.
Hard packed snow + ice, fun as long as there's some traction.
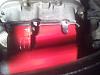
Extra fuel is in Rotopax containers with custom covers mounted to either side of the spare, and a Trasharoo on the back. The Rotopax tire mount is an EZ-rack basic from Rockslide Engineering.
Just enough room for camping equipment for two and some tools/recovery gear. Extra water carried in Rotpax containers behind the front seats on the floor.
Last edited by Mr.T; 05-14-2015 at 08:45 PM.
08-16-2014, 07:02 PM
#3
JK Junkie
Thread Starter
Here's a few helpful docs. 
Old Man Emu (OME) application guide -- Includes specs like extended and compressed shock lengths, spring rates, spring height, etc.
This PDF was reportedly from Discount Tire, but that's not where I found it. The instructions are inside. The beauty is that all one needs is the Load Index and Load Range for the original tire and the replacement tire, plus the original tire PSI, to estimate the replacement tire PSI.
Tire inflation.pdf
For instance, the original equipment BFG KM in 255/75-17 has a Load Index of 111, Load Range C, and door sticker of 37 PSI. Using the Table, a Load Index 121, Load Range E replacement tire (typical 285/70-17 tire) would be equivalent to the original at ~35 PSI. Both the Load Index and Load Range are on the side of the tire, or look it up online.
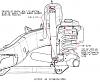
This pic has a diagram for measuring lift height.
Old Man Emu (OME) application guide -- Includes specs like extended and compressed shock lengths, spring rates, spring height, etc.
This PDF was reportedly from Discount Tire, but that's not where I found it. The instructions are inside. The beauty is that all one needs is the Load Index and Load Range for the original tire and the replacement tire, plus the original tire PSI, to estimate the replacement tire PSI.
Tire inflation.pdf
For instance, the original equipment BFG KM in 255/75-17 has a Load Index of 111, Load Range C, and door sticker of 37 PSI. Using the Table, a Load Index 121, Load Range E replacement tire (typical 285/70-17 tire) would be equivalent to the original at ~35 PSI. Both the Load Index and Load Range are on the side of the tire, or look it up online.
This pic has a diagram for measuring lift height.
Last edited by Mr.T; 12-02-2014 at 06:46 PM.
09-06-2014, 07:08 PM
#4
JK Junkie
Thread Starter
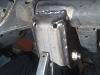
Updated spring of 2016: Removed Pure Jeep engine and transfer case skids because the engine skid front support occasionally rubbed the diff during bump stop compression. Added Rancho ROSRS6208 oil pan skid, and Rubicon Express RUBREA1014 transfer case skid. The change also gained 2-4 inches of clearance in the area of the engine oil pan & transmission. The manual trans is now more vulnerable, but it sits relatively high and isn't that delicate.
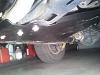
The front of the T-Case skid extends to protect the exhaust crossover, the cross member, and it's form also lends protection to the heads of the bolts in the cross member. This is where the old skid setup had some good use, and it was hard to find a T-case skid that had this coverage.
The mounting hole on the fuel tank side is recessed, and the bolt on the other side uses a thick tapered washer to protect the bolt.
The Rancho oil pan skid is held on primarily by high temp silicone (included), but there is also a tab on the front that uses one oil pan screw. It fits snug on all sides.
The old skid had some minor rock-rash in the oil pan area, but it sat around 2 inches lower so contact with earth should be less likely now...
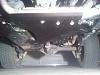
Sep 2016 update: Welded Synergy front LCA skids on.
The front of the T-Case skid extends to protect the exhaust crossover, the cross member, and it's form also lends protection to the heads of the bolts in the cross member. This is where the old skid setup had some good use, and it was hard to find a T-case skid that had this coverage.
The mounting hole on the fuel tank side is recessed, and the bolt on the other side uses a thick tapered washer to protect the bolt.
The Rancho oil pan skid is held on primarily by high temp silicone (included), but there is also a tab on the front that uses one oil pan screw. It fits snug on all sides.
The old skid had some minor rock-rash in the oil pan area, but it sat around 2 inches lower so contact with earth should be less likely now...
Sep 2016 update: Welded Synergy front LCA skids on.
Last edited by Mr.T; 09-27-2016 at 05:08 PM. Reason: Updated with latest mods...
 09-07-2014, 06:15 PM
#6
JK Junkie
Thread Starter
12-04-2014, 02:10 PM
#7
JK Junkie
Thread Starter
Several weeks ago I replaced replaced OME (Old Man Emu) Nitrocharger N196 (front) and N198 (rear) shocks with the OME "Sport" version, part numbers 60066 and 60067 receptively.
Here's how I'd rate the difference on my Jeep...
Paved roads and highways: The Sport shocks are firmer, more toward a sports car type of shock. Less brake dive, less body roll. Pot holes and speed bumps feel the same. My wife likes to read books when she's a passenger, but also has a slight tendency to get motion sickness (car sick). Without a doubt, she prefers the Sports.
Dirt roads and washboard: The Sports feel more in control as speed increases, no difference at slower speeds.
Rocks and ledges: The Sports seem firmer coming down off a rock or ledge -- Less suspension travel on compression, and less "wallow" as it settles.
Last edited by Mr.T; 12-04-2014 at 07:28 PM.
The following users liked this post:
WestAusJeep (09-18-2022)
Trending Topics
12-07-2014, 05:04 AM
#8
JK Super Freak
Nice job with this!
I went with an AEV 2" spacer lift and kept the Rubi shocks. I then went with 255/80/17 (33") BFG KM2's on the stock wheels. Overall, the ride improved slightly, while clearance off road was significantly improved, especially the break-over angle.
My goal wasn't a Moab rock monster, but to retain road manners while improving trail performance. I also did not want to increase wear and tear on suspension components by adding a bunch of weight. With that in mind, I went stuck with the stock bumpers and added a winch plate and winch with synthetic rope, again for light weight. I want this Jeep to go 300k miles without major issues.
I added an oil pan skid plate and evap canister skid. I may yet add the Mopar diff covers, at some point.
Off-road, I've had the axles crossed to the max at full turn, sway bar disconnected, and the only issue was an annoying slight rub on the plastic air dam, which could be fixed with a little trimming. The suspension performed as it should, with no weird noises or anything. I'm not sure what is thought of spacer lifts, but the AEV does just fine, as AEV told me it would over the phone when I called them and asked about it.
For me, moderation is the philosophy of life, whether with Jeeps, alcohol, or whatever.
Nice write up and awesome Jeep!
12-07-2014, 12:09 PM
#9
JK Junkie
Thread Starter
Thanks! I like the way you set up yours as well, very similar. Yep, moderation is way under-rated...
12-07-2014, 01:03 PM
#10
JK Enthusiast
Join Date: Apr 2014
Location: Alameda, CA
Posts: 479
Likes: 0
Received 0 Likes
on
0 Posts
Several weeks ago I replaced replaced OME (Old Man Emu) Nitrocharger N196 (front) and N198 (rear) shocks with the OME "Sport" version, part numbers 60066 and 60067 receptively.
Here's how I'd rate the difference on my Jeep...
Paved roads and highways: The Sport shocks are firmer, more toward a sports car type of shock. Less brake dive, less body roll. Pot holes and speed bumps feel the same. My wife likes to read books when she's a passenger, but also has a slight tendency to get motion sickness (car sick). Without a doubt, she prefers the Sports.
Dirt roads and washboard: The Sports feel more in control as speed increases, no difference at slower speeds.
Rocks and ledges: The Sports seem firmer coming down off a rock or ledge -- Less suspension travel on compression, and less "wallow" as it settles.
Here's how I'd rate the difference on my Jeep...
Paved roads and highways: The Sport shocks are firmer, more toward a sports car type of shock. Less brake dive, less body roll. Pot holes and speed bumps feel the same. My wife likes to read books when she's a passenger, but also has a slight tendency to get motion sickness (car sick). Without a doubt, she prefers the Sports.
Dirt roads and washboard: The Sports feel more in control as speed increases, no difference at slower speeds.
Rocks and ledges: The Sports seem firmer coming down off a rock or ledge -- Less suspension travel on compression, and less "wallow" as it settles.