2010 fog light upgrade to H16 LED with Pics
 06-01-2011, 07:27 PM
#1
JK Enthusiast
Thread Starter
Join Date: May 2010
Location: Toronto
Posts: 347
Likes: 0
Received 0 Likes
on
0 Posts
So I purchased a set of h16 led bulbs of ebay to convert my 2010 fogs to h16 or return them to stock if needed. This guide will show you how to convert the stock fog housing to accept the H16 bulb style.
Tools Needed:
1: Small flat head screw driver
2: Small philips screw driver
3: Brand new razor blades
4: H16 led Bulb or H16 24w Bulb
Part 1
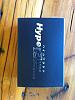
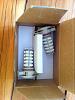
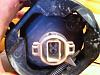
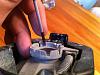
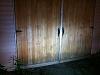
This is what showed up in the mail from ebay
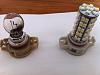
As far as I can tell the slides on the bulbs are the only thing different.
Box
Side by side comparison

Tools Needed:
1: Small flat head screw driver
2: Small philips screw driver
3: Brand new razor blades
4: H16 led Bulb or H16 24w Bulb
Part 1
This is what showed up in the mail from ebay
As far as I can tell the slides on the bulbs are the only thing different.
Box
Side by side comparison
Last edited by JeeP_MarK; 06-01-2011 at 08:29 PM.
 06-01-2011, 08:24 PM
#2
JK Enthusiast
Thread Starter
Join Date: May 2010
Location: Toronto
Posts: 347
Likes: 0
Received 0 Likes
on
0 Posts
Part 2
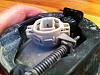
You will need to remove the stock fog housing from the jeep to do this you will need small flat head screw driver and philips to remove the grill and the thin bumper cover fasteners to access the fog housing, each housing has 4 small philips screws that holds it to the to the bumper. Unhook the harness from the housing and bring to a place to work on it and remove the stock bulb ,take the new h16 bulb and place it on the fog housing so you can see were you need to cut.
Start buy lining up the lock tabs and look for the side of the bulb were the the 2 exterior sliders are.
You will notice they are slightly closer then the stock bulb you will need to trim with the razor on the inside of one of the housing slide so it will fit.
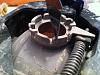
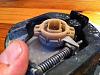
Once the 2 slider are lined up and fit right mark the super thin slider on the opposite side of the bulb with your razor blade so you now were to cut.
Now once housing is marked make a long triangle cut on the inside ,be vary careful and take your time one score at a time until one thin long triangle piece cuts loose.
Then use the blade to square the the groove as best as you can , after you are happy with your cutting use the small flat head screw driver to clean up the grove.
The H16 bulb should now fit like the stock bulb if its to tight you may need to do some more trimming.
You will need to remove the stock fog housing from the jeep to do this you will need small flat head screw driver and philips to remove the grill and the thin bumper cover fasteners to access the fog housing, each housing has 4 small philips screws that holds it to the to the bumper. Unhook the harness from the housing and bring to a place to work on it and remove the stock bulb ,take the new h16 bulb and place it on the fog housing so you can see were you need to cut.
Start buy lining up the lock tabs and look for the side of the bulb were the the 2 exterior sliders are.
You will notice they are slightly closer then the stock bulb you will need to trim with the razor on the inside of one of the housing slide so it will fit.
Once the 2 slider are lined up and fit right mark the super thin slider on the opposite side of the bulb with your razor blade so you now were to cut.
Now once housing is marked make a long triangle cut on the inside ,be vary careful and take your time one score at a time until one thin long triangle piece cuts loose.
Then use the blade to square the the groove as best as you can , after you are happy with your cutting use the small flat head screw driver to clean up the grove.
The H16 bulb should now fit like the stock bulb if its to tight you may need to do some more trimming.
Last edited by JeeP_MarK; 06-01-2011 at 09:24 PM.
06-01-2011, 08:48 PM
#3
JK Enthusiast
Thread Starter
Join Date: May 2010
Location: Toronto
Posts: 347
Likes: 0
Received 0 Likes
on
0 Posts
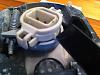
Your almost done, your h16 bulb should know fit like this .
This will show stock bulb still fits.
Now grab your H16 bulb you will see a slider one one side of the bulb that needs to be removed.

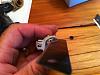
Put everything back together and your done.
This will show stock bulb still fits.
Now grab your H16 bulb you will see a slider one one side of the bulb that needs to be removed.
Put everything back together and your done.
Last edited by JeeP_MarK; 06-01-2011 at 09:19 PM.
06-01-2011, 09:06 PM
#4
JK Enthusiast
That's one way to do it I just got the gm fog light harness to solve the plug issue and then used a small file to sand down the tabs to hold it into the fog lamp assembly, both ways work good, been about 4 months now
06-01-2011, 09:08 PM
#5
JK Enthusiast
Thread Starter
Join Date: May 2010
Location: Toronto
Posts: 347
Likes: 0
Received 0 Likes
on
0 Posts
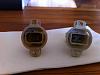
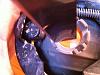
So buy this point everything should have been reinstalled, I really like the way they look but they have a little different focal point do to the longer bulb then the stock ones.
Stock bulbs on buy them selves, Notice the tighter focal point.
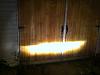
H16 LED bulbs on buy them selves, Focal point is much wider.
Front view stock bulbs
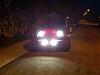
Front view H16 LED
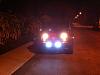
H16 Led Lights on daylight (Digging the Blue Tone)
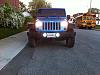
Stock bulbs on buy them selves, Notice the tighter focal point.
H16 LED bulbs on buy them selves, Focal point is much wider.
Front view stock bulbs
Front view H16 LED
H16 Led Lights on daylight (Digging the Blue Tone)
Trending Topics
06-01-2011, 09:17 PM
#9
JK Enthusiast
Thread Starter
Join Date: May 2010
Location: Toronto
Posts: 347
Likes: 0
Received 0 Likes
on
0 Posts
Thanks again
Last edited by JeeP_MarK; 06-01-2011 at 09:21 PM.
06-01-2011, 09:22 PM
#10
JK Enthusiast
Yea I still have the oem plugs but I don't plan on using them again, it's kinda cool to see some one doing it a different way and know one can tell the difference