
Auxiliary Electrical Hookup

Thread Starter
JK Super Freak
Joined: Oct 2007
Posts: 1,572
Likes: 0
From: Phoenix, AZ
I wanted to add some auxiliary electrical circuits to my '08 Wrangler:
1. to turn my winch on/off (when the key is turned on and a switch is flipped)
2. to turn on my HIDs (when at least the parking lights are on and a switch is flipped)
3. to turn on my Rock Lights (same has HIDs)
4. I wanted the switch indicators to be lit like my stock switches
5. I wanted something on the switch to indicate the switch was on
6. I wanted a fuse box that could hold relays and fuses
7. I wanted to use automotive grade materials where possible
8. I wanted to be able to modify the connections to my fuse box �easily� in the future (I�ll have additional circuits to wire)
9. I wanted to mount the relay/fuse box near the existing fuse box and battery.
Here�s a short summary of what I did.
Disclaimer: I know it�s not the most cost effective solution (note: a �cost effective� solution was not in my list), and there are better/worse/other ways to do it.
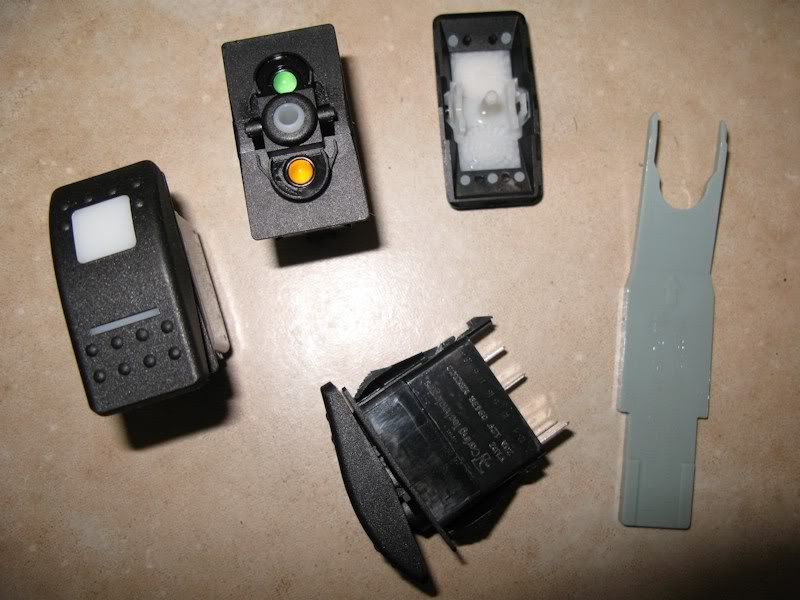
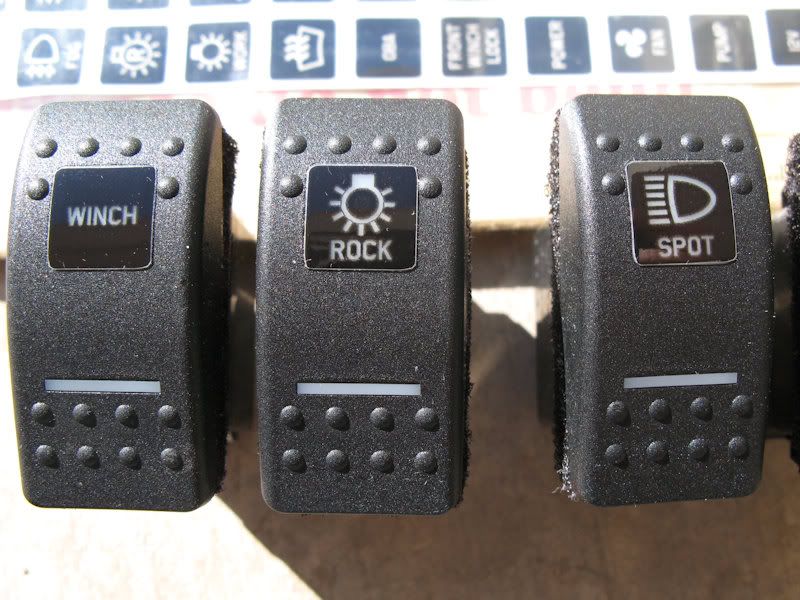
First, I looked for switches. It took a bit of hunting, but I found these Carling Contura II Rocker Switches (Model V1D2GHNB-AAC00-000) that are automotive grade, sealed, have a green LED backlight that can be wired to come on when the lights are turned on, and a red LED that can be wired to come on when the switch is turned on:
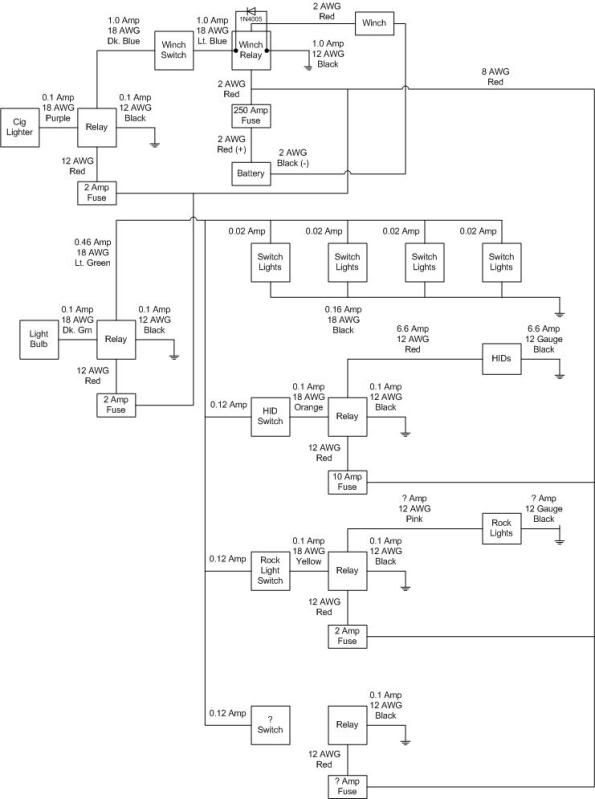
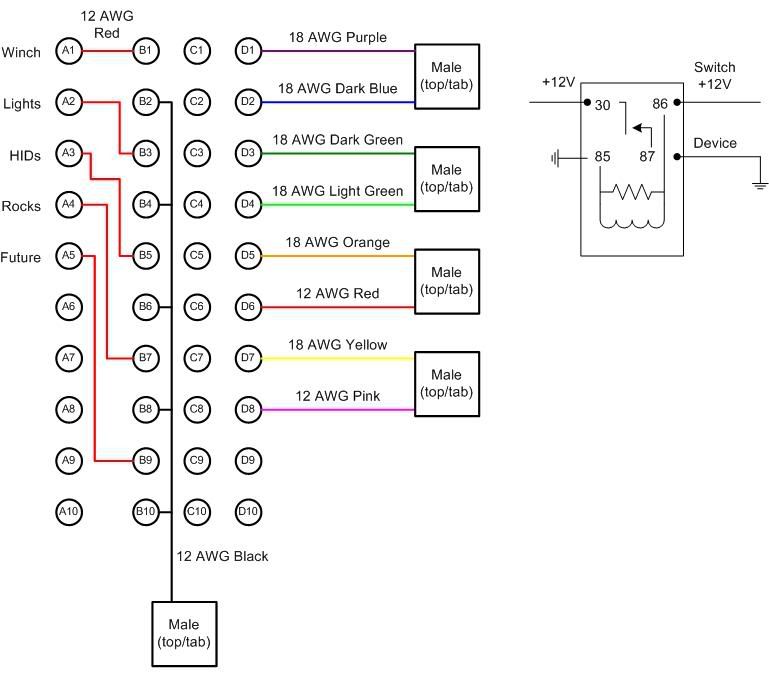
Now that I had the switches figured out I could come up with a wiring diagram. I decided to get a 4 switch setup (only using 3 switches right now) and figured it was best to protect the main power with a fuse because the winch wire would go through a relay instead of a direct connect:
Next I had to find that relay/fuse box I wanted. I finally found a Bussmann RTMR Panel (Model 15303-5-2-4) that can hold 5 relays and 10 fuses. Here�s a shot of the panel along with some of the terminals use to wire it up:

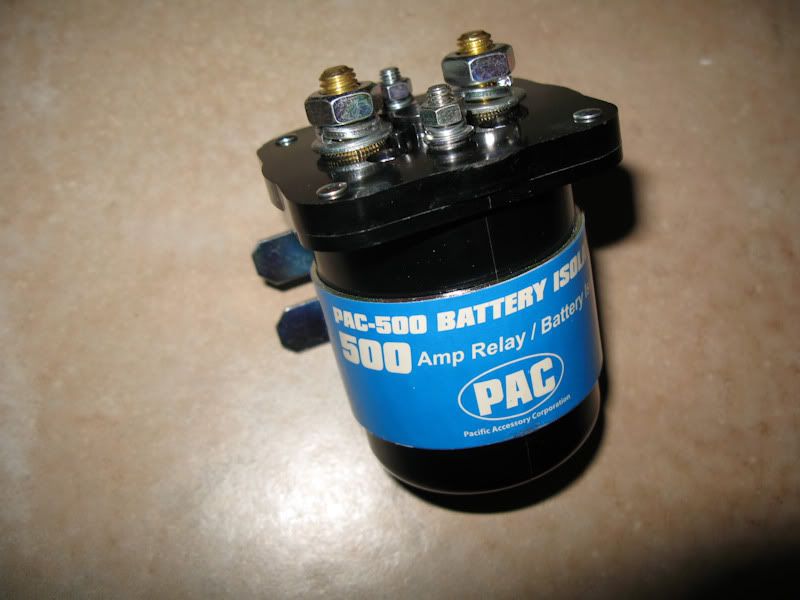
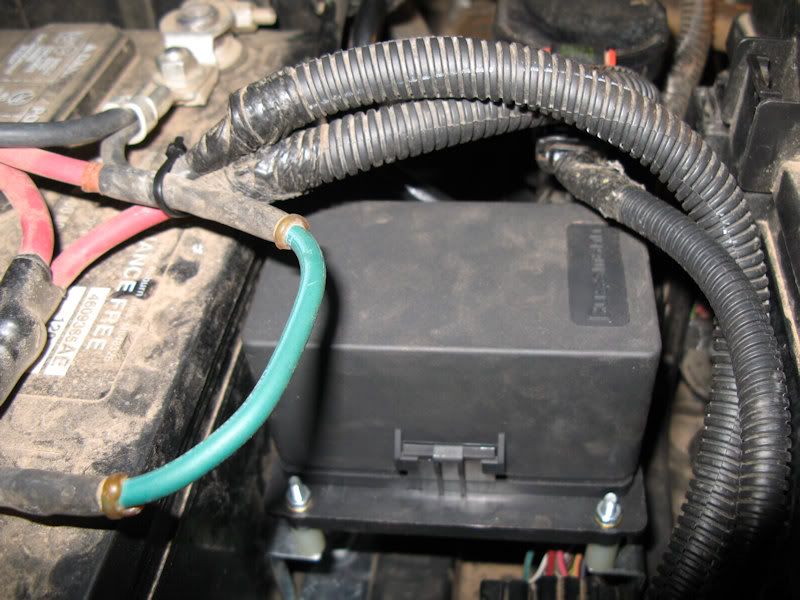
The winch is supposed to draw 416 amps at max, so I wanted to use a 500 amp relay for it:
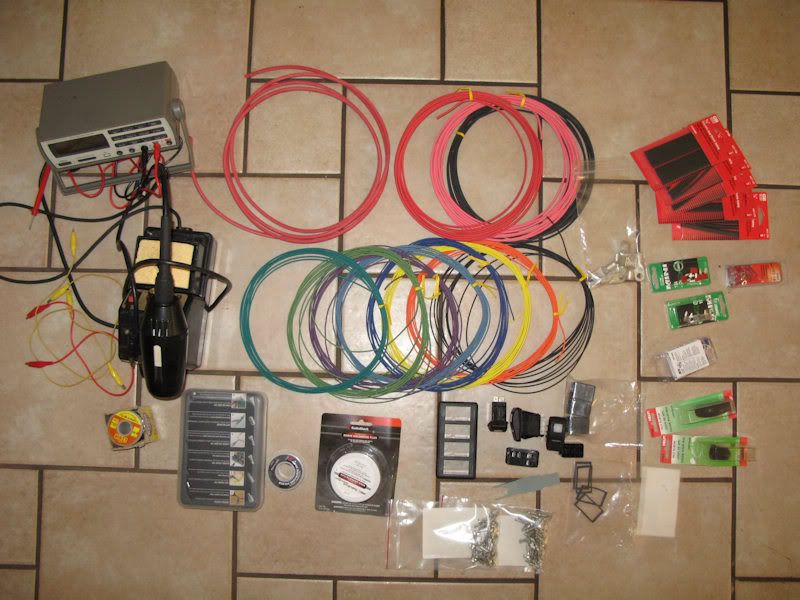
I didn�t want to use the cheap wire you find in the stores, but wanted good automotive grade wire. I got TXL wire, and got a lot of different colors, which is not the cheap way of hooking things up, but certainly makes it clear how things are supposed to be connected:
I had a hard time finding the legend stickers for the switches. I eventually had to order some from the UK. I knew before I purchased them that they would look good (with some mods) at night, and OK during the day. I could have purchased ones that looked good in the day and OK (but reversed) at night, but went with these:
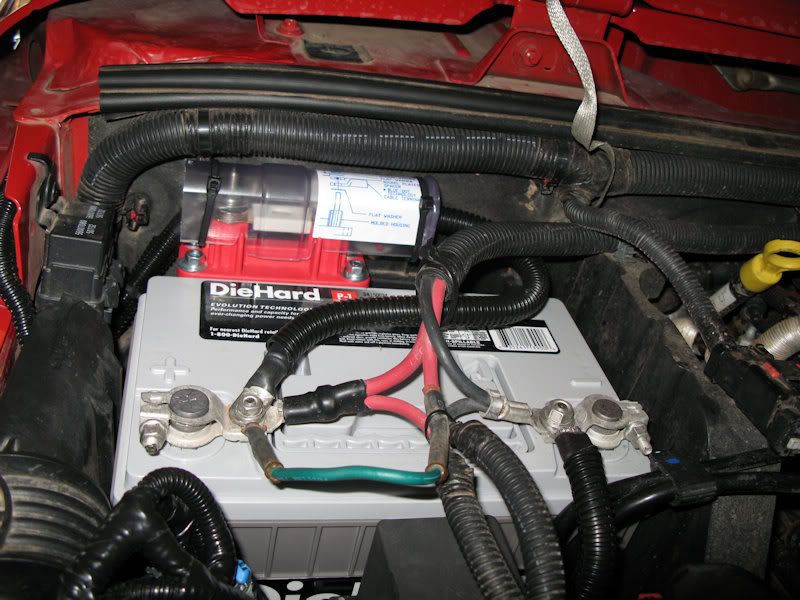
I (test) mounted the Bussmann Panel between the battery and stock fuse box:
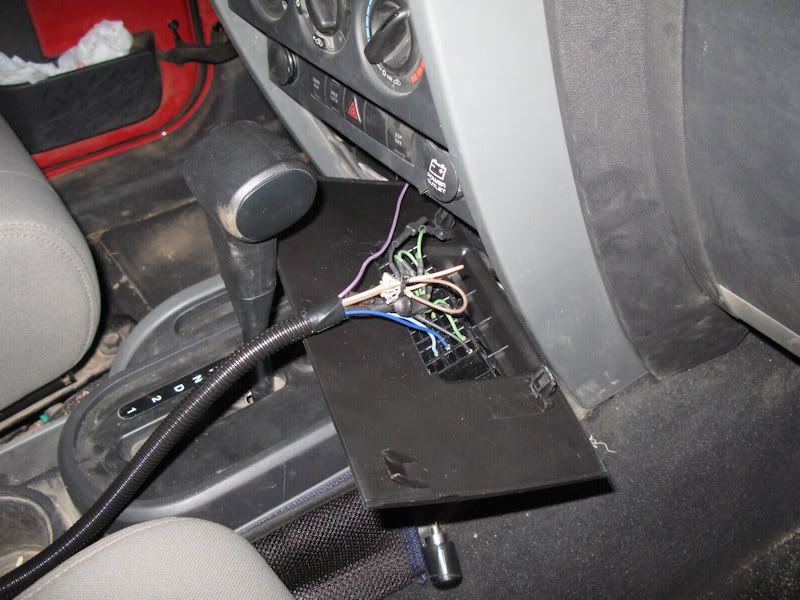
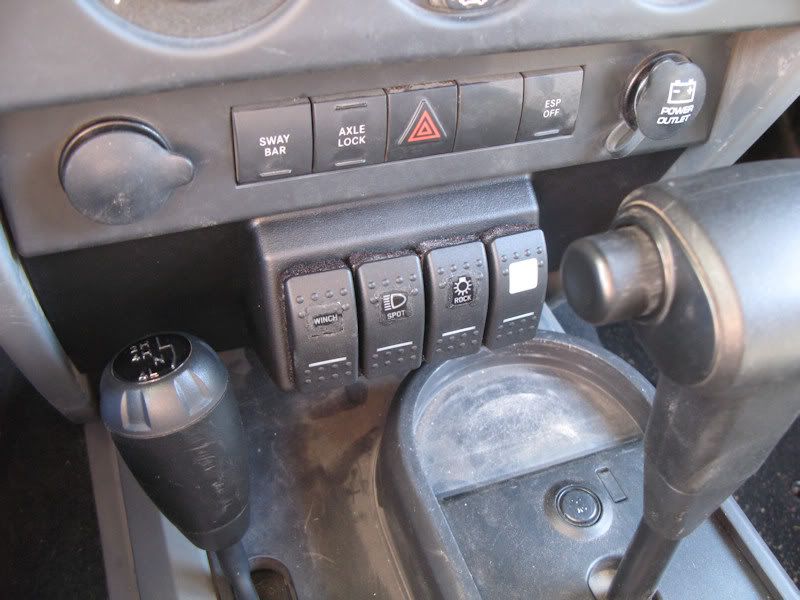
Instead of soldering the wires to the switches, I made standard connectors and plugged them into the back of the switches that I mounted on a Daystar Panel:
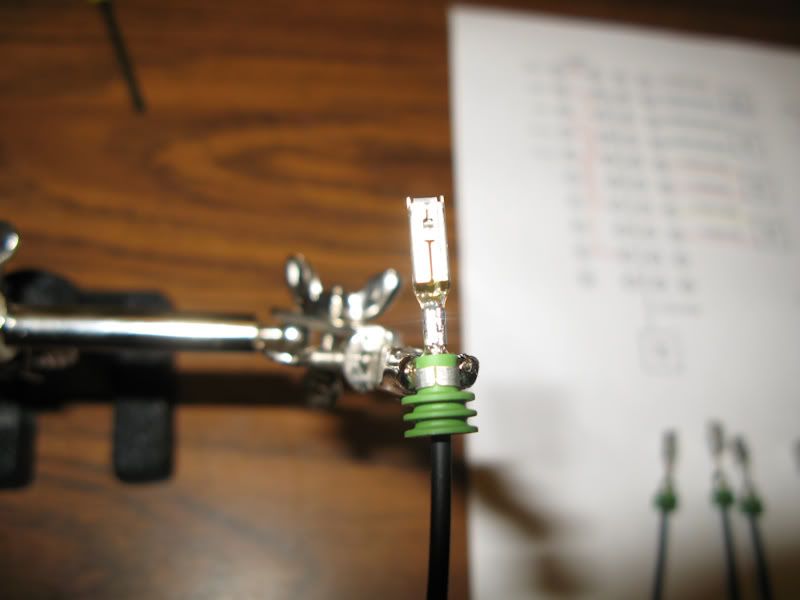
All wires were crimped and soldered (Termals: Packard 630):

I wanted to wire the RTMR Panel so it could be removed and re-installed fairly easily as I haven't decided all of the circuits I will house in it, so I have all wires in connectors. Here's the wiring diagram:
I wired up the Bussmann Panel. The wires were all crimped, soldered, and came with a sealing gasket (Terminals: Metri-Pak 280):
A view of the bottom with all wiring completed:
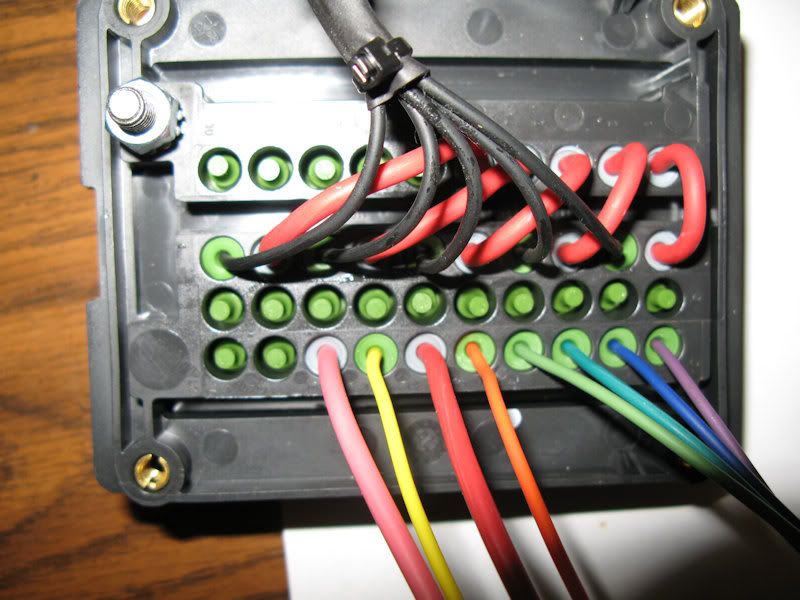
The relays are Song Chuan 301-1A-C-R1 (ISO 280, 35A, sealed). All wires were run to a standard, sealed, automotive grade connectors that were color coded, and wires were placed in looms:
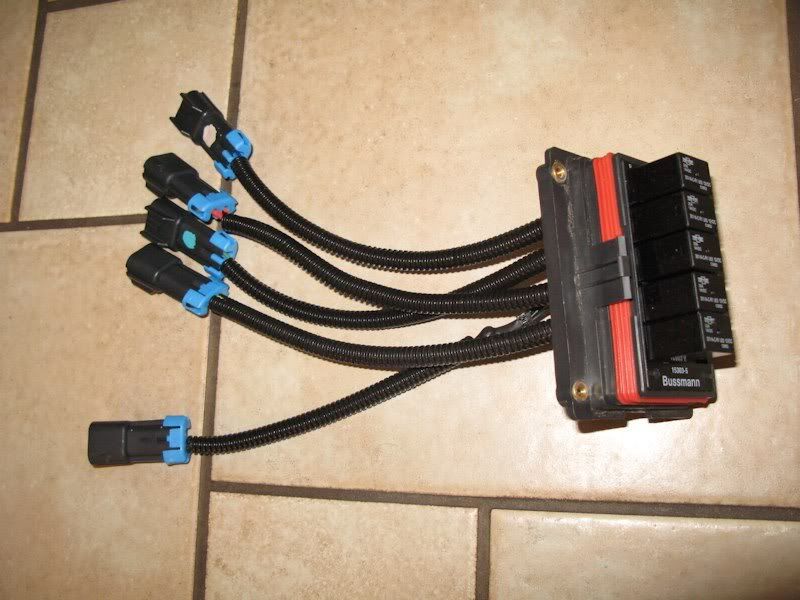
The Bussmann Panel mounted in the Jeep with the connectors ready to be hooked up:
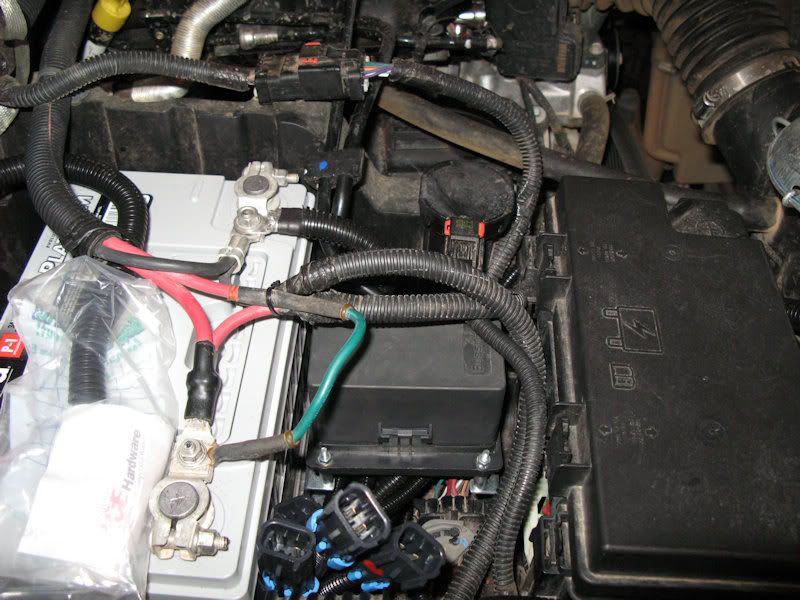
All grounds were made to existing ground lugs found on the Jeep:
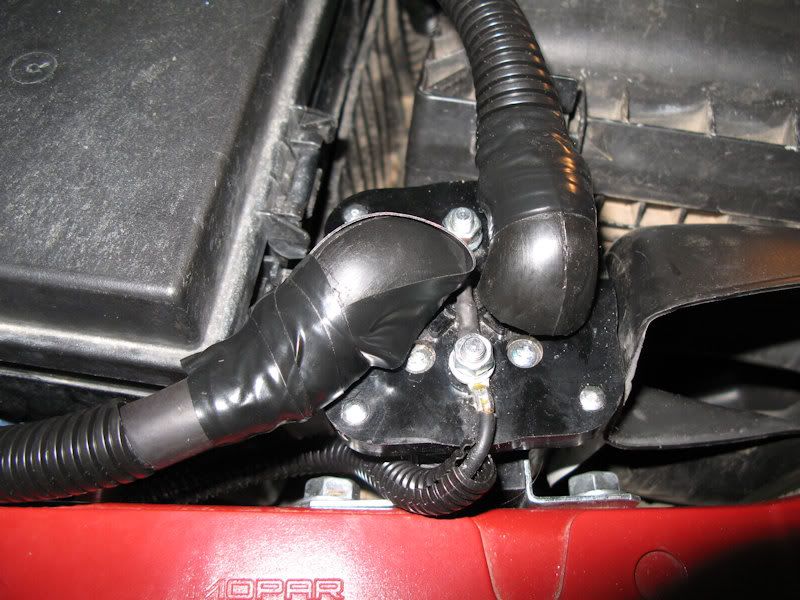
I fit the winch relay next to the stock fuse box and air box:
Everything hooked up:

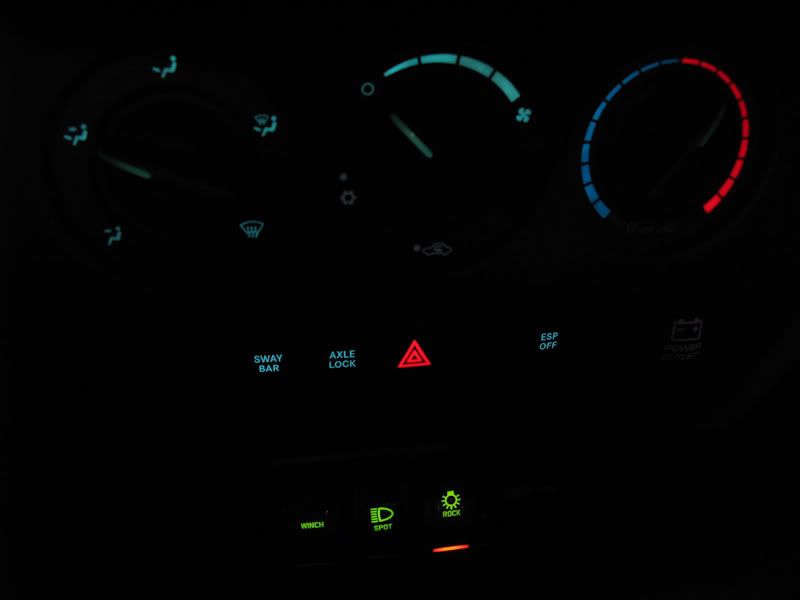
I wanted to stop any light leaks from the LEDs in the switch, so I globed some Grip Guard around the edge of the legends. I didn�t do a really neat job, but it looks a lot worse in the picture that it does in person:
Here�s how they look at night with the Rock Lights on:
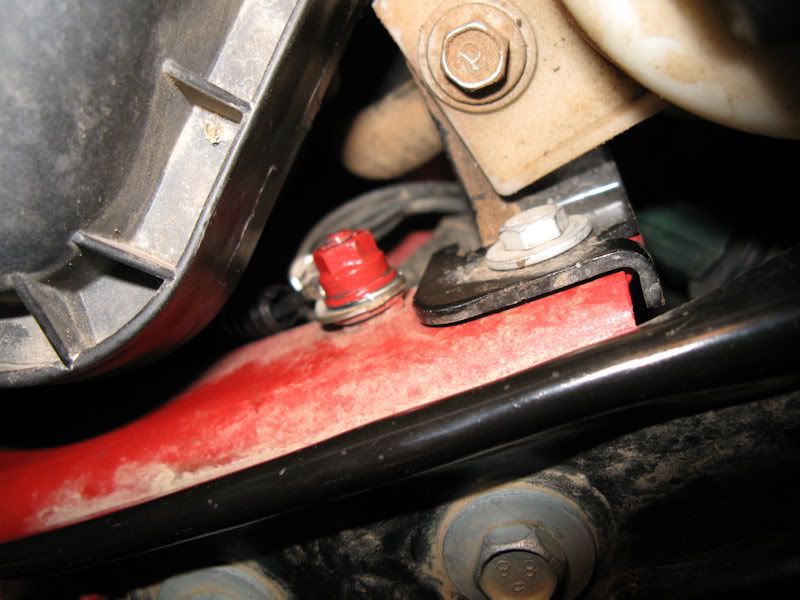
I purchased a 500+ amp ANL fuse holder to hold the 250 amp fuse, and mounted it just behind the battery:
I have a lot more pictures and info if interested.
Update: See this link for updates to my rocker covers: https://www.jk-forum.com/forums/jk-e...1/#post2908523
1. to turn my winch on/off (when the key is turned on and a switch is flipped)
2. to turn on my HIDs (when at least the parking lights are on and a switch is flipped)
3. to turn on my Rock Lights (same has HIDs)
4. I wanted the switch indicators to be lit like my stock switches
5. I wanted something on the switch to indicate the switch was on
6. I wanted a fuse box that could hold relays and fuses
7. I wanted to use automotive grade materials where possible
8. I wanted to be able to modify the connections to my fuse box �easily� in the future (I�ll have additional circuits to wire)
9. I wanted to mount the relay/fuse box near the existing fuse box and battery.
Here�s a short summary of what I did.
Disclaimer: I know it�s not the most cost effective solution (note: a �cost effective� solution was not in my list), and there are better/worse/other ways to do it.
First, I looked for switches. It took a bit of hunting, but I found these Carling Contura II Rocker Switches (Model V1D2GHNB-AAC00-000) that are automotive grade, sealed, have a green LED backlight that can be wired to come on when the lights are turned on, and a red LED that can be wired to come on when the switch is turned on:
Now that I had the switches figured out I could come up with a wiring diagram. I decided to get a 4 switch setup (only using 3 switches right now) and figured it was best to protect the main power with a fuse because the winch wire would go through a relay instead of a direct connect:
Next I had to find that relay/fuse box I wanted. I finally found a Bussmann RTMR Panel (Model 15303-5-2-4) that can hold 5 relays and 10 fuses. Here�s a shot of the panel along with some of the terminals use to wire it up:
The winch is supposed to draw 416 amps at max, so I wanted to use a 500 amp relay for it:
I didn�t want to use the cheap wire you find in the stores, but wanted good automotive grade wire. I got TXL wire, and got a lot of different colors, which is not the cheap way of hooking things up, but certainly makes it clear how things are supposed to be connected:
I had a hard time finding the legend stickers for the switches. I eventually had to order some from the UK. I knew before I purchased them that they would look good (with some mods) at night, and OK during the day. I could have purchased ones that looked good in the day and OK (but reversed) at night, but went with these:
I (test) mounted the Bussmann Panel between the battery and stock fuse box:
Instead of soldering the wires to the switches, I made standard connectors and plugged them into the back of the switches that I mounted on a Daystar Panel:
All wires were crimped and soldered (Termals: Packard 630):
I wanted to wire the RTMR Panel so it could be removed and re-installed fairly easily as I haven't decided all of the circuits I will house in it, so I have all wires in connectors. Here's the wiring diagram:
I wired up the Bussmann Panel. The wires were all crimped, soldered, and came with a sealing gasket (Terminals: Metri-Pak 280):
A view of the bottom with all wiring completed:
The relays are Song Chuan 301-1A-C-R1 (ISO 280, 35A, sealed). All wires were run to a standard, sealed, automotive grade connectors that were color coded, and wires were placed in looms:
The Bussmann Panel mounted in the Jeep with the connectors ready to be hooked up:
All grounds were made to existing ground lugs found on the Jeep:
I fit the winch relay next to the stock fuse box and air box:
Everything hooked up:
I wanted to stop any light leaks from the LEDs in the switch, so I globed some Grip Guard around the edge of the legends. I didn�t do a really neat job, but it looks a lot worse in the picture that it does in person:
Here�s how they look at night with the Rock Lights on:
I purchased a 500+ amp ANL fuse holder to hold the 250 amp fuse, and mounted it just behind the battery:
I have a lot more pictures and info if interested.
Update: See this link for updates to my rocker covers: https://www.jk-forum.com/forums/jk-e...1/#post2908523
Last edited by joe002; Apr 29, 2012 at 01:47 PM. Reason: Added some more descriptions.

Thread Starter
JK Super Freak
Joined: Oct 2007
Posts: 1,572
Likes: 0
From: Phoenix, AZ
sburggsx - Thanks. I�ve been planning it and searching for parts for months, and spent the better part of a week putting it all together. It�s nice that you can actually find all of the �standard� automotive components to complete a job that appears to be �stock�.
Thread Starter
JK Super Freak
Joined: Oct 2007
Posts: 1,572
Likes: 0
From: Phoenix, AZ
tainted_darkness - Thanks. Wire looms, zip ties, and crimped and soldered terminals really make the job turn out neat. Also, using automotive electrical connectors help when having to do maintenance.
JK Enthusiast
Joined: Feb 2009
Posts: 110
Likes: 0
From: Santa Clarita, CA

I think a list of your sources for the automotive parts would be greatly appreciated by this forum.
A few comments.... I'm looking at your wiring diagram; and it appears that the 8AWG "feed" wire to your aux relays comes after your winch fuse (250Amp). If you blow that fuse while winching; you will lose all power to the other aux items

Trending Topics
Thread Starter
JK Super Freak
Joined: Oct 2007
Posts: 1,572
Likes: 0
From: Phoenix, AZ
Very nice work!
I think a list of your sources for the automotive parts would be greatly appreciated by this forum.
A few comments.... I'm looking at your wiring diagram; and it appears that the 8AWG "feed" wire to your aux relays comes after your winch fuse (250Amp). If you blow that fuse while winching; you will lose all power to the other aux items . I�m confused by the winch switch / cig. lighter and relay circuit diagram. Where does the �In / Out� winch control switch fit into your diagram? And� why do you have four switches controlling the same �light bulb� relay?
I think a list of your sources for the automotive parts would be greatly appreciated by this forum.
A few comments.... I'm looking at your wiring diagram; and it appears that the 8AWG "feed" wire to your aux relays comes after your winch fuse (250Amp). If you blow that fuse while winching; you will lose all power to the other aux items
Good questions�
Yes, I wanted to just use the one fuse for both the winch and the Bussmann Panel. I do know that if I blow the fuse all of my circuits will go dead. I originally thought of running the wire directly from the Battery to the Panel, which is the way it�s done on our Jeep, but wanted the protection if I had a short in the wire. I am carrying two extra fuses, but I don�t really expect the winch to blow the fuse as I�ve only had to use it 3 times so far (though I�ve used the compressor on almost every trip). I think if I did blow that fuse more than once I would consider running the wire with a separate in-line fuse for the Panel separately, but like I said, for me, I want to have that fuse protect both the winch and wire to the Panel.
To engage the winch, I wanted to ensure that the key was turned on before the winch (switch) would work. The cigar lighter turns on with the ignition switch, so I connected my relay there. I didn�t want to wire in/out from inside the Jeep, I only wanted to wire on/off. The in/out is stilled controlled by the remote switch.
All of the switches have a light that will illuminate with the other dash lights. In the last picture the green parts come on when I turn on the lights and the orange par comes on when the switch is turned on.
Thread Starter
JK Super Freak
Joined: Oct 2007
Posts: 1,572
Likes: 0
From: Phoenix, AZ
Carling has a large selection of labels, but nothing good for off-roading. I also found a number of companies that had labels that were inversed or were different colors. I could only find the labels from a shop in the UK.