Newcomdigi 52" 300watt LED Light Bar
 03-14-2014, 10:30 PM
#951
JK Newbie

Join Date: Mar 2013
Location: Sidney, OH
Posts: 41
Likes: 0
Received 0 Likes
on
0 Posts
The end cap is aluminum. If you over tighten it, it will pull the threads out of the aluminum long before it does anything at all to the stainless bolt that comes with it. You don't really want to tighten it any more than what it takes to keep the light from freely moving inside the brackets. If you're still not comfortable with that, some blue loctite should be more than enough to keep the bolts in while still letting them be removable.
 03-15-2014, 05:50 PM
#952
JK Newbie

Join Date: Sep 2009
Location: dirty jerz
Posts: 64
Likes: 0
Received 0 Likes
on
0 Posts
After I had my light on for one day my ended were stripped also. Today I took them off drilled them and retapped with 7mm screws. I also used some sun washers between the bar and the mount the keep it from moving. Hope this holds up.
03-15-2014, 06:00 PM
#953
I used washers between the bolt head & bracket to keep the bar from moving. The thing that gets me is it's just the driver side end that stripped the passenger side is perfectly fine
03-15-2014, 06:18 PM
#954
JK Newbie
Join Date: Sep 2009
Location: dirty jerz
Posts: 64
Likes: 0
Received 0 Likes
on
0 Posts
Mine was the passenger side and the driver side was good. I also used lock washers between the mount and the bolt along with the sun washers between the mount and light.
03-17-2014, 09:15 AM
#955
JK Super Freak
Join Date: Oct 2012
Location: Cali
Posts: 1,007
Likes: 0
Received 0 Likes
on
0 Posts
I'm the one that started the painting the face thing. I have two models. One has screws that hold the glass(plastic) on and the 2nd style that does not have screws. If you have the screws then the job is very easy. The lens comes off without issue and silicone just on the end caps. The lens has a silicon gasket so don't damage it. If it does not have screws, it's a pain in the arse!! This means the lens is sealed with silicon the entire length. The face caps are literally slide on and off. There is only 1/4" or so of sealant just on the ends from sealing the end caps (excess). Use a small screwdriver to break the seal up on the ends and it should slide off real easy. The lens on the other hand is held in place and sealed with silicone the entire length and the old crap is a pain to remove without making a huge mess of the unit or damaging the PCB below. Correction...disassembly was simple. Re installation was a bitch. Be VERY careful not to overdo the silicone along the face. If it's too much it will ooze out across the reflectors. If it's not enough it won't be water tight from just rain. 1st one turned out great, 2nd one (no screws) has a water leak I have yet to locate. No obvious signs. Just humidity on the inside digging the lens. PM if u have other questions.
03-17-2014, 09:22 AM
#956
Damn I love that!! Did you make a write up or take pics?
03-17-2014, 02:28 PM
#957
JK Super Freak
Join Date: Dec 2009
Location: Charlotte, NC
Posts: 1,057
Likes: 0
Received 0 Likes
on
0 Posts
03-17-2014, 08:51 PM
#958
JK Super Freak
Join Date: Oct 2012
Location: OCEAN SPRINGS, MS
Posts: 1,225
Likes: 0
Received 0 Likes
on
0 Posts
03-18-2014, 10:24 AM
#959
JK Super Freak
Join Date: Oct 2012
Location: Cali
Posts: 1,007
Likes: 0
Received 0 Likes
on
0 Posts
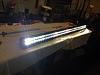
Cool no problem! I'll do a write up here this weekend. The bar is actually going on my duramax truck so I thought the diesel cab ckearance lights would be the perfect addition to integrate into the bar. My only concern is it potentially fogging or leaking now that I've got it opened. I should get my mounts on this weekend and get it all hooked up. I'll do a write up and post more pics.
The amber LEDs are flat and I glued them at the base of the reflectors so it still allows the white led light to function on a seperate switch. The amber cab lights will be hard wired into my headlight running lights and come on automatically when my headlights or running lights are on
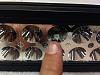
The amber LEDs are flat and I glued them at the base of the reflectors so it still allows the white led light to function on a seperate switch. The amber cab lights will be hard wired into my headlight running lights and come on automatically when my headlights or running lights are on
Last edited by Fugg it; 03-18-2014 at 10:27 AM.
03-18-2014, 10:30 AM
#960
JK Super Freak
Join Date: Oct 2012
Location: Cali
Posts: 1,007
Likes: 0
Received 0 Likes
on
0 Posts
In CA, we have to have offroad light bars covered, cops have hassled me about my jk not having its bar covered. I figured with the cab lights, I may be able to use it as "clearance lights" excuse and get away with it. We'll see