
KevinMac's Semi-Budget Build...Project Deathstar

Thread Starter
JK Enthusiast
Joined: Jun 2013
Posts: 422
Likes: 24
From: The D, MI
Long time, no update!!  That has mainly been due to a lack of upgrades, I've just been enjoying it. I just turned 14,000 miles and aside from rotating the tires, I haven't had to touch it. However, with the weather finally breaking its time to do some camping.
So without delay, here is the new RTT that arrived last week!!

I got a Bigfoot Tents popup and I'm very excited by it. I actually ordered black but it is on backorder, so this is a loaner for another month or so.
Initial impression is it seems pretty stout and it is heavy, around 150lb. The mounting setup to my Gobi is pretty clever. Fit and finish is good with a nice gelcoat surface. The only tweak I need to make is to move an awning bracket so I can rotate the handle to deploy the tent. Can't wait to hit Michigan's upper peninsula this summer!!


Cost: $2300
That has mainly been due to a lack of upgrades, I've just been enjoying it. I just turned 14,000 miles and aside from rotating the tires, I haven't had to touch it. However, with the weather finally breaking its time to do some camping.So without delay, here is the new RTT that arrived last week!!
I got a Bigfoot Tents popup and I'm very excited by it. I actually ordered black but it is on backorder, so this is a loaner for another month or so.
Initial impression is it seems pretty stout and it is heavy, around 150lb. The mounting setup to my Gobi is pretty clever. Fit and finish is good with a nice gelcoat surface. The only tweak I need to make is to move an awning bracket so I can rotate the handle to deploy the tent. Can't wait to hit Michigan's upper peninsula this summer!!


Cost: $2300
Thread Starter
JK Enthusiast
Joined: Jun 2013
Posts: 422
Likes: 24
From: The D, MI
So, after having had a couple of months to use it, I wanted to do a proper write up on the installation and use of our new Bigfoot Hard Shell Rooftop Tent.
I want to start with customer service. Mike and Liz Primrose were top notch folks to deal with. I had placed an order back in March for a black one, since everything on my Jeep is black. Mike promptly got in touch with me to communicate he only had white in stock and that it'd be 4-6 weeks before black would be available. He then offered to refund my money if I wasn't willing to wait such a long time. Since March is still a bit early to camp in Michigan, I was willing to wait for the tent that I wanted. He then made an offer that I didn't expect and that was to provide me a 'loaner' tent until the black ones became available! Further more, he offered to pick up the additional freight for the return of the white tent when we swapped out for the black one! I couldn't pass that up and jumped at the opportunity.
We did take the white tent out on several trips and it was everything that was expected. It's not easy to mount with a Gobi rack (more on that later) but the operation of the tent itself is as advertised. You can literally park and be camping in under 5 minutes! Fast forward a bit, the black tents became available a few weeks back and mine arrived on my door about 2 weeks ago. Mike and Liz were true to their word, the return of the white one didn't cost me a cent and the swap with the trucking company they setup was seamless! Major props to both of them, thank you very much for a wonderful transaction!
So with that, let's get into the nuances of a Bigfoot RTT. Keep in mind, depending on the roof rack you have, your installation will vary.
Tools Needed:
- 1/4" drive ratchet
- 13mm 1/4" drive socket (standard depth)
- 13mm 1/4" drive socket (deep well)
- 13mm speed wrench (included with tent)
- 3/8" drive air ratchet
- 13mm 3/8" drive socket (deep well)
- A 4' section of wooden 2"x4"
- A wife with small arms
- Welder
- Chop or hacksaw
Additional Items to Procure:
- (4) 5' pieces of foam water pipe insulation (Home Depot/Lowes)
- Foam Tape
- 4" piece of steel bar (1/2" diameter if I recall?)
- Preparation
So, the reason I bought my Gobi Stealth roof rack was the quality and robustness of it, the thing is built like a tank! Another perk, was how low profile it was to the roof, as compared to the Recon or some other racks on the market. This was wonderful, until the arrival of my tent and I had to do some engineering on how to make it all work together. Oh yeah, keep in mind that I also run the Arb Awning off the passenger side of the rack...this just presented another challenge. 

I started the installation by covering all the roof rack bars that contact the tent with water pipe insulation. This included the (3) bars that run crosscar and the bar that runs fore/aft on the passenger side. I added this foam to keep the tent from physically contacting the rack. The rack had a nice powdercoat on it and if the tent were allowed to touch, it would rub the powdercoat off...leading to rust. Also, I didn't want the steel rack to wear/rub on the tent shell. A quick snapshot of the foam I used is below:

The next step was the preparation of the mounting hardware. The tent itself is mounted using brackets that sandwich around the bars that run crosscar, there are (4) sets of mounting hardware in total. A snapshot of a couple of the mounts is shown below. Notice that (1) of the carriage bolts had come out of the bracket. These were supposed to be press fit but this one was a bit loose even after I put it back together. There is no way to hold the carriage bolt to the bracket while tightening down the nut so I took the precaution to put small tack welds on. NOTE: the position of the tack weld is critical, if you put it somewhere other than where I've shown, then there is a good chance the hardware will not fit into the tracks built into the tent shell!!!


The next step in the preparation was the modification of the handle that is actually used to crank open the tent. Once again, this is a Gobi specific item that had to be overcome. It is hard to explain the issue but essentially there is a spot on the rack that gets hit as you crank the handle to open/close the tent. I tried shifting the position of the tent around on the rack itself but you are somewhat limited as you have to be wary of the track positions on the underside of the tent shell. These tracks do not run the full length of the shell so you need to ensure they are over the crossbars to give you something to mount to.
Ok, getting back to the handle issue, here is a photo of (2) handles, a stock one and one I modified by adding about 4" of bar to. This pushed the handle outboard of the tent/Gobi far enough that there was no more contact. A note on where to add that 4" of material, you have to add it closest to the handle itself as the end of the crank has a "D" shape cut into it. This "D" inserts into the tent and allows you to then open/close it. In the last photo you can see the gap between the handle to a bar with a 90 degree radius, this is where it was contacting.

The final step was more of a precaution on my part, once again thinking ahead and trying to avoid wear and rust on the roof rack. The bottom steel plate that sandwiches around the rack crossbars would contact the rack even with the addition of the water pipe insulation. To avoid this, I just took some foam tape and stuck it to the steel plate. Then when you install it, you have a nice soft surface against the rack crossbar. A photo of a completely installed hardware, with foam tape, can be seen next. I did this for all (4) of the bottom mounting plates.

Ok, now that I have walked you through that we will move onto the installation of the tent itself!
I want to start with customer service. Mike and Liz Primrose were top notch folks to deal with. I had placed an order back in March for a black one, since everything on my Jeep is black.
Mike promptly got in touch with me to communicate he only had white in stock and that it'd be 4-6 weeks before black would be available. He then offered to refund my money if I wasn't willing to wait such a long time. Since March is still a bit early to camp in Michigan, I was willing to wait for the tent that I wanted. He then made an offer that I didn't expect and that was to provide me a 'loaner' tent until the black ones became available! Further more, he offered to pick up the additional freight for the return of the white tent when we swapped out for the black one! I couldn't pass that up and jumped at the opportunity. We did take the white tent out on several trips and it was everything that was expected. It's not easy to mount with a Gobi rack (more on that later) but the operation of the tent itself is as advertised. You can literally park and be camping in under 5 minutes!
Fast forward a bit, the black tents became available a few weeks back and mine arrived on my door about 2 weeks ago. Mike and Liz were true to their word, the return of the white one didn't cost me a cent and the swap with the trucking company they setup was seamless! Major props to both of them, thank you very much for a wonderful transaction! So with that, let's get into the nuances of a Bigfoot RTT. Keep in mind, depending on the roof rack you have, your installation will vary.
Tools Needed:
- 1/4" drive ratchet
- 13mm 1/4" drive socket (standard depth)
- 13mm 1/4" drive socket (deep well)
- 13mm speed wrench (included with tent)
- 3/8" drive air ratchet
- 13mm 3/8" drive socket (deep well)
- A 4' section of wooden 2"x4"
- A wife with small arms
- Welder
- Chop or hacksaw
Additional Items to Procure:
- (4) 5' pieces of foam water pipe insulation (Home Depot/Lowes)
- Foam Tape
- 4" piece of steel bar (1/2" diameter if I recall?)
- Preparation
So, the reason I bought my Gobi Stealth roof rack was the quality and robustness of it, the thing is built like a tank!
Another perk, was how low profile it was to the roof, as compared to the Recon or some other racks on the market. This was wonderful, until the arrival of my tent and I had to do some engineering on how to make it all work together. Oh yeah, keep in mind that I also run the Arb Awning off the passenger side of the rack...this just presented another challenge. I started the installation by covering all the roof rack bars that contact the tent with water pipe insulation. This included the (3) bars that run crosscar and the bar that runs fore/aft on the passenger side. I added this foam to keep the tent from physically contacting the rack. The rack had a nice powdercoat on it and if the tent were allowed to touch, it would rub the powdercoat off...leading to rust. Also, I didn't want the steel rack to wear/rub on the tent shell. A quick snapshot of the foam I used is below:

The next step was the preparation of the mounting hardware. The tent itself is mounted using brackets that sandwich around the bars that run crosscar, there are (4) sets of mounting hardware in total. A snapshot of a couple of the mounts is shown below. Notice that (1) of the carriage bolts had come out of the bracket. These were supposed to be press fit but this one was a bit loose even after I put it back together. There is no way to hold the carriage bolt to the bracket while tightening down the nut so I took the precaution to put small tack welds on. NOTE: the position of the tack weld is critical, if you put it somewhere other than where I've shown, then there is a good chance the hardware will not fit into the tracks built into the tent shell!!!


The next step in the preparation was the modification of the handle that is actually used to crank open the tent. Once again, this is a Gobi specific item that had to be overcome. It is hard to explain the issue but essentially there is a spot on the rack that gets hit as you crank the handle to open/close the tent. I tried shifting the position of the tent around on the rack itself but you are somewhat limited as you have to be wary of the track positions on the underside of the tent shell. These tracks do not run the full length of the shell so you need to ensure they are over the crossbars to give you something to mount to.
Ok, getting back to the handle issue, here is a photo of (2) handles, a stock one and one I modified by adding about 4" of bar to. This pushed the handle outboard of the tent/Gobi far enough that there was no more contact.
A note on where to add that 4" of material, you have to add it closest to the handle itself as the end of the crank has a "D" shape cut into it. This "D" inserts into the tent and allows you to then open/close it. In the last photo you can see the gap between the handle to a bar with a 90 degree radius, this is where it was contacting. 

The final step was more of a precaution on my part, once again thinking ahead and trying to avoid wear and rust on the roof rack. The bottom steel plate that sandwiches around the rack crossbars would contact the rack even with the addition of the water pipe insulation. To avoid this, I just took some foam tape and stuck it to the steel plate. Then when you install it, you have a nice soft surface against the rack crossbar. A photo of a completely installed hardware, with foam tape, can be seen next. I did this for all (4) of the bottom mounting plates.

Ok, now that I have walked you through that we will move onto the installation of the tent itself!
Thread Starter
JK Enthusiast
Joined: Jun 2013
Posts: 422
Likes: 24
From: The D, MI
- Positioning the tent on the roof rack
The position of the tent on the rack impacts the mounting. If you are looking at my Jeep head on, you can see that it is not centered and is actually offset about 2" towards the passenger side. This was done to help increase the clearance of the cranking handle to the Gobi and the awning. The clearance photo I showed in my earlier post only had the Gobi in it, the awning also became an obstacle. In this older photo you can see how the awning also is in the way of the handle.
As far as fore/aft positioning, the tent is slid back quite far. Here is a shot from the side, at the rear of the Jeep. From this you can judge just how far back it is, as it slightly overhangs the rear of the Gobi.

Once you have it about where you want it, it is time to mount it! Don't worry too much yet about it being perfecting aligned, you just need it in the general location. You will still have to move it a bit to insert the mounting hardware.
- Mounting
Installing the mounting hardware is quite a challenge by yourself, but it is possible. We will start with the front set as it is pretty straightforward. The easiest way I found was to disconnect and "popup" both of the Freedom Top panels. There isn't much room between the panels and the bottom of the tent so it is a tight space to work in. What worked for me was to open both the front doors and then move the Freedom Top panels as far forward and outboard as possible. This opened up about a 6" gap from which to access the (2) steel tracks that run fore/aft in the bottom of the tent.
In this photo you can see the (2) steel tracks and also the mounting hardware (that we welded in the prior post) installed around the forward-most crossbar. The mounting hardware simply slides into the track. Once you reach the crossbar, you need to lift the tent up 3 inches so you can slide the hardware rearwards so that the bolts straddle the crossbar. This is difficult because as I mentioned there is only about 6 inches of roof between the Freedom Top panels and the tent weighs about 150lb! To accomplish this, I was sitting on the center armrest with an arm reaching out the roof. Once you get each of the front mounting hardware sets to straddle the crossbar, put the bottom steel plate on (the one I put foam tape on) and start the locknuts. DO NOT FULLY TIGHTEN THE LOCKNUTS DOWN YET!

Now it is time to move to the rear. This is where the 2"x4" and wife with small arms comes into play. So, what I did was took the 2"x4" and slid it inbetween the roof rack and the tent as shown in the photo below. This allowed me to use the roof rack as a pivot and gain the leverage needed to easily lift the rear of the tent so that I could once again slide the mounting hardware into the steel track so that the carriage bolts straddle the rear roof rack crossbar. Recall that when I loaded the front mounting hardware, I put the bottom steel plate on separately as there was room to work. There is NO room to work in the back due to the geometry of the roof rack. In order to make it easier, I had the bottom steel plate already mounting to (1) of the carriage bolts with a locknut to hold it on. That way I only had to get (1) more locknut per side started. If that explanation didn't make sense, I tried to capture it in the photo that follows the 2"x4". If you look closely, you can see the bottom steel plate dangling on the right carriage bolt and the locknut retaining it.


Now that both sides of the rear mounting hardware are in the tracks and straddling the crossbar, it is time for the wife! My arms were too big in diameter to fit in between the roof and the Gobi to be able to reach in and start the other locknut. She had to first get the bottom steel plate aligned to the 2nd carriage bolt and then start the locknut. This was even difficult for her as there really is that little room to maneuver. What we found worked was that she would get the plate on the carriage bolt and then I would hold it there with a broom handle while she then started the locknut. Lefty loosey, babe! Once we got her square away on clockwise/counterclockwise she was able to knock it out in a few tries.
At this point, you can now do your final positioning of the tent as it is time to go ahead and tighten it down! Finally!!!!!!!!
- Final Tightening
Tightening of the mounting hardware is fairly straightforward. For the front mounting hardware, I was once again sitting on the center console with an arm hung out the roof. I used a 1/4" ratchet with standard depth 13mm socket to start and then moved to the deep well socket to finish it off. Once those are tightened down you can go ahead and resecure your Freedom Top panels and close your doors.
The rear hardware was more of a challenge. As I mentioned before, I could not physically fit my arm in there, I needed to have my wife start the locknuts. Since she has never used a ratchet before I needed a better way of tightening the locknuts down. What I found was that I could BARELY get my 3/8" air ratchet to fit in between the roof and the Gobi. The problem with this was the depth of the socket. A standard 3/8" drive 13mm socket isn't deep enough to allow the locknut to be driven all the way home. A standard deep well socket, when mounted on the air ratchet, was too tall to fit over the end of the carriage bolt to drive the nut home. I ended up putting a 13mm deep well socket into my chop saw and cut about 3/8" off of the end of it. I basically made a "less deep well" socket, that fit over the end of the bolt and was still deep enough to drive the locknut all the way home!
- Closing
My closing thoughts are pretty simple. I love my Gobi rack. I love my Bigfoot tent. The 1st time (the white tent) I tried to assemble them took me the better of a weekend as I was encountering and solving the assembly issues as they came. When it came time to assemble them this time (the black tent), it took me about 1 1/2 hours. Since I don't plan to remove the tent until it is time to store it for winter, I think that is a reasonable amount of time to mount something so big and heavy.
A quick note on the installation of the mounting hardware and the tightening of the locknuts. Due to the tight working conditions in there, I did scratch up my roof but it is no worse than if I'd taken a couple of tree branches across the surface so I think that is acceptable, I just wanted to give full disclosure. Also, since the tent and rack are so tight to the roof, you can't see the scratches anyway.
In my next post I will highlight the tent itself with interior photos and more!
The position of the tent on the rack impacts the mounting. If you are looking at my Jeep head on, you can see that it is not centered and is actually offset about 2" towards the passenger side. This was done to help increase the clearance of the cranking handle to the Gobi and the awning. The clearance photo I showed in my earlier post only had the Gobi in it, the awning also became an obstacle. In this older photo you can see how the awning also is in the way of the handle.
As far as fore/aft positioning, the tent is slid back quite far. Here is a shot from the side, at the rear of the Jeep. From this you can judge just how far back it is, as it slightly overhangs the rear of the Gobi.

Once you have it about where you want it, it is time to mount it! Don't worry too much yet about it being perfecting aligned, you just need it in the general location. You will still have to move it a bit to insert the mounting hardware.
- Mounting
Installing the mounting hardware is quite a challenge by yourself, but it is possible. We will start with the front set as it is pretty straightforward. The easiest way I found was to disconnect and "popup" both of the Freedom Top panels. There isn't much room between the panels and the bottom of the tent so it is a tight space to work in. What worked for me was to open both the front doors and then move the Freedom Top panels as far forward and outboard as possible. This opened up about a 6" gap from which to access the (2) steel tracks that run fore/aft in the bottom of the tent.
In this photo you can see the (2) steel tracks and also the mounting hardware (that we welded in the prior post) installed around the forward-most crossbar. The mounting hardware simply slides into the track. Once you reach the crossbar, you need to lift the tent up 3 inches so you can slide the hardware rearwards so that the bolts straddle the crossbar. This is difficult because as I mentioned there is only about 6 inches of roof between the Freedom Top panels and the tent weighs about 150lb! To accomplish this, I was sitting on the center armrest with an arm reaching out the roof. Once you get each of the front mounting hardware sets to straddle the crossbar, put the bottom steel plate on (the one I put foam tape on) and start the locknuts. DO NOT FULLY TIGHTEN THE LOCKNUTS DOWN YET!

Now it is time to move to the rear. This is where the 2"x4" and wife with small arms comes into play.
So, what I did was took the 2"x4" and slid it inbetween the roof rack and the tent as shown in the photo below. This allowed me to use the roof rack as a pivot and gain the leverage needed to easily lift the rear of the tent so that I could once again slide the mounting hardware into the steel track so that the carriage bolts straddle the rear roof rack crossbar. Recall that when I loaded the front mounting hardware, I put the bottom steel plate on separately as there was room to work. There is NO room to work in the back due to the geometry of the roof rack. In order to make it easier, I had the bottom steel plate already mounting to (1) of the carriage bolts with a locknut to hold it on. That way I only had to get (1) more locknut per side started. If that explanation didn't make sense, I tried to capture it in the photo that follows the 2"x4". If you look closely, you can see the bottom steel plate dangling on the right carriage bolt and the locknut retaining it.

Now that both sides of the rear mounting hardware are in the tracks and straddling the crossbar, it is time for the wife!
My arms were too big in diameter to fit in between the roof and the Gobi to be able to reach in and start the other locknut. She had to first get the bottom steel plate aligned to the 2nd carriage bolt and then start the locknut. This was even difficult for her as there really is that little room to maneuver. What we found worked was that she would get the plate on the carriage bolt and then I would hold it there with a broom handle while she then started the locknut. Lefty loosey, babe! Once we got her square away on clockwise/counterclockwise she was able to knock it out in a few tries. At this point, you can now do your final positioning of the tent as it is time to go ahead and tighten it down! Finally!!!!!!!!
- Final Tightening
Tightening of the mounting hardware is fairly straightforward. For the front mounting hardware, I was once again sitting on the center console with an arm hung out the roof. I used a 1/4" ratchet with standard depth 13mm socket to start and then moved to the deep well socket to finish it off. Once those are tightened down you can go ahead and resecure your Freedom Top panels and close your doors.
The rear hardware was more of a challenge. As I mentioned before, I could not physically fit my arm in there, I needed to have my wife start the locknuts. Since she has never used a ratchet before I needed a better way of tightening the locknuts down. What I found was that I could BARELY get my 3/8" air ratchet to fit in between the roof and the Gobi. The problem with this was the depth of the socket. A standard 3/8" drive 13mm socket isn't deep enough to allow the locknut to be driven all the way home. A standard deep well socket, when mounted on the air ratchet, was too tall to fit over the end of the carriage bolt to drive the nut home. I ended up putting a 13mm deep well socket into my chop saw and cut about 3/8" off of the end of it.
- Closing
My closing thoughts are pretty simple. I love my Gobi rack. I love my Bigfoot tent. The 1st time (the white tent) I tried to assemble them took me the better of a weekend as I was encountering and solving the assembly issues as they came. When it came time to assemble them this time (the black tent), it took me about 1 1/2 hours. Since I don't plan to remove the tent until it is time to store it for winter, I think that is a reasonable amount of time to mount something so big and heavy.
A quick note on the installation of the mounting hardware and the tightening of the locknuts. Due to the tight working conditions in there, I did scratch up my roof but it is no worse than if I'd taken a couple of tree branches across the surface so I think that is acceptable, I just wanted to give full disclosure. Also, since the tent and rack are so tight to the roof, you can't see the scratches anyway.
In my next post I will highlight the tent itself with interior photos and more!
Last edited by KevinMac; Jun 23, 2016 at 02:42 PM.
Thread Starter
JK Enthusiast
Joined: Jun 2013
Posts: 422
Likes: 24
From: The D, MI
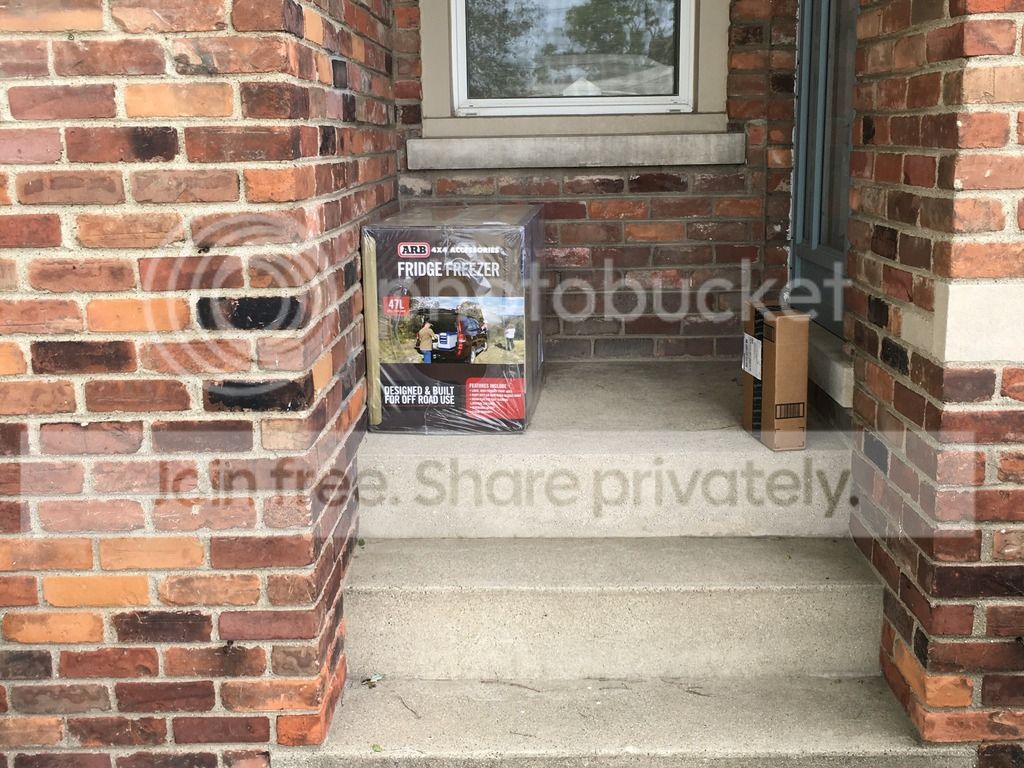
Question: How do you know the wife has bought into the idea of going on a trip out West next summer?
Answer: When you come home from work and find a brand new 50qt ARB Fridge/Freezer on the front porch!! 
Hell yeah, time to get to planning! By West, the general area we want to go to is Montana, Colorado, Wyoming area. Glacier Nathional Park, Yellowstone, etc...So, any recommendations on places and/or time of year? Let's hear them!
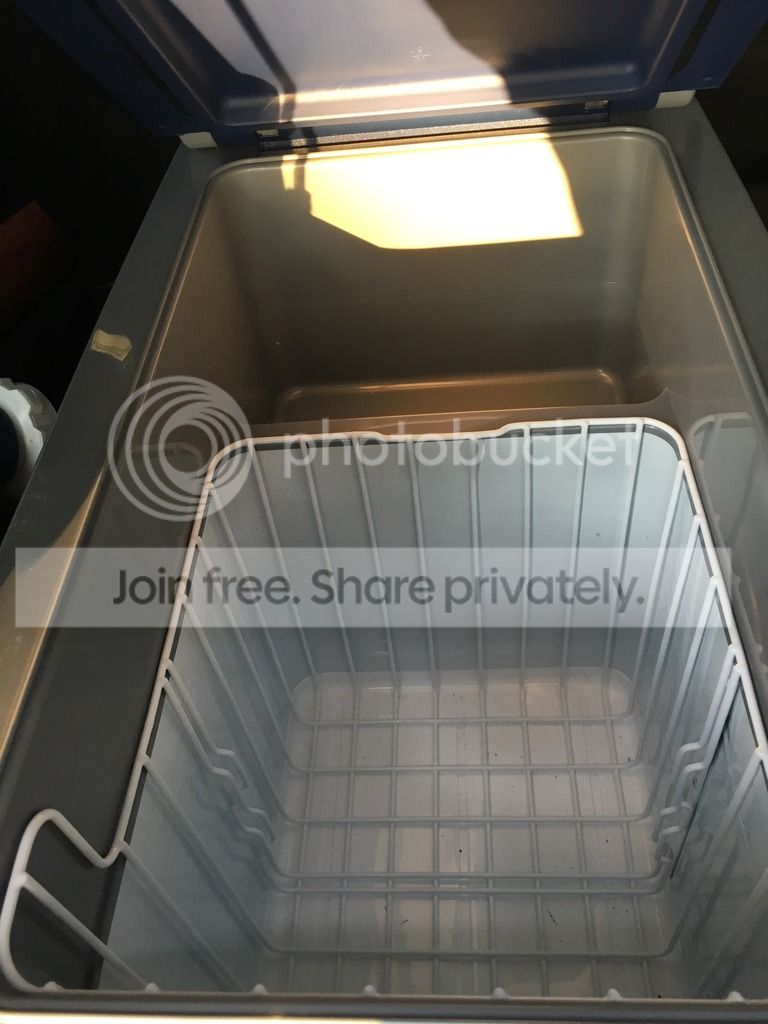
As for the ARB, it fits great in the back and will easily hold a bunch of food and drink. Hooray for no more soggy lunchmeat and cheese due to melted ice!


Cost: Free!!
Answer: When you come home from work and find a brand new 50qt ARB Fridge/Freezer on the front porch!!

Hell yeah, time to get to planning! By West, the general area we want to go to is Montana, Colorado, Wyoming area. Glacier Nathional Park, Yellowstone, etc...So, any recommendations on places and/or time of year? Let's hear them!
As for the ARB, it fits great in the back and will easily hold a bunch of food and drink. Hooray for no more soggy lunchmeat and cheese due to melted ice!


Cost: Free!!
Thread Starter
JK Enthusiast
Joined: Jun 2013
Posts: 422
Likes: 24
From: The D, MI
Today is a local holiday here in Detroit, the day of the annual Woodward Cruise. Tens of thousands of cars, new and old and well over 1 million people attend the event every year. It is America's celebration of the automobile.
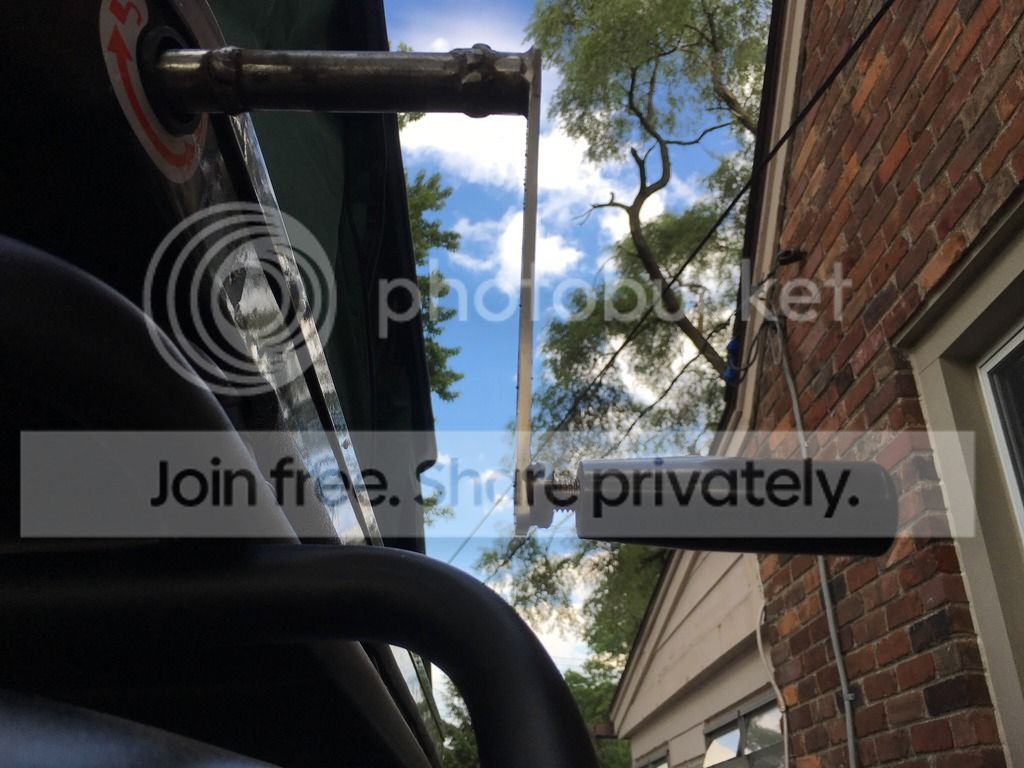
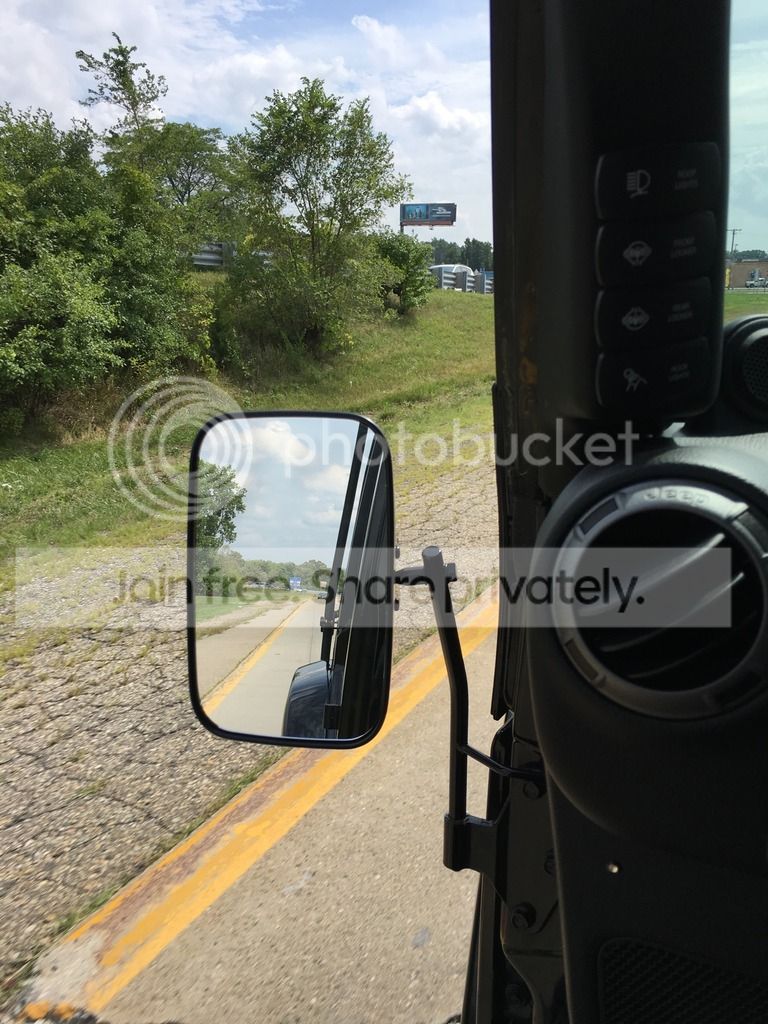
Like most locals, I've got a few toys in the garage but the Jeep hadn't seen much love in the last month so I decided to clean it up and take it out. Weather looked good so I decided to pull the doors. In doing so, I still needed side mirrors. I had a cheap $10 cycle mirror stuck in the door hinge hole that legally speaking, served the purpose. I decided I wanted to go something a little better and ordered up a set of JustAddMud side mirrors.
They also mount in the hinge hole but have the added feature of a strong cydrilical magnet that helps eliminate the rotation.
Below is a shot of the driver side mirror and under that, a close up of the mounting, including the magnet.


In general, nice mirrors. Adjustability is good and they don't rattle around or anything like that. However, they still move around a little more that I would like in the hinge hole.
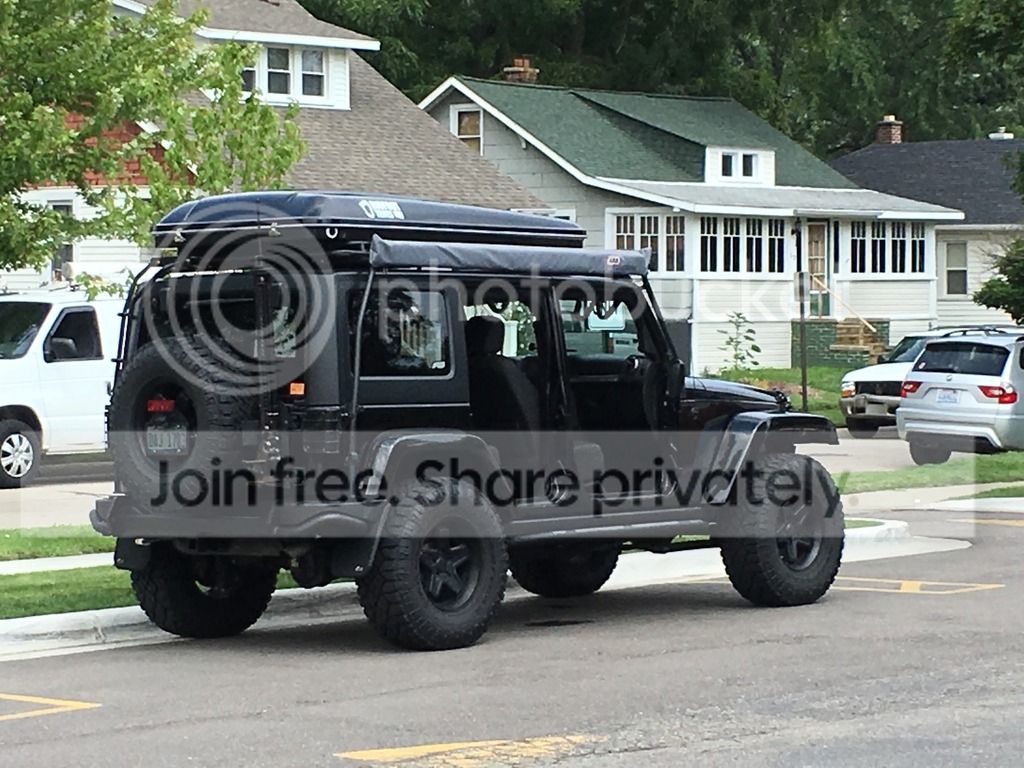
Gratuitous full vehicle shot when we stopped for lunch.
So, you are asking why I am posting this at 7pm on such a big day locally? Well, the weather gods are bitches and the sky opened up...bigtime. I ran home to put my doors back on as it turned into a damn monsoon out there. I'm still making payments!
- Cost: $119
Like most locals, I've got a few toys in the garage but the Jeep hadn't seen much love in the last month so I decided to clean it up and take it out. Weather looked good so I decided to pull the doors. In doing so, I still needed side mirrors. I had a cheap $10 cycle mirror stuck in the door hinge hole that legally speaking, served the purpose. I decided I wanted to go something a little better and ordered up a set of JustAddMud side mirrors.
They also mount in the hinge hole but have the added feature of a strong cydrilical magnet that helps eliminate the rotation.
Below is a shot of the driver side mirror and under that, a close up of the mounting, including the magnet.


In general, nice mirrors. Adjustability is good and they don't rattle around or anything like that. However, they still move around a little more that I would like in the hinge hole.

Gratuitous full vehicle shot when we stopped for lunch.

So, you are asking why I am posting this at 7pm on such a big day locally? Well, the weather gods are bitches and the sky opened up...bigtime. I ran home to put my doors back on as it turned into a damn monsoon out there. I'm still making payments!
- Cost: $119
JK Newbie
Joined: Aug 2015
Posts: 3
Likes: 0
After much homework and lots of combing the internet for parts, I am happy to report that I now have a fully functional ATC system!!! 
 I successfully made the last connections to the main HVAC connector this evening, set it to "Auto", crossed my fingers and let her rip.
  It is about 15F outside and I initially set the temperature to 72F. The heat kicked on high and then gradually backed off the blower speed as it approached the target temp. Letting it idle in my driveway for a few minutes, it would then increase blower speed as required to keep the temp at 72F. To confirm function, I turned it up to 80F and the blower kicked into high. Backing the temp down to 64F, it reduced the speed to low. Finally, I pushed the AC button and as it should (per the owners manual), the AC light blinked 3 times noting that the AC wasn't required to maintain the requested temperature. I'm very happy with the final result and am glad it worked out. To clarify things for everyone, I will make a new post summarizing everything as my info is a bit scattered over several posts. That way, if anyone else wants to do this, they have a comprehensive guide. I will likely get to that in the next day or so! Until then, here are 2 pictures of the "In Cabin Temperature Sensor" functioning. If you look closely at the first picture, there is what looks like an impeller on the shaft. In the 2nd photo, you can see that impeller spinning, sampling the cabin air temperature...pretty cool, huh?
I successfully made the last connections to the main HVAC connector this evening, set it to "Auto", crossed my fingers and let her rip. It is about 15F outside and I initially set the temperature to 72F. The heat kicked on high and then gradually backed off the blower speed as it approached the target temp. Letting it idle in my driveway for a few minutes, it would then increase blower speed as required to keep the temp at 72F. To confirm function, I turned it up to 80F and the blower kicked into high. Backing the temp down to 64F, it reduced the speed to low. Finally, I pushed the AC button and as it should (per the owners manual), the AC light blinked 3 times noting that the AC wasn't required to maintain the requested temperature. I'm very happy with the final result and am glad it worked out. To clarify things for everyone, I will make a new post summarizing everything as my info is a bit scattered over several posts. That way, if anyone else wants to do this, they have a comprehensive guide. I will likely get to that in the next day or so! Until then, here are 2 pictures of the "In Cabin Temperature Sensor" functioning. If you look closely at the first picture, there is what looks like an impeller on the shaft. In the 2nd photo, you can see that impeller spinning, sampling the cabin air temperature...pretty cool, huh? JK Enthusiast
Joined: Feb 2012
Posts: 168
Likes: 0
From: Charlotte, NC
I struggle with the roof top tent brackets on the Gobi always such a pain to screw them down I bought some Yakima snap arounds, this reduced the number of bolts by half I did question them being a hard plastic if it would hold up and only tested it once so far on a weekend trip but everything was snug when I arrived back home
Plus it was only $10
 Below is an example for reference
Plus it was only $10
Thread Starter
JK Enthusiast
Joined: Jun 2013
Posts: 422
Likes: 24
From: The D, MI
Unfortunately, I don't have any leads left from my original connector. Your best bet will be a U-pull-it type place. The upside is you don't necessarily have to find a Jeep, FCA uses the same connectors on a lot of their vehicles so you may be able to find the same connector on a minivan HVAC controller or the like.
Best of luck!